")
Drag and Drop Work Order Scheduling Application in ASP.NET Core
This ASP.NET Core application shows how to use the JavaScript Scheduler component from DayPilot Pro package to create a visual work order scheduling application.
-
It lets you manage a schedule of work orders - assign work orders to a specific employee and time slot.
-
You can easily create new work orders using drag and drop.
-
There is a separate queue of work orders displayed next to the schedule - you can use it to store incoming work orders or as a temporary place for work order that you need to reschedule.
-
The Scheduler displays a total utilization for each team of employees.
-
Includes a trial version of DayPilot Pro for JavaScript (see License below).
Drag and drop work order scheduling in action:

License
Licensed for testing and evaluation purposes. Please see the license agreement included in the sample project. You can use the source code of the tutorial if you are a licensed user of DayPilot Pro for JavaScript. Buy a license.
Run the ASP.NET Core Project
The attached Visual Studio project includes C# and JavaScript source code and all dependencies. The SQL Server database (LocalDB) is created and initialized automatically on the first run.
Introduction to Using JavaScript Scheduler Component in ASP.NET Core

This tutorial explains how to configure the JavaScript Scheduler to display a work order schedule. It shows how to configure the timeline, display employees as rows (grouped by team), display group availability in a summary row, handle drag and drop from a queue of unscheduled work orders.
It assumes that you already know how to add the Scheduler component to your application. If you want to learn more about using the JavaScript Scheduler in ASP.NET Core, please see the ASP.NET Core Scheduler Tutorial.
Load and Display Employees as Rows (Grouped by Team)

After adding a blank JavaScript Scheduler to the main page, it is necessary to load the employee data so they can be displayed as rows.
The employees are organized in groups. The Scheduler displays a flat list of rows by default - in order to show groups, it is necessary to enable row header hierarchy:
const scheduler = new DayPilot.Scheduler("scheduler", {
  treeEnabled: true,
  treePreventParentUsage: true,
  // ...
});
The parent rows will not be used for scheduling so we disabled them using treePreventParentUsage property. This makes the parent rows unavailable as drag and drop target - the Scheduler won’t let you drop any work order there (no matter if you reschedule an existing work order or drag an unscheduled one from the queue).
Now we can call the server-side API endpoint to get a list of rows that will be displayed in the Scheduler.
const {data: resources} = await DayPilot.Http.get(`/api/Resources`);
scheduler.update({resources});
The /api/Resources endpoint return the hierarchy of resources - the individual employees are stored is children of their respective groups.
You can see that the controller specifies the output JSON structure using an anonymous class. This class includes the standard properties (Id, Name, Children) and adds two more properties:
-
The
Expandedproperty makes the resource groups expanded on the initial load (expanded: true). -
The
CellsAutoUpdatedproperty tells the Scheduler to recalculate the row cell content of every update. This will be used for updating the group availability information.
// GET: api/Resources
[HttpGet]
public async Task<ActionResult<IEnumerable>> GetResources()
{
    return await _context.Groups
        .Include(g => g.Resources.OrderBy(e => e.Name))
        .Select(g => new
        {
            Id = "G" + g.Id,
            Name = g.Name,
            Children = g.Resources,
            Expanded = true,
            CellsAutoUpdated = true
        })
        .OrderBy(e => e.Name)
        .ToListAsync();
}
Sample JSON response:
[
  {
    "id": "G1",
    "expanded": true,
    "children": [
      {
        "id": 1,
        "name": "Person 1"
      },
      {
        "id": 2,
        "name": "Person 2"
      },
      {
        "id": 3,
        "name": "Person 3"
      }
    ],
    "name": "Group 1",
    "cellsAutoUpdated": true
  },
  {
    "id": "G2",
    "expanded": true,
    "children": [
      {
        "id": 4,
        "name": "Person 4"
      },
      {
        "id": 5,
        "name": "Person 5"
      },
      {
        "id": 6,
        "name": "Person 6"
      }
    ],
    "name": "Group 2",
    "cellsAutoUpdated": true
  },
  {
    "id": "G3",
    "expanded": true,
    "children": [
      {
        "id": 7,
        "name": "Person 7"
      },
      {
        "id": 8,
        "name": "Person 8"
      }
    ],
    "name": "Group 3",
    "cellsAutoUpdated": true
  }
]
To save client-side updates, we will load scheduler resources (/api/Resources) together with work order data (/api/WorkOrders).
The following schedulerLoad() method invokes two parallel HTTP requests (one for the resources, one for the events/work order data). It waits for both of them to complete and then it updates the scheduler once using the update() method.
async schedulerLoad() {
  const start = scheduler.visibleStart();
  const end = scheduler.visibleEnd();
  const promiseResources = DayPilot.Http.get(`/api/Resources`);
  const promiseEvents = DayPilot.Http.get(`/api/WorkOrders?start=${start}&end=${end}`);

  const [{data: resources}, {data: events}] = await Promise.all([promiseResources, promiseEvents]);

  scheduler.update({resources, events});
},
Configure the Time Scale

We will configure the Scheduler to use cell duration of 30 minutes. The Scheduler supports several scale options, including the “CellDuration” mode which lets you specify custom cell duration in minutes.
const scheduler = new DayPilot.Scheduler("scheduler", {
  scale: "CellDuration",
  cellDuration: 30,
  timeHeaders: [{groupBy: "Day"}, {groupBy: "Hour"}],

  days: DayPilot.Date.today().daysInMonth(),
  startDate: DayPilot.Date.today().firstDayOfMonth(),

  businessBeginsHour: 9,
  businessEndsHour: 17,
  showNonBusiness: false,

  // ..

});
The time cells are grouped by hour and day in the time header.
const scheduler = new DayPilot.Scheduler("scheduler", {
  scale: "CellDuration",
  cellDuration: 30,
  timeHeaders: [{groupBy: "Day"}, {groupBy: "Hour"}],

  days: DayPilot.Date.today().daysInMonth(),
  startDate: DayPilot.Date.today().firstDayOfMonth(),

  businessBeginsHour: 9,
  businessEndsHour: 17,
  showNonBusiness: false,

  // ..

});
This example shows a fixed time range (the current month).
If you want to let users change the visible date, there are two options:
-
Add next/previous buttons and/or a date picker
-
Enabled infinite scrolling
Define Business Hours

The Scheduler defines business hours as a range from 9 a.m. to 6 p.m.
Normally, the scheduler displays full 24 hours per day. However, the standard working time (8 hours) is just 1/3 of each day and it would display large segments of unused time. That’s why we are going limit the view to the business hours and the hide the remaining time. You can define your own business hours using businessBeginsHour and businessEndsHour properties:
const scheduler = new DayPilot.Scheduler("scheduler", {

  // ...

  businessBeginsHour: 9,
  businessEndsHour: 17,
  showNonBusiness: false,

  // ..

});
The business hours can be displayed using a different background color of the grid cells. You can also hide it altogether (showNonBusiness: false). In that case, the Scheduler will display a vertical line at the point where the timeline in interrupted.
If you use shifts, you can define your own slots as demonstrated in the ASP.NET Core Shift Scheduling tutorial.
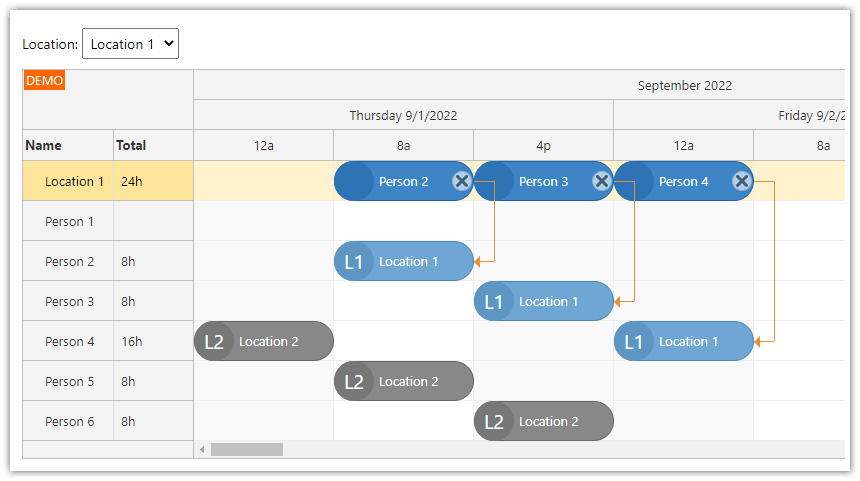
Calculate and Display Resource Utilization for Groups/Teams

Our ASP.NET Core work order scheduling application displays a graphical representation of group utilization:
-
There are rectangles at the top of each group cell representing the number of child resources.
-
Rectangles representing busy resources use blue background color.
Below, it displays the calculated utilization as a percentage (e.g. 33%). The percentage is calculated as follows:
1. First, we get the number of child resources:
const children = scheduler.rows.find(args.cell.resource).children();
const total = children.length;
2. Then we get a list of rows that have a work order scheduled for the corresponding time cell:
const used = children.filter(row => { return !!row.events.forRange(args.cell.start, args.cell.end).length; }).length;3. Now we can calculate the utilization (as percentage):
const available = total - used;
const percentage = Math.round(used/total*100);
This is the complete onBeforeCellRender implementation:
onBeforeCellRender: args => {
  if (args.cell.isParent) {
    const children = scheduler.rows.find(args.cell.resource).children();
    const total = children.length;
    const used = children.filter(row => { return !!row.events.forRange(args.cell.start, args.cell.end).length; }).length;
    const available = total - used;
    const percentage = Math.round(used/total*100);

    const colorFree = "#e0e0e0";
    const colorFull = "#00619b";
    const colorSome = DayPilot.ColorUtil.lighter("#00639c", 2);

    const colorCellAvailable = "#f6f6f6";
    const colorCellFull = DayPilot.ColorUtil.lighter("#00639c", 3);

    const w = scheduler.cellWidth / total;
    args.cell.areas = [];
    args.cell.areas.push({
      text: `${percentage}%`,
      style: "text-align: center; font-size: 12px; font-weight: normal;",
      top: 20,
      left: 0,
      right: 0
    });

    args.cell.backColor = colorCellAvailable;
    if (available === 0) {
      args.cell.backColor = colorCellFull;
      args.cell.areas[0].fontColor = "#ffffff";
    }

    args.cell.areas.push({
      top: 0,
      height: 10,
      left: 0,
      right: 0,
      backColor: "#ffffff"
    });
    DayPilot.list.for(total).forEach((item, i) => {
      let color = colorFree;
      if (i < used) {
        color = colorSome;
      }
      if (available === 0) {
        color = colorFull;

      }
      args.cell.areas.push({
        top: 0,
        height: 10,
        left: i*w,
        width: w - 1,
        backColor: color
      });
    });
  }
}
For another example of resource group availability displayed using color bars, see the JavaScript Scheduler: Displaying Group Availability tutorial. It is also possible to display the total availability using a chart in a special row.
Queue of Unscheduled Work Orders

On the left side, there is a list of work orders that haven’t been scheduled for a specific time. You can use this list as a queue of work order requests that were submitted but were not scheduled yet.
The queue items hold basic information about the work order:
-
text (description that will be displayed in the work order box)
-
duration (up to 8 hours)
-
color (one of the predefined values)
The queue is ordered and you can reorder the pending work orders easily using drag and drop.
The queue is implemented using a special Queue component:
<div id="queue"></div>

<script>
  const queue = new DayPilot.Queue("queue", {
    // ...
  });
  queue.init();
</script>
While it is possible to use a custom list and make the items draggable to the Scheduler, it is more convenient to use the Queue component that provides additional functionality:
-
Items can be reordered using drag and drop within the queue.
-
It uses an API and styling compatible with the Scheduler.
-
It is possible to drag items (work orders) from the Scheduler back to the Queue.
const queue = new DayPilot.Queue("queue", {

  eventHeight: 45,
  eventBarWidth: 15,
  contextMenu: new DayPilot.Menu({
    items: [
      {
        text: "Edit...",
        onClick: args => {
          app.queueTaskEdit(args.source);
        }
      },
      {
        text: "-",
      },
      {
        text: "Delete",
        onClick: args => {
          app.queueTaskDelete(args.source.id());
        }
      },
    ]
  }),
  onEventClick: args => {
    app.queueTaskEdit(args.e);
  },
  onEventMove: args => {
    app.queueTaskMove(args.e, args.position, args.external, args.source);
  },
  onBeforeEventRender: args => {
    const duration = new DayPilot.Duration(args.data.start, args.data.end);

    args.data.html = "";

    const color = args.data.color || "#666666";
    const backColor = DayPilot.ColorUtil.lighter(color, 2);
    const bottomColor = DayPilot.ColorUtil.lighter(color, 1);

    args.data.backColor = backColor;
    args.data.borderColor = bottomColor;
    args.data.barHidden = true;

    args.data.areas = [
      {
        top: 15,
        right: 5,
        height: 16,
        width: 16,
        fontColor: "#666",
        symbol: "icons/daypilot.svg#minichevron-down-4",
        visibility: "Hover",
        action: "ContextMenu",
        style: "background-color: rgba(255, 255, 255, 1); border: 1px solid #666; box-sizing: border-box; cursor:pointer; border-radius: 20px;"
      },
      {
        top: 0,
        left: 25,
        bottom: 0,
        width: 12,
        fontColor: "#ffffff",
        symbol: "icons/daypilot.svg#move-vertical",
        style: "cursor: move",
        visibility: "Hover",
        toolTip: "Drag task to the scheduler"
      },
      {
        top: 5,
        left: 40,
        text: args.data.text,
        fontColor: "#ffffff",
      },
      {
        bottom: 0,
        height: 20,
        left: 0,
        right: 0,
        fontColor: "#ffffff",
        backColor: bottomColor,
        style: "padding-left: 40px;",
        text: app.formatDuration(duration)
      }
    ];
  }
});
queue.init();
As soon as the Queue component is configured, we can load queue data from the /api/WorkOrders/Unscheduled API endpoint:
async queueLoad() {
  const {data} = await DayPilot.Http.get("/api/WorkOrders/Unscheduled");
  const events = data.map(item => ({...item, duration: DayPilot.Duration.ofMinutes(item.duration)}));
  queue.update({events});
},
This endpoint (ASP.NET Core controller) returns a list of queued work orders. The unscheduled work orders have to ResourceId assigned (it is null).
// GET: api/WorkOrders/Unscheduled
[HttpGet("Unscheduled")]
public async Task<ActionResult<IEnumerable<WorkOrder>>> GetWorkOrdersUnscheduled()
{
    return await _context.WorkOrders.Where(e => e.ResourceId == null).OrderBy(e => e.Ordinal).ThenByDescending(e => e.OrdinalPriority).ToListAsync();
}
Add a New Work Order to the Queue
You can add a new work order using a button displayed above the work order queue:

It is created using a simple <button> element:
<button id="addToQueue">Add task...</button>
The “onclick” event handler fires queueAddTask() method:
app.elements.addToQueue.addEventListener("click", () => {
  app.queueTaskAdd();
});
The queueTaskAdd() method displays a modal dialog that asks for work order details:
async queueTaskAdd() {

  const form = app.queueTaskForm();

  const data = {
    text: "Task",
    duration: 60,
    color: app.colors[0].id
  };

  const modal = await DayPilot.Modal.form(form, data, {top: 200});

  if (modal.canceled) {
    return;
  }

  const params = {
    ...modal.result,
    ...app.startEndFromMinutes(modal.result.duration)
  };

  const {data: created} = await DayPilot.Http.post("/api/WorkOrders", params);

  queue.events.add(created);

}
This is an example of a modal dialog for entering new work order:

When you click “OK”, the work order request will be added to the bottom of the queue.
Create a New Work Order using Drag and Drop

In order to create a work order directly at the desired position, you can use drag and drop selection. When you select a time range, the Scheduler fires onTimeRangeSelected event handler:
const scheduler = new DayPilot.Scheduler("scheduler", {
  // ...
  onTimeRangeSelected: args => {
    app.schedulerTaskAdd(args.start, args.end, args.resource);
  },
  // ...
});
The schedulerTaskAdd() method opens a modal dialog with details, saves the work order to the database (by sending a POST HTTP request to /api/WorkOrders).
async schedulerTaskAdd(start, end, resource) {
  const modal = await DayPilot.Modal.prompt("Create a new task:", "Task 1");

  scheduler.clearSelection();
  if (!modal.result) {
    return;
  }

  let params = {
    text: modal.result,
    start: start,
    end: end,
    resource: resource,
    color: app.colors[0].id
  };

  const {data: result} = await DayPilot.Http.post("/api/WorkOrders", params);

  scheduler.events.add(result);

}
After calling scheduler.events.add(), the new work order will be added to the Scheduler:

Assign and Schedule Work Order using Drag and Drop

To schedule a work order, simply drag it from the queue to the target position in the Scheduler grid.
const scheduler = new DayPilot.Scheduler("scheduler", {
  // ...
  onEventMove: args => {
    app.schedulerTaskMove(args.e.id(), args.newStart, args.newEnd, args.newResource, args.external);
  },
  // ...
});
The onEventMove event handler is called whenever you drop a work order box. When you drag an item from the queue, the Scheduler detects an external source and sets mark args.external to true.
The schedulerTaskMove() method stores the new position in the database using (a PUT request to /api/WorkOrders/{id} endpoint).
async schedulerTaskMove(id, start, end, resource, external) {
  let params = {
    start,
    end,
    resource
  };

  await DayPilot.Http.put(`/api/WorkOrders/${id}`, params);

  if (external) {
    queue.events.remove(id);
  }
}
When it detects that the item was dragged from the queue, it removes it from the UI using queue.events.remove().
Enforcing Restrictions: Maximum Work Order Duration

We will limit the maximum duration of a work order to 8 hours. This can be done using the real-time drag and drop events (onEventResizing, onTimeRangeSelecting).
onEventResizing: args => {
  let duration = new DayPilot.Duration(args.start, args.end);
  if (duration.totalHours() > 8) {
    args.allowed = false;
    args.right.enabled = true;
    args.right.html = "Maximum duration is 8 hours";
  }
},
onTimeRangeSelecting: args => {
  let duration = new DayPilot.Duration(args.start, args.end);
  if (duration.totalHours() > 8) {
    args.allowed = false;
    args.right.enabled = true;
    args.right.html = "Maximum duration is 8 hours";
  }
},
In the work order edit modal dialog (queue), the duration can’t be selected freely - you need to select one of the pre-defined values.
Reschedule a Work Order

You can reschedule a work order using drag and drop.
-
Drag the work order to a different employee to re-assign it.
-
Postpone the work order by dragging it to another time slot.
-
Change the duration of the assignment by dragging the end of the work order box.
The position changes are handled using onEventMove event handler that we described above.
The resizing of a work order box is handled by onEventResize event which works in a similar same way so we can reuse the existing schedulerTaskMove() method:
onEventResize: args => {
  app.schedulerTaskMove(args.e.id(), args.newStart, args.newEnd, args.e.resource(), false);
},
Modify a Work Order

To modify a work order, you can use the “Edit” modal dialog. This dialog opens when you click the work order box or you can use the context menu.
The context menu is defined as follows:
contextMenu: new DayPilot.Menu({
  items: [
    {
      text: "Edit...",
      onClick: args => {
        app.schedulerTaskEdit(args.source);
      }
    },
    {
      text: "-",
    },
    {
      text: "Unschedule",
      onClick: async args => {
        const ev = args.source;
        const {data: item} = await DayPilot.Http.post(`/api/WorkOrders/${ev.data.id}/Unschedule`);

        scheduler.events.remove(ev);
        queue.events.add(item);
      }
    },
    {
      text: "-",
    },
    {
      text: "Delete",
      onClick: args => {
        app.schedulerClickDelete(args.source.id());
      }
    },
  ],
})
The app.schedulerTaskEdit() function opens a modal dialog:
async schedulerTaskEdit(e) {
  const {data: resources} = await DayPilot.Http.get("/api/Resources/Flat");

  const form = [
    {
      id: 'text',
      name: 'Name',
    },
    {
      name: 'Start',
      id: 'start',
      dateFormat: 'd/M/yyyy h:mm tt',
      disabled: true
    },
    {
      id: 'end',
      name: 'End',
      dateFormat: 'd/M/yyyy h:mm tt',
      disabled: true
    },
    {
      type: 'select',
      id: 'resource',
      name: 'Employee',
      options: resources,
      disabled: true
    },
    {
      type: 'select',
      id: 'color',
      name: 'Color',
      options: app.colors
    },
  ];

  const data = {
    ...e.data,
    duration: new DayPilot.Duration(e.data.start, e.data.end).totalMinutes()
  };

  const modal = await DayPilot.Modal.form(form, data);

  if (modal.canceled) {
    return;
  }

  const id = e.data.id;
  await DayPilot.Http.put(`/api/WorkOrders/${id}`, modal.result);

  const updated = {
    ...e.data,
    text: modal.result.text,
    color: modal.result.color
  };

  scheduler.events.update(updated);

}
The content of the modal dialog is programmatically defined using the form array. The DayPilot.Modal.form() method displays the modal dialog and pre-fills the form items with data from the supplied data object.
Upon confirmation, the details of the work order are updated in the database through a PUT HTTP call to the /api/WorkOrders/${id} API endpoint.
The work order schedule UI is updated using the events.update() method.
Unschedule a Work Order
The work order scheduling UI provides two ways to unschedule a work order:
-
Click the “Unschedule” in the work order context menu.
-
Drag the work order back to the queue.
The “Unschedule” context menu item calls the /api/WorkOrders/{id}/Unschedule endpoint.
-
It checks that the work order exists in the database.
-
It resets the
ResourceIdto null. -
To place it to the bottom of the queue, it sets the Ordinal value to 10000 and then it compacts the ordinal values.
// POST: api/WorkOrders/5/Unschedule
[HttpPost("{id}/Unschedule")]
public async Task<ActionResult<WorkOrder>> PostWorkOrderUnschedule(int id)
{
    WorkOrder workOrder = await _context.WorkOrders.FindAsync(id);
    if (workOrder == null)
    {
        return NotFound();
    }

    workOrder.ResourceId = null;
    workOrder.Ordinal = 10000;
    workOrder.OrdinalPriority = new DateTime();
    await _context.SaveChangesAsync();

    await CompactOrdinals();

    return Ok(workOrder);
}
When the client-side application receives the response, it updates the UI - it removes the work order from the Scheduler and adds it to the Queue.
scheduler.events.remove(ev);
queue.events.add(item);
We keep the Start and End values as they are - this will keep the existing duration of the work order - when the work order is stored without a ResourceId, it is treated as an unscheduled request and it uses the difference between Start and End to calculate the duration (the actual start value is not important).
It is also possible to drag a work order back to the queue.
To allow dragging a work order out of the Scheduler component, it is necessary to set the dragOutAllowed property to true:
const scheduler = new DayPilot.Scheduler("scheduler", {
    dragOutAllowed: true,
    // ...
});
When the user drops the work order in the Queue component, the Queue fires the onEventMove event handler with the args.external property set to true.
const queue = new DayPilot.Queue("queue", {
  onEventMove: args => {
    app.queueTaskMove(args.e, args.position, args.external, args.source);
  },
  // ...
});
The queueTaskMove() function handles the database update:
async queueTaskMove(e, position, external, source) {
  const id = e.id();
  const {data: item} = await DayPilot.Http.put(`/api/WorkOrders/${id}`, {position});
  if (external) {
    source.events.remove(e);
  }
},
Data Model (Entity Framework)
This ASP.NET Core application uses code-first approach and defines the database structure using model classes.
Three model classes are included:
-
WorkOrder -
Resource -
Group
The WorkOrder class defines the work order tasks. In addition to the identification properties (Id and Text), it also defines the scheduling data (Start, End, ResourceId). If the task is still in the queue of unscheduled items, it stores the duration using the difference between Start and End values. The position in the queue is stored using Ordinal and OrdinalPriority properties. The WorkOrder class includes only the basic properties required for the core functionality. In your application, you will probably want to keep other information with the work orders - you can extend this class as needed.
The Resource class defines people that will be displayed as rows in the Scheduler component. These child rows can be used for work order assignments. Each resource is a member of a group (GroupId).
The Group class defines resource groups.
using System.Text.Json.Serialization;
using Microsoft.EntityFrameworkCore;

namespace Project.Models
{
    public class WorkOrder
    {
        public int Id { get; set; }
        public string Text { get; set; }
        public DateTime Start { get; set; }
        public DateTime End { get; set; }

        [JsonPropertyName("resource")]
        public int? ResourceId { get; set; }

        [JsonIgnore]
        public Resource? Resource { get; set; }

        public int Ordinal { get; set; }

        public DateTime OrdinalPriority { get; set; }

        public string? Color { get; set; }
    }

    public class Resource
    {
        public int Id { get; set; }
        public string Name { get; set; }


        [JsonIgnore]
        public Group Group { get; set; }

        [JsonIgnore]
        public int GroupId { get; set; }
    }

    public class Group
    {
        public int Id { get; set; }

        public string Name { get; set; }

        [JsonPropertyName("children")]
        public ICollection<Resource> Resources { get; set; }
    }


    public class WorkOrderDbContext : DbContext
    {
        public DbSet<WorkOrder> WorkOrders { get; set; }
        public DbSet<Group> Groups { get; set; }
        public DbSet<Resource> Resources { get; set; }

        public WorkOrderDbContext(DbContextOptions<WorkOrderDbContext> options) : base(options)
        {
        }
    }
}
Entity Framework Migrations and SQL Server Database Schema
The SQL Server database will created automatically using Entity Framework upon the first start of the application. The database is initialized using the following code in Program.cs:
// Ensure the database is created.
using (var serviceScope = app.Services.CreateScope())
{
    var services = serviceScope.ServiceProvider;
    try
    {
        var context = services.GetRequiredService<WorkOrderDbContext>();
        context.Database.EnsureCreated();
    }
    catch (Exception ex)
    {
        var logger = services.GetRequiredService<ILogger<Program>>();
        logger.LogError(ex, "An error occurred creating the DB.");
    }
}
The SQL Server database schema will be created using the model classes and the WorkOrderDbContext class. In the OnMOdelCreating method, some initial data are generated (sample resources and groups). The WorkOrders table will be empty.
public class WorkOrderDbContext : DbContext
{
  public DbSet<WorkOrder> WorkOrders { get; set; }
  public DbSet<Group> Groups { get; set; }
  public DbSet<Resource> Resources { get; set; }

  // ...

  protected override void OnModelCreating(ModelBuilder modelBuilder)
  {
      modelBuilder.Entity<Group>().HasData(new Group { Id = 1, Name = "Group 1" });
      modelBuilder.Entity<Group>().HasData(new Group { Id = 2, Name = "Group 2" });
      modelBuilder.Entity<Group>().HasData(new Group { Id = 3, Name = "Group 3" });

      modelBuilder.Entity<Resource>().HasData(new Resource { Id = 1, Name = "Person A", GroupId = 1 });
      modelBuilder.Entity<Resource>().HasData(new Resource { Id = 2, Name = "Person B", GroupId = 1 });
      modelBuilder.Entity<Resource>().HasData(new Resource { Id = 3, Name = "Person C", GroupId = 1 });

      modelBuilder.Entity<Resource>().HasData(new Resource { Id = 4, Name = "Person D", GroupId = 2 });
      modelBuilder.Entity<Resource>().HasData(new Resource { Id = 5, Name = "Person E", GroupId = 2 });
      modelBuilder.Entity<Resource>().HasData(new Resource { Id = 6, Name = "Person F", GroupId = 2 });

      modelBuilder.Entity<Resource>().HasData(new Resource { Id = 7, Name = "Person G", GroupId = 3 });
      modelBuilder.Entity<Resource>().HasData(new Resource { Id = 8, Name = "Person H", GroupId = 3 });

  }
}
The Groups table stores resources groups.
CREATE TABLE [dbo].[Groups] (
    [Id]   INT            IDENTITY (1, 1) NOT NULL,
    [Name] NVARCHAR (MAX) NOT NULL,
    CONSTRAINT [PK_Groups] PRIMARY KEY CLUSTERED ([Id] ASC)
);
The Resources table stores resources (people).
CREATE TABLE [dbo].[Resources] (
    [Id]      INT            IDENTITY (1, 1) NOT NULL,
    [Name]    NVARCHAR (MAX) NOT NULL,
    [GroupId] INT            NOT NULL,
    CONSTRAINT [PK_Resources] PRIMARY KEY CLUSTERED ([Id] ASC),
    CONSTRAINT [FK_Resources_Groups_GroupId] FOREIGN KEY ([GroupId]) REFERENCES [dbo].[Groups] ([Id]) ON DELETE CASCADE
);


GO
CREATE NONCLUSTERED INDEX [IX_Resources_GroupId]
    ON [dbo].[Resources]([GroupId] ASC);
The WorkOrders table stores work order items.
CREATE TABLE [dbo].[WorkOrders] (
    [Id]              INT            IDENTITY (1, 1) NOT NULL,
    [Text]            NVARCHAR (MAX) NOT NULL,
    [Start]           DATETIME2 (7)  NOT NULL,
    [End]             DATETIME2 (7)  NOT NULL,
    [ResourceId]      INT            NULL,
    [Ordinal]         INT            NOT NULL,
    [OrdinalPriority] DATETIME2 (7)  NOT NULL,
    [Color]           NVARCHAR (MAX) NULL,
    CONSTRAINT [PK_WorkOrders] PRIMARY KEY CLUSTERED ([Id] ASC),
    CONSTRAINT [FK_WorkOrders_Resources_ResourceId] FOREIGN KEY ([ResourceId]) REFERENCES [dbo].[Resources] ([Id])
);


GO
CREATE NONCLUSTERED INDEX [IX_WorkOrders_ResourceId]
    ON [dbo].[WorkOrders]([ResourceId] ASC);
History
-
March 23, 2026: Upgraded to .NET 10, DayPilot Pro for JavaScript 2026.1.6860. Softer event colors, event border radius using eventBorderRadius property.
-
February 25, 2024: Upgraded to .NET 8, DayPilot Pro for JavaScript 2024.1.5886, automatic database initialization
-
September 21, 2023: Upgraded to DayPilot Pro for JavaScript 2023.3.5732; updated color scheme
-
November 7, 2022: Initial version (.NET 6)