")
Overview
Assign work orders to employees
Employees are organized in groups
See a queue of unscheduled work orders
Schedule a work order using drag and drop
Unschedule a work order and return it back to the queue
React frontend created using DayPilot React Scheduler component
PHP backend with MySQL storage
License
Licensed for testing and evaluation purposes. Please see the license agreement included in the sample project. You can use the source code of the tutorial if you are a licensed user of DayPilot Pro for JavaScript.
Queue of Unscheduled Work Orders
Our planning system will display a queue of unscheduled work orders on the left side. You can add a new work order using the “Add Task” button and specify a name and duration.
 - Queue of Unscheduled Tasks")
The new work order will be added to the bottom of the queue. You can change the task priority by dragging it to a higher position within the queue.
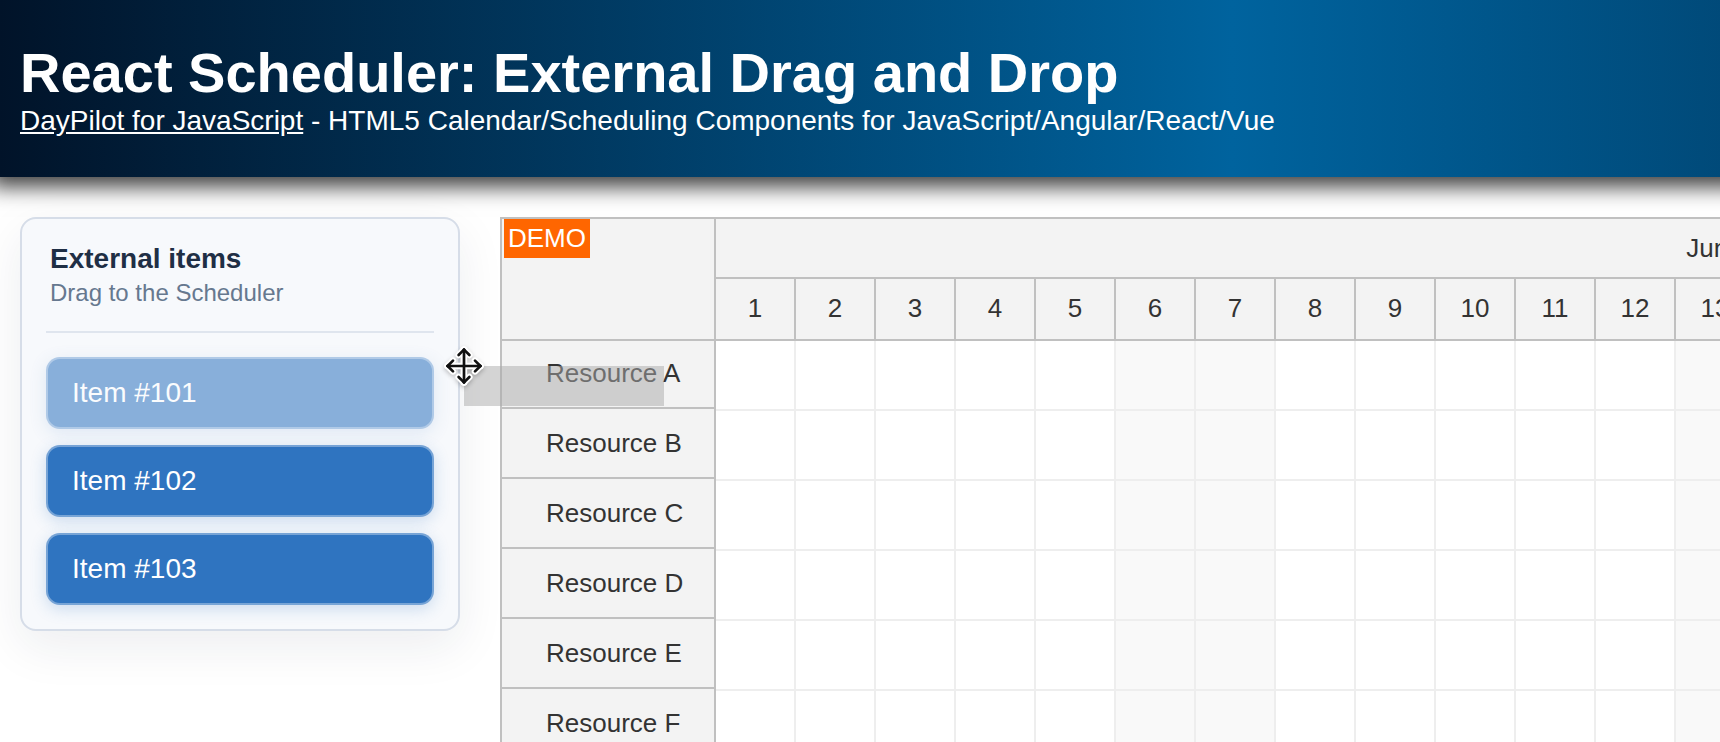
Schedule a Work Order using Drag and Drop
You can schedule a task by dragging it from the queue to the schedule grid on the right side.
 - Schedule using Drag and Drop")
Assign the person and time by dragging the task over the schedule grid:
 - Assign Person and Date")
The task will be saved at the target position on drop:
 - Schedule on Drop")
If you want to unschedule the task again you can drag it back to the queue.
Running the Application
The application consists of two projects:
React frontend project
PHP backend project
When deploying the application, the React frontend project needs to be in the application root and the PHP backend needs to be in the /api directory.
In order to make development and debugging easier, the React project is configured to proxy the /api/* requests to the PHP project running at port 8090:
setupProxy.js
const { createProxyMiddleware } = require('http-proxy-middleware');

module.exports = function(app) {
  app.use(
    '/api',
    createProxyMiddleware({
      target: 'http://localhost:8090',
      changeOrigin: true,
    })
  );
};
To run the PHP project, use the following command:
Linux
php -S 127.0.0.1:8090 -t /home/daypilot/tutorials/react-work-order-phpWindows
php.exe -S 127.0.0.1:8090 -t C:\Users\daypilot\tutorials\react-work-order-phpTo run the React project, make sure that the dependencies are loaded first:
npm installNow you can run the React project:
npm run startWork Order Queue
 - Task Queue")
The queue of unscheduled work orders is implemented using a new Queue component which has been introduced in DayPilot Pro for JavaScript 2021.2.4972. The queue uses an API similar to the React Scheduler component API which makes it easier to integrate it into your application.
You can add the Queue component to the React application using the <DayPilotQueue> tag to the JSX:
<div className={"queue"}>
  <button onClick={ev => clickAdd(ev)}>Add Task</button>
  <DayPilotQueue
    {...config}
    controlRef={setQueue}
  />
</div>
The Queue component behavior is controlled by properties which you can specify using <DayPilotQueue> attributes. In this example, we set the properties using this.state.config object and assign them to the Queue component using the spread syntax (three dots).
Our configuration object specifies 3 event handlers:
onEventClick - this event is fired when the user clicks a queue item
onEventMove - this event is fired when a queue item is moved using drag and drop (that can be either a new position within the queue or an item dragged from the React Scheduler component)
onBeforeEventRender - this event is fired during rendering and it lets you customize the event appearance
The queue is ordered - it respects the original order of tasks as supplied using the events attribute. We load the unscheduled work order data using a call to /api/work_order_unscheduled_list.php script. It returns the task data in JSON format. For the JSON array item structure please see the DayPilot.Event.data property documentation.
useEffect(() => {
  const fetchData = async () => {
    const { data: unscheduled } = await DayPilot.Http.get("/api/work_order_unscheduled_list.php");

    const events = unscheduled.map(data => {
      return {
        ...data,
        duration: DayPilot.Duration.ofMinutes(data.duration)
      };
    });

    setEvents(events);
  };

  fetchData();
}, []);
The <DayPilotQueue> component automatically activates the items so that can be dragged to the React Scheduler (see below).
This is the outline of our Queue component (Queue.js):
import React, {forwardRef, useEffect, useImperativeHandle, useState} from 'react';
import {DayPilot, DayPilotQueue} from "daypilot-pro-react";

const Queue = forwardRef((props, ref) => {
  const [queue, setQueue] = useState(null);
  const [events, setEvents] = useState([]);

  // ...

  const config = {
    contextMenu: menu,
    eventBarVisible: false,
    eventHeight: 40,
    onEventClick: args => {
      clickQueueEdit(args.e.data);
    },
    onEventMove: async args => {
      const { data: item } = await DayPilot.Http.post("/api/work_order_move.php", {
        id: args.e.data.id,
        position: args.position
      });
      if (args.external) {
        args.source.events.remove(args.e);
      }
    },
    onBeforeEventRender: args => {
      const duration = new DayPilot.Duration(args.data.start, args.data.end);
      args.data.html = "";

      args.data.areas = [
        {
          top: 10,
          right: 8,
          height: 20,
          width: 20,
          padding: 2,
          backColor: "#ffffff",
          fontColor: "#1f9324",
          symbol: "icons/daypilot.svg#minichevron-down-4",
          visibility: "Visible",
          action: "ContextMenu",
          menu: menu,
          style: "border-radius: 25px; border: 1px solid #1f9324; box-sizing: border-box; cursor:pointer;"
        },
        {
          top: 0,
          left: 12,
          bottom: 0,
          width: 12,
          fontColor: "#ffffff",
          symbol: "icons/daypilot.svg#move-vertical",
          style: "cursor: move",
          visibility: "Hover",
          toolTip: "Drag task to the scheduler"
        },
        {
          top: 3,
          left: 30,
          fontColor: "#ffffff",
          text: args.data.text
        },
        {
          bottom: 3,
          left: 30,
          fontColor: "#eeeeee",
          text: formatDuration(duration)
        }
      ];
    }
  };

  // ...

  useEffect(() => {
    const fetchData = async () => {
      const { data: unscheduled } = await DayPilot.Http.get("/api/work_order_unscheduled_list.php");

      const events = unscheduled.map(data => {
        return {
          ...data,
          duration: DayPilot.Duration.ofMinutes(data.duration)
        };
      });

      setEvents(events);
    };

    fetchData();
  }, []);

  return (
    <div className={"queue"}>
      <button onClick={ev => clickAdd(ev)}>Add Task</button>
      <DayPilotQueue
        {...config}
        events={events}
        controlRef={setQueue}
      />
    </div>
  );
});

export default Queue;
The work_order_unscheduled_list.php PHP script returns the work order data in JSON format:
<?php
require_once '_db.php';
$result = db_get_unscheduled();
class Event {
public $id;
public $start;
public $end;
public $text;
}
$events = array();
foreach($result as $row) {
$e = new Event();
$e->id = (int) $row['id'];
$e->text = $row['name'];
$e->start = $row['start'];
$e->end = $row['end'];
$events[] = $e;
}
header('Content-Type: application/json');
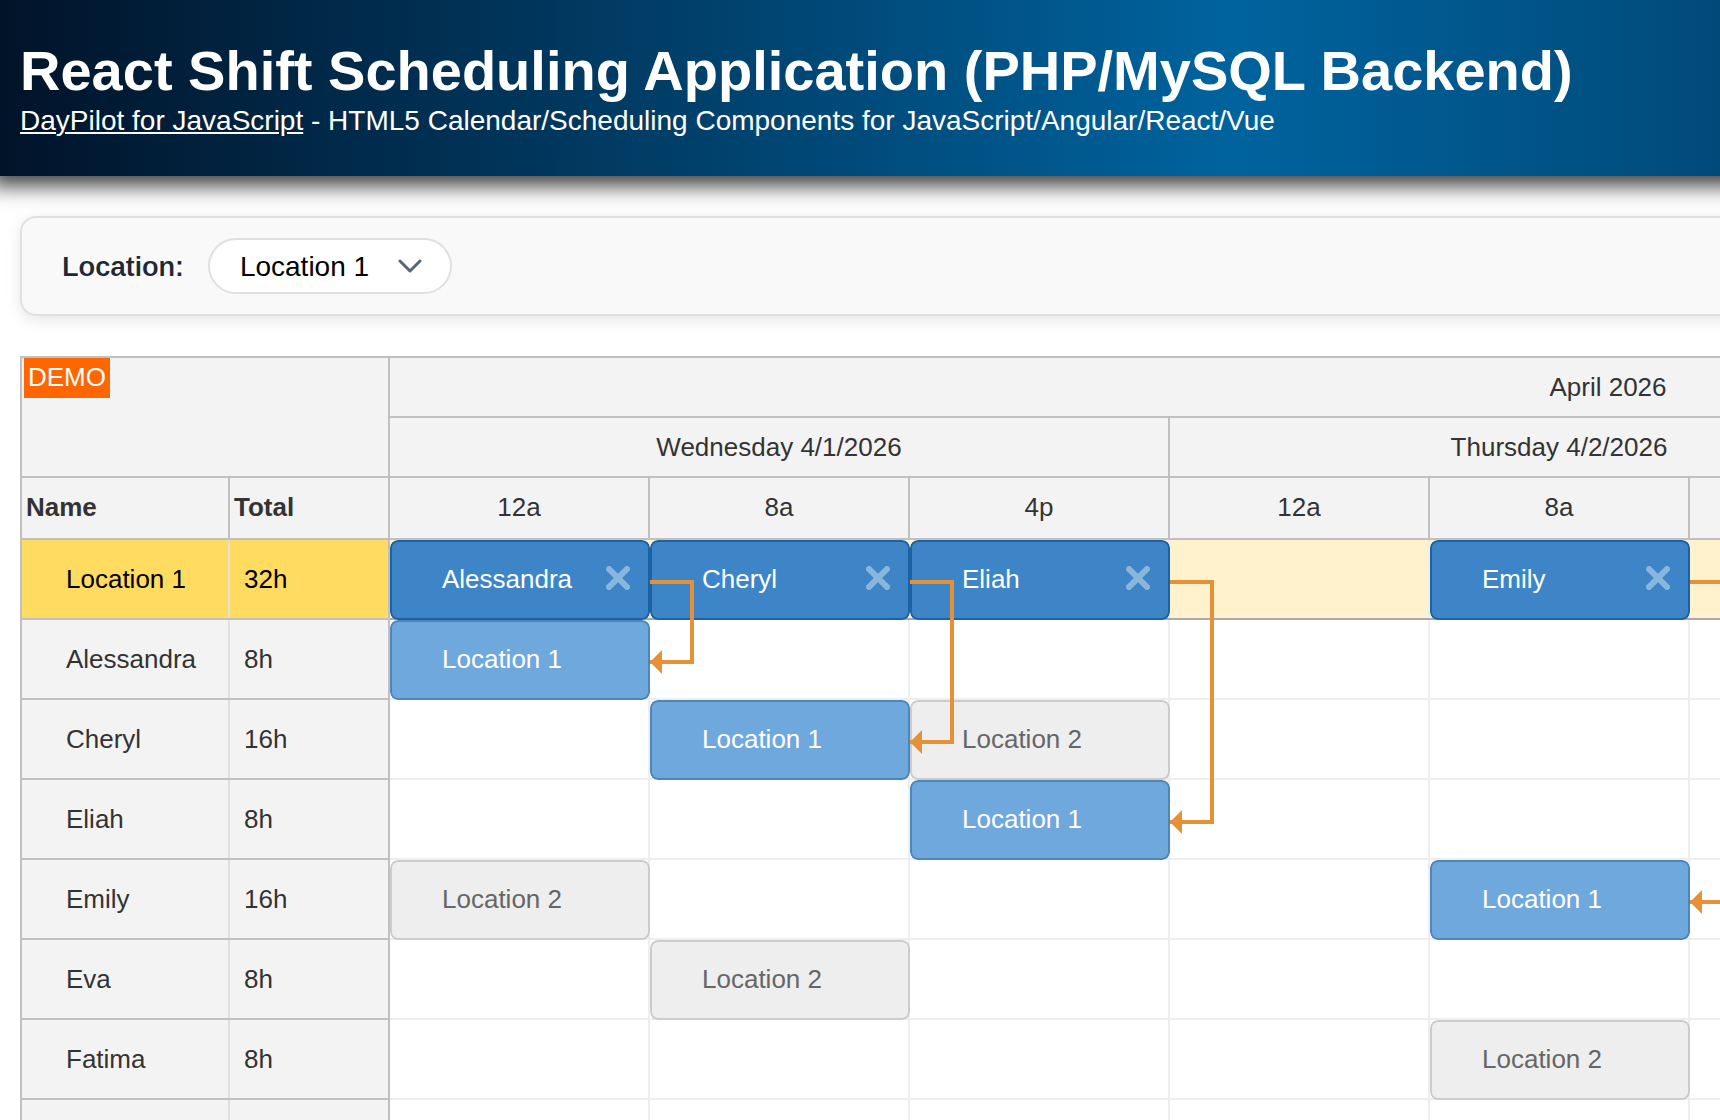
echo json_encode($events);Work Order Schedule
 - Schedule Grid")
The main schedule grid is created using React Scheduler component. It displays the employees as rows (they can be organized in teams) and time slots as columns. The Scheduler grid uses 30-minute cells but it can be adjusted as needed (see the cellDuration property).
Scheduler JSX
<DayPilotScheduler
  {...config}
/>
The configuration is stored in the config object. It uses the Scheduler properties (and events) to customize the appearance and behavior.
const config = {
    eventHeight: 40,
    cellWidth: 80,
    timeHeaders: [{groupBy: "Day"}, {groupBy: "Hour"}],
    scale: "CellDuration",
    cellDuration: 30,
    showNonBusiness: false,
    treePreventParentUsage: true,
    days: DayPilot.Date.today().daysInMonth(),
    startDate: DayPilot.Date.today().firstDayOfMonth(),
    timeRangeSelectedHandling: "Enabled",
    treeEnabled: true,
    // ....
};
We load the people/employees and work order data in a special useEffect() block.
The API calls are made using DayPilot.Http.get(). We run them in parallel and wait for both of them to complete. As soon as the API calls are complete, we update the Scheduler events and resource using setEvents() and setResources(), respectively.
useEffect(() => {
  if (!scheduler) {
    return;
  }

  const loadData = async () => {

    const start = scheduler.visibleStart();
    const end = scheduler.visibleEnd();
    const promiseResources = DayPilot.Http.get(`/api/work_order_resources.php`);
    const promiseEvents = DayPilot.Http.get(`/api/work_order_list.php?start=${start}&end=${end}`);
    const [{data: resources}, {data: events}] = await Promise.all([promiseResources, promiseEvents]);

    setEvents(events);
    setResources(resources);

    scheduler.scrollTo(DayPilot.Date.today());
  };

  loadData();
}, [scheduler]);
This is how our React Scheduler component looks now:
import React, { useEffect, useRef, useState } from 'react';
import { DayPilot, DayPilotScheduler } from "daypilot-pro-react";
import Queue from "./Queue";

const Scheduler = () => {
  const [scheduler, setScheduler] = useState(null);
  const queueRef = useRef(null);
  const [events, setEvents] = useState([]);
  const [resources, setResources] = useState([]);
  const config = {
    eventHeight: 40,
    cellWidth: 80,
    dragOutAllowed: true,
    timeHeaders: [{groupBy: "Day"}, {groupBy: "Hour"}],
    scale: "CellDuration",
    cellDuration: 30,
    durationBarVisible: false,
    showNonBusiness: false,
    treePreventParentUsage: true,
    days: DayPilot.Date.today().daysInMonth(),
    startDate: DayPilot.Date.today().firstDayOfMonth(),
    timeRangeSelectedHandling: "Enabled",
    treeEnabled: true,
    // ...
  };

  // ...

  useEffect(() => {
    if (!scheduler) {
      return;
    }

    const loadData = async () => {

      const start = scheduler.visibleStart();
      const end = scheduler.visibleEnd();
      const promiseResources = DayPilot.Http.get(`/api/work_order_resources.php`);
      const promiseEvents = DayPilot.Http.get(`/api/work_order_list.php?start=${start}&end=${end}`);
      const [{data: resources}, {data: events}] = await Promise.all([promiseResources, promiseEvents]);

      setEvents(events);
      setResources(resources);

      scheduler.scrollTo(DayPilot.Date.today());
    };

    loadData();
  }, [scheduler]);

  return (
    <div className={"wrap"}>
      <div className={"left"}>
        <Queue ref={queueRef}/>
      </div>
      <div className={"right"}>
        <DayPilotScheduler
          {...config}
          events={events}
          resources={resources}
          controlRef={setScheduler}
        />
      </div>
    </div>
  );
}
export default Scheduler;
New Work Order
 - New Work Order")
There are two ways to schedule a work order:
You can add a work order to the queue of unscheduled tasks and drag it to the schedule later
You can create a work order by selecting a time range directly in the Schedule
Now we will add the logic for the second option - creation of a scheduled work order directly in the grid.
We need to handle onTimeRangeSelected event handler which is fired when a time range selection is complete. Our event handler will open a modal dialog (to ask for work order details) and make an API call to create the work order in the database. As soon as the API call is complete, we add the new task to the Scheduler using events.add(). This is more efficient than reloading all the work order data.
const config = {
  // ...
  onTimeRangeSelected: async args => {
    const modal = await DayPilot.Modal.prompt("Create a new task:", "Task 1");

    scheduler.clearSelection();
    if (!modal.result) {
      return;
    }

    const params = {
      text: modal.result,
      start: args.start,
      end: args.end,
      resource: args.resource
    };

    const {data: result} = await DayPilot.Http.post("/api/work_order_create.php", params);

    scheduler.events.add(result);

  },
  // ...
};
This is the source code of work_order_create.php script which saves the work order in the database:
<?php
require_once '_db.php';
$json = file_get_contents('php://input');
$params = json_decode($json);
$start = new DateTime($params->start);
$end = new DateTime($params->end);
$stmt = $db->prepare("INSERT INTO events (name, start, end, resource_id) VALUES (:name, :start, :end, :resource)");
$stmt->bindParam(':start', $params->start);
$stmt->bindParam(':end', $params->end);
$stmt->bindParam(':name', $params->text);
$stmt->bindParam(':resource', $params->resource);
$stmt->execute();
class Result {
public $start;
public $end;
public $text;
public $id;
public $resource;
}
$response = new Result();
$response->start = $params->start;
$response->end = $params->end;
$response->resource = (int) $params->resource;
$response->text = $params->text;
$response->id = (int) $db->lastInsertId();
header('Content-Type: application/json');
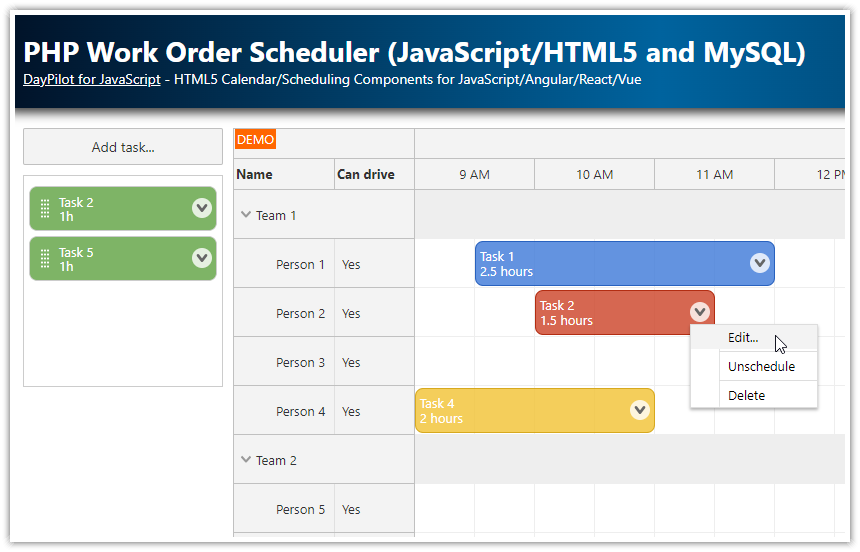
echo json_encode($response);Schedule a Queued Work Order
 - Schedule a Queued Work Order")
You can move the unscheduled tasks from the Queue to the Scheduler to assign a person and time.
This action is handled using onEventMove event handler of the Scheduler. In the event handler, we notify the server (/api/work_order_move.php endpoint) and as soon as the HTTP call is complete we check if the event came from the Queue and remove it from there.
Scheduler.js
const config = {
  // ...
  onEventMove: async args => {

    const params = {
      id: args.e.id(),
      start: args.newStart,
      end: args.newEnd,
      resource: args.newResource
    };

    await DayPilot.Http.post("/api/work_order_move.php", params);

    if (args.external) {
      queueRef.current.remove(args.e.id());
    }

  },
  // ...
};
Here is the source of the /api/work_order_move.php script:
<?php
require_once '_db.php';

$json = file_get_contents('php://input');
$params = json_decode($json);

if (!isset($params->resource)) {

  $now = (new DateTime("now"))->format('Y-m-d H:i:s');

  $stmt = $db->prepare("UPDATE events SET resource_id = null, ordinal = :ordinal, ordinal_priority = :priority WHERE id = :id");
  $stmt->bindParam(':id', $params->id);
  $stmt->bindParam(':ordinal', $params->position);
  $stmt->bindParam(':priority', $now);
  $stmt->execute();
}
else {
  $stmt = $db->prepare("UPDATE events SET start = :start, end = :end, resource_id = :resource, ordinal = null, ordinal_priority = null WHERE id = :id");
  $stmt->bindParam(':id', $params->id);
  $stmt->bindParam(':start', $params->start);
  $stmt->bindParam(':end', $params->end);
  $stmt->bindParam(':resource', $params->resource);
  $stmt->execute();
}

db_compact_ordinals();

class Result {}

$response = $params;

header('Content-Type: application/json');
echo json_encode($response);
Database Storage
By default, the PHP API backend uses an automatically-created SQLite database so you can try the project without any DB configuration. The database file (daypilot.sqlite) is created automatically in the PHP project root (just make sure that the process has permissions to write there).
You may want to switch to MySQL database. You can do that by editing the _db.php file and changing the file header as follows:
<?php

// use sqlite
//require_once '_db_sqlite.php';

// use MySQL
require_once '_db_mysql.php';


// ... rest of the file unchanged
MySQL Database Schema
The MySQL database includes three tables (events, groups, and resources):
CREATE TABLE IF NOT EXISTS events (
  id INTEGER PRIMARY KEY AUTO_INCREMENT,
  name TEXT,
  start DATETIME,
  end DATETIME,
  resource_id VARCHAR(30),
  ordinal integer,
  ordinal_priority datetime
  );

CREATE TABLE groups (
  id INTEGER  NOT NULL PRIMARY KEY,
  name VARCHAR(200)  NULL);

CREATE TABLE resources (
  id INTEGER  PRIMARY KEY AUTO_INCREMENT NOT NULL,
  name VARCHAR(200)  NULL,
  group_id INTEGER  NULL);
The groups and resources tables define the Scheduler rows. The events table includes the work orders. Unscheduled work orders will have NULL value in the the resource_id field.
History
August 11, 2024: Upgraded to React 18, DayPilot Pro 2024.3. PHP 8+ compatibility. Updated styling.
May 19, 2021: Initial release.