")
Overview
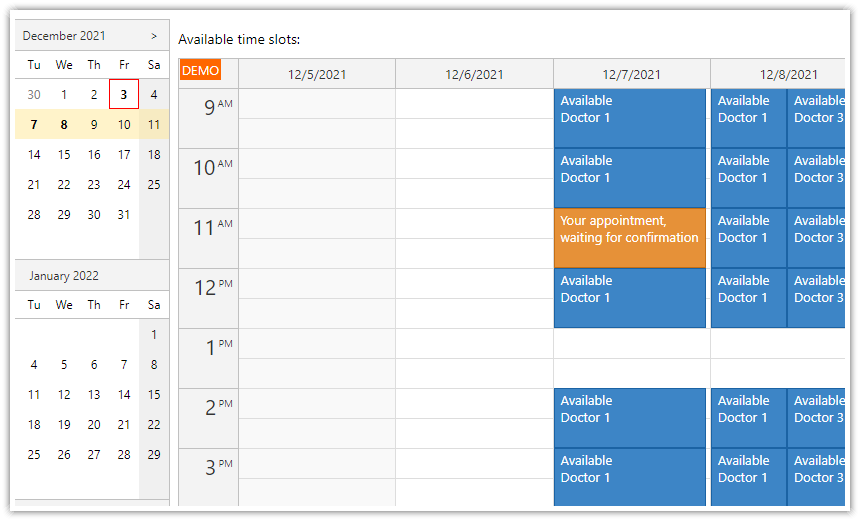
This ASP.NET Core application lets you schedule employee shifts for multiple locations.
You can switch between locations easily and view the shifts from a different perspective.
You can see the employee availability immediately.
The Scheduler displays total hours or shifts planned for each resource (location, employee).
The application uses an HTML5 frontend implemented in JavaScript that uses the JavaScript Scheduler component from DayPilot Pro for JavaScript library to show the shift data.
The backend is implemented using ASP.NET Core API Controllers (REST API).
C# and .NET 10
Entity Framework 10
Visual Studio project
Includes a trial version of DayPilot Pro for JavaScript (see License below)
License
Licensed for testing and evaluation purposes. Please see the license agreement included in the sample project. You can use the source code of the tutorial if you are a licensed user of DayPilot Pro for JavaScript.
Scheduling Employee Shifts in ASP.NET Core
You can use this ASP.NET Core application to assign shifts to locations (or positions) and workers. This tutorial focuses on the visual representation of the shifts and management of the shift assignments using drag and drop.
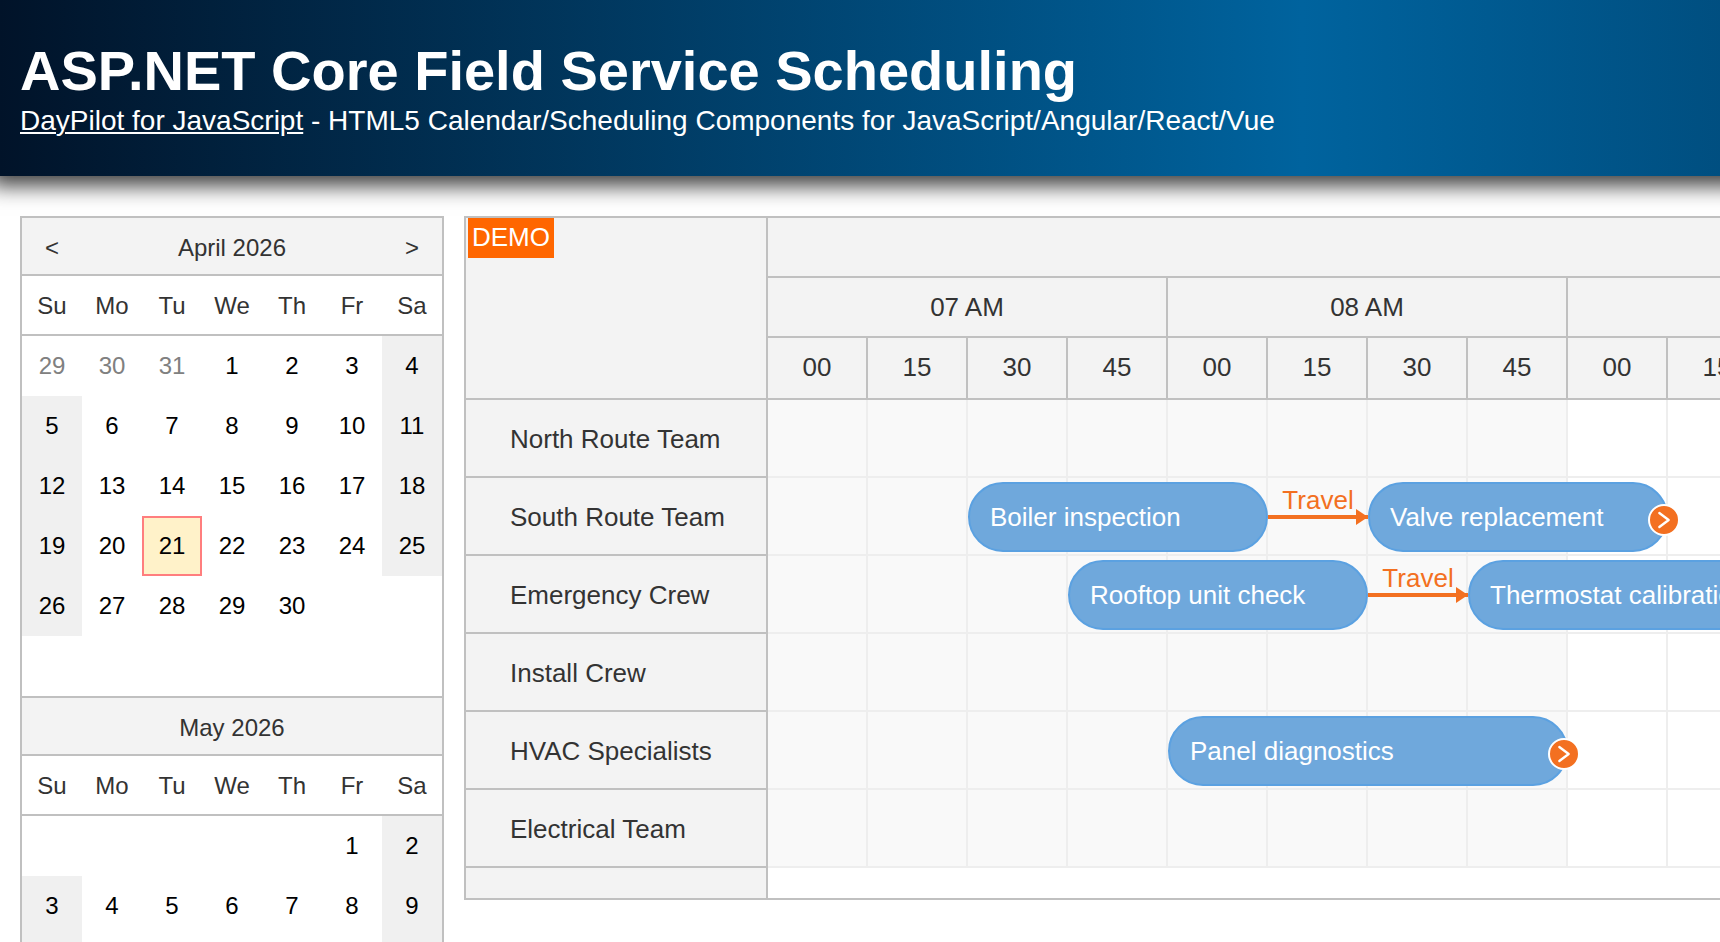
The horizontal axis of the ASP.NET Core Scheduler component displays the timeline (shift slots).
The vertical axis displays the selected location (in the first row) and all active employees.
The attached ASP.NET Core application defines 3 different locations/positions and 6 employees. These resources are loaded from the database and you can add/modify them as needed.
The Scheduler UI lets you create shift assignments using the following steps:
1. Select a location using the dropdown list.
The Scheduler will switch the view to display details of shifts planned for the selected location.
Each assignment is represented by two event boxes (in the location row and in the employee row), connected using an orange link.

2. To create a new shift assignment, click the selected shift slot in the grid.
This will create a new shift assignment record for the selected date and employee.
It is not possible to create a new assignment in a slot that is already used.
The shift assignment can’t be created in the top row (which displays data for the selected location).

3. Confirm creation of a new shift assignment:

4. The Scheduler will create two linked boxes in the grid - in the top row (which displays an overview for the location) and in the employee row (it displays all shifts assigned to an employee).
The new assignment is saved in the SQL Server database (using an API call).

Storing and Displaying Shift Assignments

Each shift assignment is stored as a single record in the database (SQL Server/LocalDB).
The assignments use the following model class:
public class Assignment
{
    public int Id { get; set; }

    public int EmployeeId { get; set; }

    [JsonIgnore]
    public Employee Employee { get; set; } = null!;

    public int LocationId { get; set; }

    [JsonIgnore]
    public Location Location { get; set; } = null!;

    public DateTime Start { get; set; }

    public DateTime End { get; set; }
}
You can see that it stores the basic information (Id, Start, End) and a link to the assigned employee (EmployeeId) and location (LocationId).
The AssignmentsController loads assignments from the SQL Server database.
The selection is limited to the date range specified using
startandendquery string parameters.The
GetAssignments()method returns the data in JSON format, using a specialShiftAssignmentclass.
namespace Project.Controllers
{
    [Route("api/[controller]")]
    [ApiController]
    public class AssignmentsController : ControllerBase
    {
        private readonly ShiftDbContext _context;

        public AssignmentsController(ShiftDbContext context)
        {
            _context = context;
        }

        // GET: api/Assignments
        [HttpGet]
        public async Task<ActionResult<IEnumerable<ShiftAssignment>>> GetAssignments([FromQuery] DateTime start, [FromQuery] DateTime end)
        {
            var result = await _context.Assignments
                .Where(e => !((e.End <= start) || (e.Start >= end)))
                .Select(e => new ShiftAssignment
                {
                    Id = e.Id,
                    Start = e.Start,
                    End = e.End,
                    EmployeeId = e.EmployeeId,
                    LocationId = e.LocationId
                })
                .ToListAsync();

            return Ok(result);
        }

        // ...

    }

    public class ShiftAssignment
    {
        public int Id { get; set; }
        public DateTime Start { get; set; }
        public DateTime End { get; set; }
        public int EmployeeId { get; set; }
        public int LocationId { get; set; }
    }

}
This is a sample JSON response with shift data:
[
  {
    "id": 11,
    "start": "2024-09-05T08:00:00",
    "end": "2024-09-05T16:00:00",
    "employeeId": 2,
    "locationId": 1
  }
]
On the client side, we load the assignments whenever the user changes the location selection using the drop-down list.
init() {
    window.addEventListener("DOMContentLoaded", () => {
        app.elements.locations.addEventListener("change", (e) => {
            const locationId = parseInt(e.target.value);
            app.activateLocation(locationId);
        });
        app.loadLocations();
    });
}
When the selection changes, the application calls activateLocation() function that loads the data, transforms it and updates the JavaScript Scheduler component.
It loads fresh data (including employees and shift assignments).
It transforms the shift assignment data (each assignment active in the current view will be displayed as two boxes)
It connects the related shift assignments using a link.
The assignments and employees are loaded using two separate HTTP calls. We execute them in parallel and wait for both of them to complete (to avoid double update of the Scheduler component):
const promiseEmployees = DayPilot.Http.get("/api/Employees");
const promiseAssignments = DayPilot.Http.get(`/api/Assignments?start=${start}&end=${end}`);
const [{data:resources}, {data:assignments}] = await Promise.all([promiseEmployees, promiseAssignments]);
The resources array now holds the employee data loaded from /api/Employees endpoint. The items already use the correct format that is needed to load them as rows in the Scheduler. Because we want to display the current location as the first row, we insert a new item at the top:
resources.splice(0, 0, { id: "L" + item.id, name: item.name, type: "location" });You can see that the location row will use “L” as the id prefix.
Our database uses a standard identity column (
id) for[Employees]and[Locations]tables.As we mix resources of two types in the same view, it could result in duplicate ID values.
The “L” prefix makes the location row id unique and helps us identify the row type.
Now we can transform the assignments.
const events = [];
const links = [];
assignments.forEach(e => {
    if (e.locationId === item.id) {
        // location row
        events.push({
            ...e,
            id: "L" + e.id,
            text: "",
            resource: "L" + e.locationId,
            join: e.id,
            type: "location"
        });

        // employee row
        events.push({
            ...e,
            text: "",
            resource: e.employeeId,
            join: e.id
        });

        // link connecting the events
        links.push({
            from: "L" + e.id,
            to: e.id,
            type: "FinishToFinish",
            color: "#e69138"
        });
    }
});
Each record is represented by two boxes, connected with a link.
The first event box will be displayed in the “Location” row. It uses the
locationId(correctly prefixed with"L") as theresourcefield. Theresourcefield will be used to determine the target row.The second event box will be displayed in the corresponding “Employee” row. The
resourcefield uses theemployeeIdvalue.
Now we can update the Scheduler component:
scheduler.update({
  resources,
  events,
  links
});
This is the complete activateLocation() function:
const app = {
async activateLocation(location) {
let item = location;
if (typeof location !== "object") {
item = app.findLocation(location);
}
const start = scheduler.visibleStart();
const end = scheduler.visibleEnd();
const promiseEmployees = DayPilot.Http.get("/api/Employees");
const promiseAssignments = DayPilot.Http.get(`/api/Assignments?start=${start}&end=${end}`);
const [{data:resources}, {data:assignments}] = await Promise.all([promiseEmployees, promiseAssignments]);
resources.splice(0, 0, { id: "L" + item.id, name: item.name, type: "location" });
const events = [];
const links = [];
assignments.forEach(e => {
if (e.locationId === item.id) {
// location row
events.push({
...e,
id: "L" + e.id,
text: "",
resource: "L" + e.locationId,
join: e.id,
type: "location"
});
// person row
events.push({
...e,
text: "",
resource: e.employeeId,
join: e.id
});
// link connecting the events
links.push({
from: "L" + e.id,
to: e.id,
type: "FinishToFinish",
color: "#e69138"
});
} else {
// inactive assignment
events.push({
...e,
text: "",
resource: e.employeeId,
join: e.id,
type: "inactive"
});
}
});
scheduler.update({
resources,
events,
links
});
}
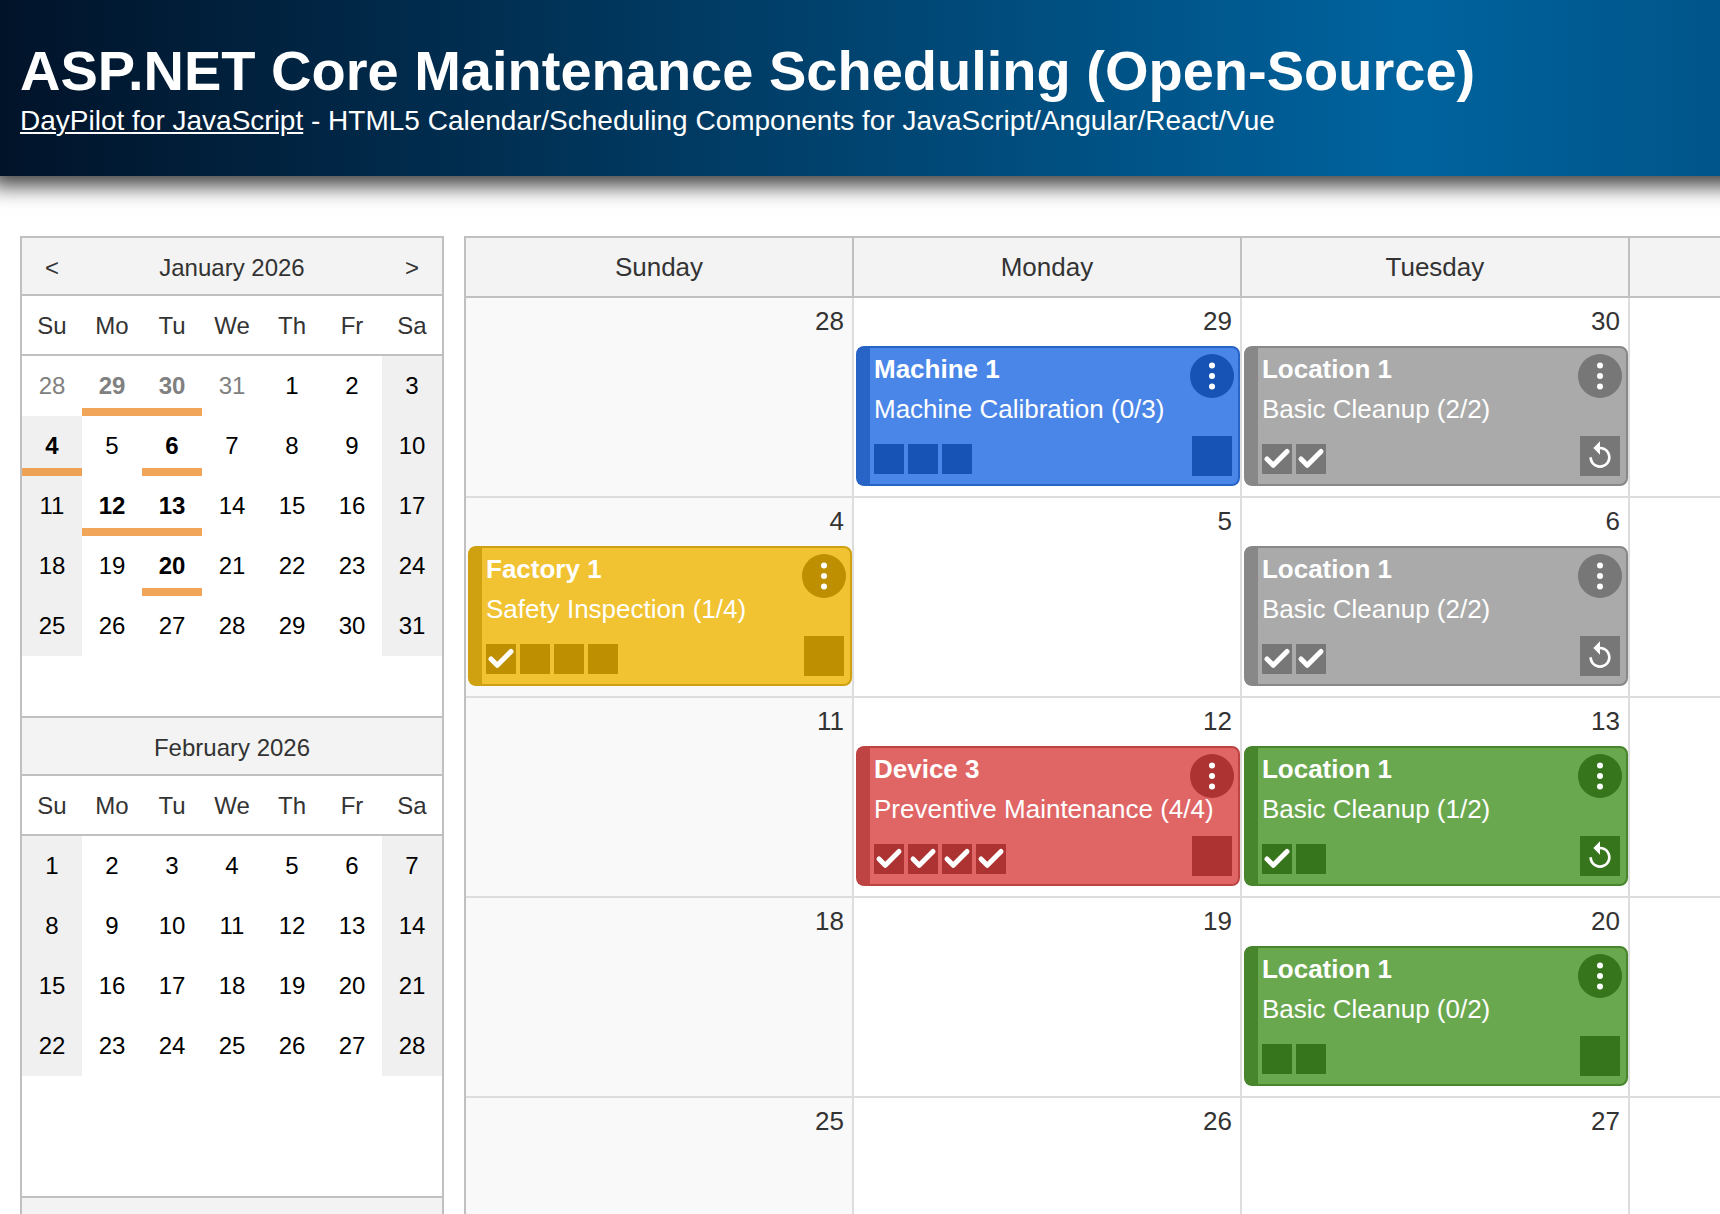
}Shifts at Different Locations

The shift scheduler view is focused on displaying shifts for the selected location. However, we want to display the employee assignments for the other locations in the plan as well.
To make it clear that they don’t belong to the current location, these assignments use a gray background color.
These “inactive” assignments provide context - you can see all assignments for each worker in each row.
It also prevents the shift administrator from assigning shifts to employees who are not available.
Drag and Drop Shift Scheduling
The ASP.NET Core Scheduler component includes built-in support for drag and drop. We will use this feature to add an ability to reschedule the shifts easily.
To change the time slot, you can drag the item horizontally in the location row to a new time slot. The assigned worker will remain unchanged.

You can also use drag and drop to assign the shift slot to another employee. Drag the bottom box to another row to change the worker assignment:

Implementing the Drag and Drop Logic
Each shift assignment is displayed as two linked event boxes (one in the location row, one in the employee row). Both boxes share the same join value, which tells the Scheduler to move them together as a group (see Joint Events). However, each box type has a different movement constraint:
The location box can only move horizontally (changing the time slot). The assigned employee remains unchanged.
The employee box can only move vertically (reassigning to a different worker). The time slot remains unchanged.
The onEventMoving event handler enforces the movement constraint for the employee box. It fires in real time during drag and drop, allowing you to customize the move behavior (see Drag and Drop Moving). When the user drags the employee box, the handler locks the time position for both the dragged event and its linked partner using the args.multimove array (see Event Multi-Moving):
onEventMoving: args => {
    const e = args.e;
    if (e.data.type !== "location") {
        args.start = e.start();
        args.end = e.end();
        args.multimove[1].start = e.start();
        args.multimove[1].end = e.end();
    }
},
The onEventMove event handler is fired after the drop. It saves the change to the database and updates the linked event box on the client side.
When the location box is moved (time slot change), we update the start/end on the server and sync the employee box:
onEventMove: async (args) => {
    const e = args.e;
    if (e.data.type === "location") {
        const params = {
            start: args.newStart,
            end: args.newEnd
        };
        await DayPilot.Http.put("/api/Assignments/" + e.data.join, params);
        const employeeAssignment = scheduler.events.find(e.data.join);
        employeeAssignment.data.start = args.newStart;
        employeeAssignment.data.end = args.newEnd;
        scheduler.events.update(employeeAssignment);
    }
    // ...
},
When the employee box is moved (worker reassignment), we update the employee on the server and sync the location box:
onEventMove: async (args) => {
    const e = args.e;
    // ...
    if (e.data.type !== "location") {
        const params = {
            id: e.data.join,
            employeeId: args.newResource
        };
        await DayPilot.Http.put("/api/Assignments/" + e.data.join, params);
        const locationAssignment = scheduler.events.find("L" + e.data.join);
        locationAssignment.data.employeeId = args.newResource;
        scheduler.events.update(locationAssignment);
    }
},
Calculating Totals for Each Employee/Row

The Scheduler component can display data related to rows in additional columns. We will define a special column that will display the total shift time for each row.
The first row displays the total time scheduled for the selected location.
The employee rows display a shift total for the respective worker.
const scheduler = new DayPilot.Scheduler("dp", {

    // ...

    eventBorderRadius: "20px",
    rowHeaderColumns: [
        { name: "Name", display: "name" },
        { name: "Total" }
    ],
    onBeforeRowHeaderRender: (args) => {
        const duration = args.row.events.totalDuration();
        const columnTotal = args.row.columns[1];
        if (duration.totalHours() > 0 && columnTotal) {
            columnTotal.text = duration.totalHours() + "h";
        }
    },

    // ...

});
The total time is calculated in hours but you can also switch to shifts.
const scheduler = new DayPilot.Scheduler("dp", {

    // ...

    onBeforeRowHeaderRender: (args) => {
        const shifts = args.row.events.all().length;
        const columnTotal = args.row.columns[1];
        if (shifts > 0 && columnTotal) {
            columnTotal.text = shifts;
        }
    },

    // ...

});
Defining Shift Plan Slots (Timeline)

In most standard views, the JavaScript Scheduler component uses pre-defined slot units (such as Hour, Day, Week, etc.). You only define the slot size, start date and the number of days. The timeline (displayed on the horizontal axis) will be generated automatically.
We need to show three 8-hour shifts per day, starting at 12am, 8am, and 4pm. The Scheduler doesn’t have a special scale value for this scenario but can generate the timeline manually and define all slots one by one.
When you add
scale: "Manual"to the config, the Scheduler will use slots defined using thetimelineproperty.We will use the
app.getTimeline()function to generate the time slots.
Scheduler configuration:
const scheduler = new DayPilot.Scheduler("dp", {
    timeHeaders: [{ groupBy: "Month" }, { groupBy: "Day", format: "dddd M/d/yyyy" }, { groupBy: "Cell" }],
    startDate: DayPilot.Date.today().firstDayOfMonth(),
    days: DayPilot.Date.today().daysInMonth(),
    onBeforeTimeHeaderRender: (args) => {
        if (args.header.level === 2) {
            args.header.text = args.header.start.toString("h") + args.header.start.toString("tt").substring(0, 1).toLowerCase();
        }
    },
    scale: "Manual",
    timeline: app.getTimeline(),
    // ...
});
And this is the app.getTimeline() function that defines the shift slots:
const app = {
    // ...
    getTimeline() {
        const days = DayPilot.Date.today().daysInMonth();
        const start = DayPilot.Date.today().firstDayOfMonth();

        const result = [];
        for (let i = 0; i < days; i++) {
            const day = start.addDays(i);
            result.push({
                start: day.addHours(0),
                end: day.addHours(8)
            });
            result.push({
                start: day.addHours(8),
                end: day.addHours(16)
            });
            result.push({
                start: day.addHours(16),
                end: day.addHours(24)
            });
        }
        return result;
    },

};
You can modify the getTimeline() function to use different shift start hours and/or different shift duration (and the number of shifts per day).
Styling the Shift Assignment using Active Areas
First, we will enable rounded corners using the eventBorderRadius property:
const scheduler = new DayPilot.Scheduler("dp", {
    eventBorderRadius: "20px",
    // ...
});
For further appearance customization of the shift assignment, we will use the onBeforeEventRender event handler:
First, we hide the default duration bar:
args.data.barHidden = true;Then we set color of the event background, border and font:
args.data.fontColor = "#ffffff";
args.data.backColor = "#6fa7d4";
args.data.borderColor = "darker";
As the final step, we will add a circle with an abbreviation of the assignment text using an active area. You can also replace the abbreviated text with a custom icon.
onBeforeEventRender: (args) => {
    args.data.barHidden = true;
    args.data.fontColor = "#ffffff";
    args.data.backColor = "#6fa7d4";
    args.data.borderColor = "darker";

    // dot
    const short = app.initials(args.data.text);
    args.data.areas = [{
        left: 0,
        top: 0,
        width: 40,
        height: 40,
        style: "border-radius: 36px; font-size: 20px; display: flex; align-items: center; justify-content: center;",
        backColor: DayPilot.ColorUtil.darker(args.data.backColor, 1),
        fontColor: "#ffffff",
        text: short
    }];
}
The app.initials() function extracts the initial letter from the first two words of the shift assignment text description:
const app = {
initials(str) {
if (typeof str !== "string") {
return "";
}
return str.split(" ").slice(0, 2).map(w => w[0] && w[0].toUpperCase()).join("");
},
// ...
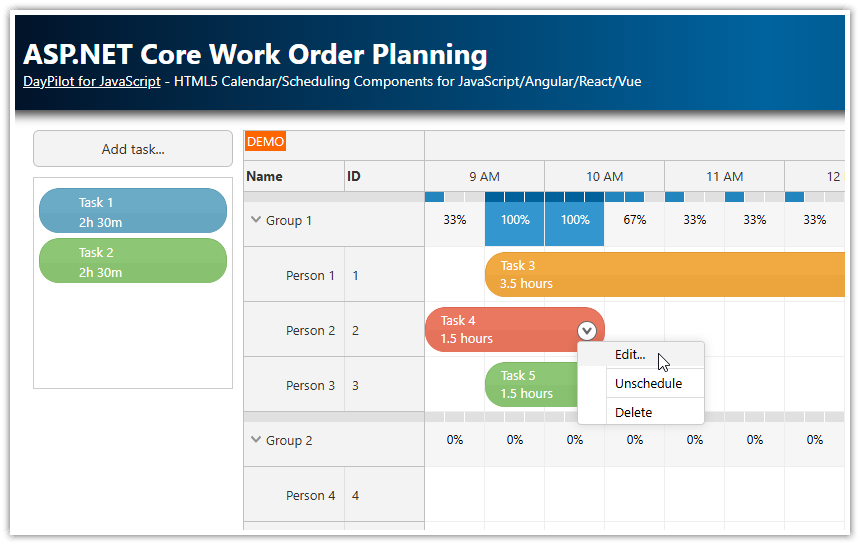
};Deleting Shift Assignments

In our shift planning application, you can delete the assignments using a “delete” icon that is displayed on the right side of the assignment boxes in the Scheduler.
You can add the icon using event active areas.
We will only add the icon to the main assignment box that is displayed in the “Location” row.
The linked assignment box that is displayed in the employee row will be deleted as well but it doesn’t show the icon.
To add the icon, use onBeforeEventRender event handler:
onBeforeEventRender: (args) => {
    const isLocation = args.data.type === "location";

    // ...

    if (isLocation) {
        const person = scheduler.rows.find(args.data.employeeId);

        args.data.backColor = "#3d85c6";
        args.data.text = person.name;
        args.data.moveVDisabled = true;

        args.data.areas = [
            {
                right: 2,
                top: 10,
                height: 20,
                width: 20,
                cssClass: "scheduler_default_event_delete",
                style: "background-color: #fff; border: 1px solid #ccc; box-sizing: border-box; border-radius: 10px; padding: 0px;",
                visibility: "Visible",
                onClick: async (args) => {
                    const modal = await DayPilot.Modal.confirm("Delete this assignment?");
                    if (modal.canceled) {
                        return;
                    }
                    const locationAssignment = args.source;
                    const assignmentId = parseInt(locationAssignment.data.join);
                    const employeeAssignment = scheduler.events.find(assignmentId);
                    await DayPilot.Http.delete("/api/Assignments/" + assignmentId);
                    scheduler.events.remove(locationAssignment);
                    scheduler.events.remove(employeeAssignment);
                }
            }
        ];
    }

    // ...

}
The DELETE HTTP request will invoke DeleteAssignment() method of the AssignmentsController class on the server side.
// DELETE: api/Assignments/5
[HttpDelete("{id}")]
public async Task<IActionResult> DeleteAssignment(int id)
{
    var assignment = await _context.Assignments.FindAsync(id);
    if (assignment == null)
    {
        return NotFound();
    }

    _context.Assignments.Remove(assignment);
    await _context.SaveChangesAsync();

    return NoContent();
}
Entity Framework Model Classes
This ASP.NET Core project uses Entity Framework to handle data persistence. The following NuGet packages are already installed:
PM> Install-Package Microsoft.EntityFrameworkCore
PM> Install-Package Microsoft.EntityFrameworkCore.SqlServer
PM> Install-Package Microsoft.EntityFrameworkCore.Tools
The project uses 3 data model classes:
Employee- stores information about employees (employees will be displayed as rows in the Scheduler)Location- information about locations (you can switch the current location using a drop down displayed above the main scheduling grid)Assignment- the Assignment class stores shift data (it links an employee with a location and a specific shift slot)
Employee class
public class Employee
{
    public int Id { get; set; }
    public required string Name { get; set; }
}
Location class
public class Location
{
    public int Id { get; set; }
    public required string Name { get; set; }
}
Assignment class
public class Assignment
{
    public int Id { get; set; }

    public int EmployeeId { get; set; }

    [JsonIgnore]
    public Employee Employee { get; set; } = null!;

    public int LocationId { get; set; }

    [JsonIgnore]
    public Location Location { get; set; } = null!;

    public DateTime Start { get; set; }

    public DateTime End { get; set; }
}
How to Run This ASP.NET Core Project
Requirements:
SQL Server (LocalDB)
.NET 10
The project uses “code first” approach to define the data model. This means you can generate the database schema for SQL Server from the code.
The database will be created and initialized when you first run the shift planning application (Program.cs):
// ...

// Ensure the database is created.
using (var serviceScope = app.Services.CreateScope())
{
    var services = serviceScope.ServiceProvider;
    try
    {
        var context = services.GetRequiredService<ShiftDbContext>();
        context.Database.EnsureCreated();
    }
    catch (Exception ex)
    {
        var logger = services.GetRequiredService<ILogger<Program>>();
        logger.LogError(ex, "An error occurred creating the DB.");
    }
}

// ...
During database initialization, sample rows (employees) and locations will be added:
public class ShiftDbContext : DbContext
{

  // ...

  protected override void OnModelCreating(ModelBuilder modelBuilder)
  {
      modelBuilder.Entity<Employee>().HasData(new Employee { Id = 1, Name = "Person 1" });
      modelBuilder.Entity<Employee>().HasData(new Employee { Id = 2, Name = "Person 2" });
      modelBuilder.Entity<Employee>().HasData(new Employee { Id = 3, Name = "Person 3" });
      modelBuilder.Entity<Employee>().HasData(new Employee { Id = 4, Name = "Person 4" });
      modelBuilder.Entity<Employee>().HasData(new Employee { Id = 5, Name = "Person 5" });
      modelBuilder.Entity<Employee>().HasData(new Employee { Id = 6, Name = "Person 6" });

      modelBuilder.Entity<Location>().HasData(new Location { Id = 1, Name = "Location 1" });
      modelBuilder.Entity<Location>().HasData(new Location { Id = 2, Name = "Location 2" });
      modelBuilder.Entity<Location>().HasData(new Location { Id = 3, Name = "Location 3" });

  }
}
The database name is specified in the config (appsettings.json). If needed, you can review the connection string before running the database initialization script. The database name is DayPilot.TutorialAspNetCoreShifts.
{
    "ConnectionStrings": {
        "ShiftContext": "Server=(localdb)\\mssqllocaldb;Database=DayPilot.TutorialAspNetCoreShifts;Trusted_Connection=True"
    },
}
SQL Server Database Schema
Here is the SQL Server database schema generated from the Entity Framework model classes.
[Assignments] database table:
CREATE TABLE [dbo].[Assignments] (
    [Id]         INT           IDENTITY (1, 1) NOT NULL,
    [EmployeeId] INT           NOT NULL,
    [LocationId] INT           NOT NULL,
    [Start]      DATETIME2 (7) NOT NULL,
    [End]        DATETIME2 (7) NOT NULL,
    CONSTRAINT [PK_Assignments] PRIMARY KEY CLUSTERED ([Id] ASC),
    CONSTRAINT [FK_Assignments_Employees_EmployeeId] FOREIGN KEY ([EmployeeId]) REFERENCES [dbo].[Employees] ([Id]) ON DELETE CASCADE,
    CONSTRAINT [FK_Assignments_Locations_LocationId] FOREIGN KEY ([LocationId]) REFERENCES [dbo].[Locations] ([Id]) ON DELETE CASCADE
);


GO
CREATE NONCLUSTERED INDEX [IX_Assignments_EmployeeId]
    ON [dbo].[Assignments]([EmployeeId] ASC);


GO
CREATE NONCLUSTERED INDEX [IX_Assignments_LocationId]
    ON [dbo].[Assignments]([LocationId] ASC);
[Employees] database table:
CREATE TABLE [dbo].[Employees] (
    [Id]   INT            IDENTITY (1, 1) NOT NULL,
    [Name] NVARCHAR (MAX) NOT NULL,
    CONSTRAINT [PK_Employees] PRIMARY KEY CLUSTERED ([Id] ASC)
);
[Locations] database table:
CREATE TABLE [dbo].[Locations] (
    [Id]   INT            IDENTITY (1, 1) NOT NULL,
    [Name] NVARCHAR (MAX) NOT NULL,
    CONSTRAINT [PK_Locations] PRIMARY KEY CLUSTERED ([Id] ASC)
);
History
April 7, 2026: Upgraded to .NET 10, DayPilot Pro 2026.2.6899. CSS-to-property migration (eventBorderRadius). Dynamic timeline start date. Code modernization (LINQ projection, nullable annotations).
June 19, 2024: Upgraded to .NET 8, DayPilot Pro 2024.2.5957. Automatic database initialization.
February 16, 2023: Upgraded to .NET 7, DayPilot Pro 2023.1.5535
September 13, 2022: Initial version (.NET 6)