")
Overview
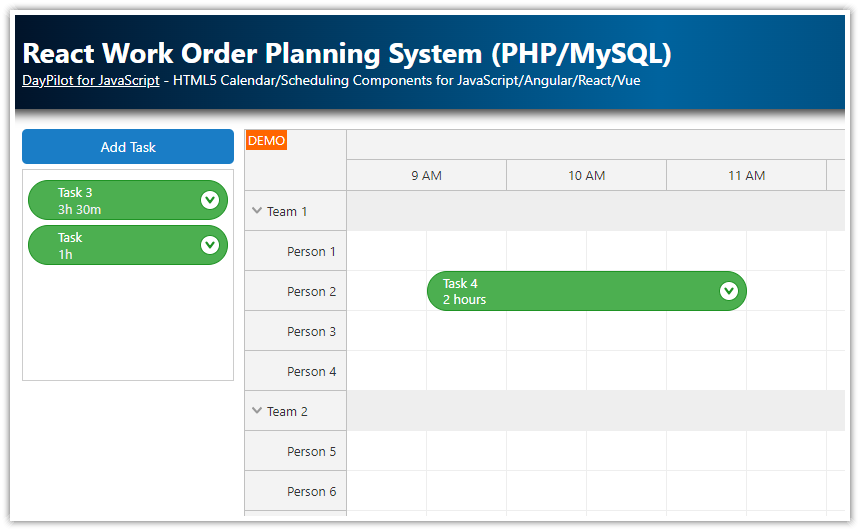
The work order PHP application fronted uses JavaScript and HTML5 to create a visual interface with a queue of unscheduled tasks and a scheduler with assigned work orders.
You can add new work orders to the queue or you can directly schedule it.
You can drag work orders between the queue and the scheduler.
The application lets you edit the work order details using a modal dialog.
The MySQL database will be automatically created and initialized on startup (see the instructions at the end of the tutorial).
Includes a trial version of DayPilot Pro for JavaScript (see License below)
License
Licensed for testing and evaluation purposes. Please see the license agreement included in the sample project. You can use the source code of the tutorial if you are a licensed user of DayPilot Pro for JavaScript.
How to schedule a work order using drag and drop?
1. You can select the desired position directly in the main scheduler. The scheduler displays workers on the vertical axis and time on the horizontal axis. This way you can assign the work order to a specific employee and also set the exact time - at the same time.
After you finish the target slot selection, you can enter the work order details in a dialog window.

2. You can also drag the an unscheduled work order from the queue. The queue contains a list of work orders that have already been entered into the system (with details like description and expected duration) but haven’t been scheduled for a specific time.

The work order scheduler board is created using two visual components from the DayPilot Pro for JavaScript package:
The JavaScript Scheduler component is used to display the main scheduler grid.
The JavaScript Queue component is used to display the queue of unscheduled tasks.
How to create the work order scheduler in JavaScript and PHP?

To learn more about using the JavaScript/HTML5 scheduler component in PHP, please see the HTML5 Scheduler tutorial. The tutorial covers the Scheduler component basics, such as installation, configuration options, loading JSON data using a PHP script and handling user input.
To create a work order scheduler, use the following configuration. It sets the layout properties (time header resolution, scale of the scheduler grid, row header columns) and defines handlers for user actions (work order clicks, moving and resizing, and other drag and drop actions).
<script src="js/daypilot/daypilot-all.min.js"></script>

<div id="scheduler"></div>

<script>
  const scheduler = new DayPilot.Scheduler("scheduler", {
    cellDuration: 30,
    cellWidth: 60,
    days: DayPilot.Date.today().daysInMonth(),
    dragOutAllowed: true,
    durationBarHeight: 5,
    eventHeight: 45,
    durationBarVisible: false,
    eventBorderRadius: 8,
    rowMarginTop: 2,
    rowMarginBottom: 2,
    rowHeaderColumns: [
      {name: "Name"},
      {name: "Can drive", display: "driving"}
    ],
    scale: "CellDuration",
    showNonBusiness: false,
    startDate: DayPilot.Date.today().firstDayOfMonth(),
    timeHeaders: [{groupBy: "Day"}, {groupBy: "Hour"}],
    timeRangeSelectedHandling: "Enabled",
    treeEnabled: true,
    treePreventParentUsage: true,
    onTimeRangeSelected: args => {
      workOrderApp.schedulerTaskAdd(args.start, args.end, args.resource);
    },
    onEventClick: args => {
      workOrderApp.schedulerTaskEdit(args.e);
    },
    onEventMove: args => {
      workOrderApp.schedulerTaskMove(args.e.id(), args.newStart, args.newEnd, args.newResource, args.external);
    },
    onEventResize: args => {
      workOrderApp.schedulerTaskMove(args.e.id(), args.newStart, args.newEnd, args.e.resource(), false);
    },
    onEventResizing: args => {
      const duration = new DayPilot.Duration(args.start, args.end);
      if (duration.totalHours() > 8) {
        args.allowed = false;
      }
    },
    onTimeRangeSelecting: args => {
      const duration = new DayPilot.Duration(args.start, args.end);
      if (duration.totalHours() > 8) {
        args.allowed = false;
      }
    },

    // ...

  });
  scheduler.init();
</script>
How to load employee data to be displayed in the Scheduler?

The scheduler displays workers/employees as rows. You can display the worker data using a PHP script that load the employees from the database and returns a JSON array.
The workOrderApp.schedulerLoad() method loads the rows and scheduled work orders at the same time using parallel HTTP requests. It waits for for both HTTP requests to complete and update the Scheduler component just once. This method is more efficient and user friendly.
<script>
  const workOrderApp = {

    async schedulerLoad() {
      const start = scheduler.visibleStart();
      const end = scheduler.visibleEnd();
      const promiseResources = DayPilot.Http.get(`/api/work_order_resources.php`);
      const promiseEvents = DayPilot.Http.get(`/api/work_order_list.php?start=${start}&end=${end}`);

      const [{data: resources}, {data: events}] = await Promise.all([promiseResources, promiseEvents]);

      scheduler.update({resources, events});
    },

    // ...

  };

</script>
This is the source code of the PHP script that loads the worker data from MySQL database (work_order_resources.php):
<?php
require_once '_db.php';

$scheduler_groups = $db->query('SELECT * FROM resource_groups ORDER BY name');

class Group {
  public $id;
  public $name;
  public $expanded;
  public $children;
}
class Resource {
  public $id;
  public $name;
  public $driving;
}

$groups = array();

foreach($scheduler_groups as $group) {
  $g = new Group();
  $g->id = "group_".$group['id'];
  $g->name = $group['name'];
  $g->expanded = true;
  $g->children = array();
  $groups[] = $g;

  $stmt = $db->prepare('SELECT * FROM resources WHERE group_id = :group ORDER BY name');
  $stmt->bindParam(':group', $group['id']);
  $stmt->execute();
  $scheduler_resources = $stmt->fetchAll();

  foreach($scheduler_resources as $resource) {
    $r = new Resource();
    $r->id = (int) $resource['id'];
    $r->name = $resource['name'];
    $r->driving = 'Yes';
    $g->children[] = $r;
  }
}

header('Content-Type: application/json');
echo json_encode($groups);
How to display a queue of unscheduled work orders?

To display a queue of unscheduled works orders, you can use either a custom list of items that you activate as external drag and drop source or you can use the special Queue component that does most of the work for you:
The unscheduled work orders are styled using the built-in theme which matches the Scheduler component theme.
The items are already activated and you can drag them directly to the main scheduler.
You can change the order of items in the queue using drag and drop.
You can drag items from the scheduler back to the queue (to unschedule them).
You can display additional options using a context menu (a hint icon appears on the right side on hover).
You can see that the Queue component configuration is quite simple:
<script src="js/daypilot/daypilot-all.min.js"></script>

<div id="unscheduled"></div>

<script>
  const unscheduled = new DayPilot.Queue("unscheduled", {
    contextMenu: new DayPilot.Menu({
      items: [
        {
          text: "Edit...",
          onClick: args => {
            workOrderApp.queueTaskEdit(args.source);
          }
        },
        {
          text: "-",
        },
        {
          text: "Delete",
          onClick: args => {
            workOrderApp.queueTaskDelete(args.source.id());
          }
        },
      ]
    }),
    onEventClick: args => {
      workOrderApp.queueTaskEdit(args.e);
    },
    onEventMove: args => {
      workOrderApp.queueTaskMove(args.e, args.position, args.external, args.source);
    },

    // ...

  });
  unscheduled.init();

</script>
Above the queue, there is a button that lets you add a new task. It opens a modal dialog with task details, such as name, duration, and color.
async queueTaskAdd() {

  const durations = [
    {id: 60, name: "1 hour"},
    {id: 90, name: "1.5 hours"},
    {id: 120, name: "2 hours"},
    {id: 150, name: "2.5 hours"},
    {id: 180, name: "3 hours"},
    {id: 210, name: "3.5 hours"},
    {id: 240, name: "4 hours"},
    {id: 270, name: "4.5 hours"},
    {id: 300, name: "5 hours"},
    {id: 330, name: "5.5 hours"},
    {id: 360, name: "6 hours"},
    {id: 390, name: "6.5 hours"},
    {id: 420, name: "7 hours"},
    {id: 450, name: "7.5 hours"},
    {id: 480, name: "8 hours"},
  ];

  const form = [
    {name: 'Description', id: 'text', type: 'text',},
    {type: 'select', id: 'duration', name: 'Duration', options: durations,},
    {
      type: 'select',
      id: 'color',
      name: 'Color',
      options: workOrderApp.colors
    },
  ];

  const data = {
    text: "Task",
    duration: 60
  };

  const modal = await DayPilot.Modal.form(form, data);

  if (modal.canceled) {
    return;
  }

  const params = {
    ...modal.result,
    ...workOrderApp.startEndFromMinutes(modal.result.duration)
  };

  const {data: created} = await DayPilot.Http.post("/api/work_order_unscheduled_create.php", params);

  unscheduled.events.add(created);

},
When you confirm the creation, the queueTaskAdd() method calls the server-side API and creates a new record in the database (work_order_unscheduled_create.php):
<?php
require_once '_db.php';

$json = file_get_contents('php://input');
$params = json_decode($json);

$ordinal = db_get_max_ordinal() + 1;

$stmt = $db->prepare("INSERT INTO events (name, start, end, color, ordinal) VALUES (:name, :start, :end, :color, :ordinal)");
$stmt->bindParam(':name', $params->text);
$stmt->bindParam(':start', $params->start);
$stmt->bindParam(':end', $params->end);
$stmt->bindParam(':color', $params->color);
$stmt->bindParam(':ordinal', $ordinal);
$stmt->execute();

db_compact_ordinals();

class Result {
  public $id;
  public $start;
  public $end;
  public $text;
  public $color;
}

$response = new Result();
$response->start = $params->start;
$response->end = $params->end;
$response->text = $params->text;
$response->color = $params->color;
$response->id = (int) $db->lastInsertId();

header('Content-Type: application/json');
echo json_encode($response);
How to create a modal dialog with work order details?

You can display a modal dialog with custom fields using DayPilot Modal (an open-source library that lets you create dynamic modal dialogs from code). The Modal API is also included in DayPilot Pro.
The following example shows the dialog that opens when you click the work order box in the scheduler. It displays the following fields:
Name
Start
End
Employee
Color
The source data object (the work order in this case) is mapped to the modal dialog fields as specified using form[].id values. Example:
Form with a “Name” field that will display the text property of the data object.
const form = [
  {
    id: 'text',
    name: 'Name',
  }
];
Data object:
const data = {
  text: "Task 1"
};
The DayPilot.Modal.form() method displays the dialog:
const modal = await DayPilot.Modal.form(form, data);The method returns a promise so we can use await to continue when the modal is closed. The result object (modal.result) stores the values entered by the user.
This is the schedulerTaskEdit() method that displays the details of the specified work order:
const workOrderApp = {
  colors: [
    {name: "Default", id: null},
    {name: "Green", id: "#6aa84f"},
    {name: "Blue", id: "#3c78d8"},
    {name: "Red", id: "#cc4125"},
    {name: "Yellow", id: "#f1c232"},
  ],
  async schedulerTaskEdit(e) {
    const {data: resources} = await DayPilot.Http.get("/api/work_order_resources_flat.php");

    const form = [
      {
        id: 'text',
        name: 'Name',
      },
      {
        name: 'Start',
        id: 'start',
        dateFormat: 'd/M/yyyy h:mm tt',
        disabled: true
      },
      {
        id: 'end',
        name: 'End',
        dateFormat: 'd/M/yyyy h:mm tt',
        disabled: true
      },
      {
        type: 'select',
        id: 'resource',
        name: 'Employee',
        options: resources,
        disabled: true
      },
      {
        type: 'select',
        id: 'color',
        name: 'Color',
        options: workOrderApp.colors
      },
    ];

    const modal = await DayPilot.Modal.form(form, e.data);

    if (modal.canceled) {
      return;
    }

    await DayPilot.Http.post("/api/work_order_update.php", modal.result);

    const data = {
      ...e.data,
      text: modal.result.text,
      color: modal.result.color
    };

    scheduler.events.update(data);

  },

  // ...

};
How to use the work order application with MySQL database?
By default, the application uses SQLite database so you can start it right away without any database configuration.
If you want to switch to MySQL, you need to edit the _db.php file and comment out the line with '_db_sqlite.php' and uncomment the line with '_db_mysql.php'.
<?php

// use sqlite
// require_once '_db_sqlite.php';

// use MySQL
require_once '_db_mysql.php';

// ...
Now the application will use the MySQL database specified in _db_mysql.php (edit the variables as needed):
<?php
$host = "127.0.0.1";
$port = 3306;
$username = "username";
$password = "password";
$database = "workorder";
If the database (workorder by default) doesn’t exist, it will be created and initialized with the following MySQL schema:
CREATE TABLE IF NOT EXISTS events (
  id INTEGER PRIMARY KEY AUTO_INCREMENT,
  name TEXT,
  start DATETIME,
  end DATETIME,
  resource_id VARCHAR(30),
  ordinal integer,
  ordinal_priority datetime,
  color varchar(200)
);

CREATE TABLE resource_groups (
  id INTEGER  NOT NULL PRIMARY KEY,
  name VARCHAR(200)  NULL
);

CREATE TABLE resources (
  id INTEGER  PRIMARY KEY AUTO_INCREMENT NOT NULL,
  name VARCHAR(200)  NULL,
  group_id INTEGER  NULL
);
Full Source Code
Here is the full source code of the front end of our PHP work order scheduling application:
<!DOCTYPE html>
<html>
<head>
  <meta charset="utf-8"/>
  <meta name="viewport" content="width=device-width, initial-scale=1">
  <title>PHP Work Order Scheduler (JavaScript/HTML5 and MySQL)</title>

  <link rel="stylesheet" type="text/css" href="main.css"/>

  <!-- DayPilot library -->
  <script src="js/daypilot/daypilot-all.min.js"></script>
</head>
<body>
<div class="header">
  <h1><a href='https://code.daypilot.org/19393/php-work-order-scheduler-javascript-html5-and-mysql'>PHP Work Order Scheduler (JavaScript/HTML5 and MySQL)</a></h1>
  <div><a href="https://javascript.daypilot.org/">DayPilot for JavaScript</a> - HTML5 Calendar/Scheduling Components for JavaScript/Angular/React/Vue</div>
</div>

<div class="main">
  <div class="parent">
    <div class="left">
      <button id="addToQueue">Add task...</button>
      <div id="unscheduled"></div>
    </div>
    <div class="right">
      <div id="scheduler"></div>
    </div>
  </div>
  <div class="generated">Generated using <a href="https://builder.daypilot.org/">DayPilot UI Builder</a>.</div>
</div>

<script>
  const scheduler = new DayPilot.Scheduler("scheduler", {
    cellDuration: 30,
    cellWidth: 60,
    days: DayPilot.Date.today().daysInMonth(),
    dragOutAllowed: true,
    durationBarHeight: 5,
    eventHeight: 45,
    durationBarVisible: false,
    eventBorderRadius: 8,
    rowMarginTop: 2,
    rowMarginBottom: 2,
    rowHeaderColumns: [
      {name: "Name"},
      {name: "Can drive", display: "driving"}
    ],
    scale: "CellDuration",
    showNonBusiness: false,
    startDate: DayPilot.Date.today().firstDayOfMonth(),
    timeHeaders: [{groupBy: "Day"}, {groupBy: "Hour"}],
    timeRangeSelectedHandling: "Enabled",
    treeEnabled: true,
    treePreventParentUsage: true,
    onBeforeEventRender: args => {

      const hours = new DayPilot.Duration(args.data.start, args.data.end).totalHours();

      // styling
      args.data.backColor = args.data.color;
      if (!args.data.backColor) {
        args.data.backColor = "#999999";
      }
      args.data.backColor += "cc";

      args.data.borderColor = "darker";
      args.data.fontColor = "white";

      args.data.html = "";

      // text, context menu icon
      args.data.areas = [
        {
          left: 8,
          top: 7,
          fontColor: "#ffffff",
          text: args.data.text
        },
        {
          left: 8,
          bottom: 7,
          fontColor: "#ffffff",
          text: hours + " hours",
          cssClass: "task-duration"
        },
        {
          top: 12,
          right: 5,
          height: 20,
          width: 20,
          padding: 2,
          fontColor: "#666666",
          backColor: "#ffffffcc",
          symbol: "icons/daypilot.svg#minichevron-down-4",
          visibility: "Visible",
          action: "ContextMenu",
          borderRadius: "50%",
          style: "cursor:pointer;"
        },
      ];
    },
    onBeforeCellRender: args => {
      if (args.cell.isParent) {
        args.cell.properties.backColor = "#eee";
      }
    },
    onTimeRangeSelected: args => {
      workOrderApp.schedulerTaskAdd(args.start, args.end, args.resource);
    },
    onEventClick: args => {
      workOrderApp.schedulerTaskEdit(args.e);
    },
    onEventMove: args => {
      workOrderApp.schedulerTaskMove(args.e.id(), args.newStart, args.newEnd, args.newResource, args.external);
    },
    onEventResize: args => {
      workOrderApp.schedulerTaskMove(args.e.id(), args.newStart, args.newEnd, args.e.resource(), false);
    },
    onEventResizing: args => {
      const duration = new DayPilot.Duration(args.start, args.end);
      if (duration.totalHours() > 8) {
        args.allowed = false;
      }
    },
    onTimeRangeSelecting: args => {
      const duration = new DayPilot.Duration(args.start, args.end);
      if (duration.totalHours() > 8) {
        args.allowed = false;
      }
    },
    contextMenu: new DayPilot.Menu({
      items: [
        {
          text: "Edit...",
          onClick: args => {
            workOrderApp.schedulerTaskEdit(args.source);
          }
        },
        {
          text: "-",
        },
        {
          text: "Unschedule",
          onClick: async args => {
            const ev = args.source;
            const {data: item} = await DayPilot.Http.post("/api/work_order_unschedule.php", {
              id: ev.data.id
            });

            scheduler.events.remove(ev);
            unscheduled.events.add(item);
          }
        },
        {
          text: "-",
        },
        {
          text: "Delete",
          onClick: args => {
            workOrderApp.schedulerClickDelete(args.source.id());
          }
        },
      ],
    })
  });
  scheduler.init();


  const unscheduled = new DayPilot.Queue("unscheduled", {

    eventHeight: 45,
    eventBorderRadius: 8,
    eventBarVisible: false,
    contextMenu: new DayPilot.Menu({
      items: [
        {
          text: "Edit...",
          onClick: args => {
            workOrderApp.queueTaskEdit(args.source);
          }
        },
        {
          text: "-",
        },
        {
          text: "Delete",
          onClick: args => {
            workOrderApp.queueTaskDelete(args.source.id());
          }
        },
      ]
    }),
    onEventClick: args => {
      workOrderApp.queueTaskEdit(args.e);
    },
    onEventMove: args => {
      workOrderApp.queueTaskMove(args.e, args.position, args.external, args.source);
    },
    onBeforeEventRender: args => {
      const duration = new DayPilot.Duration(args.data.start, args.data.end);

      args.data.html = "";

      args.data.backColor = args.data.color;
      if (!args.data.backColor) {
        args.data.backColor = "#999999";
      }
      args.data.backColor += "dd";

      args.data.areas = [
        {
          top: 12,
          right: 5,
          height: 20,
          width: 20,
          padding: 2,
          fontColor: "#666666",
          backColor: "#ffffffcc",
          symbol: "icons/daypilot.svg#minichevron-down-4",
          visibility: "Visible",
          action: "ContextMenu",
          borderRadius: "50%",
          style: "cursor:pointer;"
        },
        {
          top: 0,
          left: 10,
          bottom: 0,
          width: 12,
          fontColor: "#ffffff",
          symbol: "icons/daypilot.svg#move-vertical",
          style: "cursor: move",
          visibility: "Visible",
          toolTip: "Drag task to the scheduler"
        },
        {
          top: 7,
          left: 30,
          text: args.data.text,
          fontColor: "#ffffff",
        },
        {
          bottom: 7,
          left: 30,
          fontColor: "#ffffff",
          text: workOrderApp.formatDuration(duration)
        }
      ];
    }
  });
  unscheduled.init();


  const workOrderApp = {
    elements: {
      addToQueue: document.querySelector("#addToQueue")
    },
    colors: [
      {name: "Default", id: null},
      {name: "Green", id: "#6aa84f"},
      {name: "Blue", id: "#3c78d8"},
      {name: "Red", id: "#cc4125"},
      {name: "Yellow", id: "#f1c232"},
    ],
    async schedulerClickDelete(id) {
      await DayPilot.Http.post("/api/work_order_delete.php", {id});
      scheduler.events.remove(id);
    },
    async schedulerLoad() {
      const start = scheduler.visibleStart();
      const end = scheduler.visibleEnd();
      const promiseResources = DayPilot.Http.get(`/api/work_order_resources.php`);
      const promiseEvents = DayPilot.Http.get(`/api/work_order_list.php?start=${start}&end=${end}`);

      const [{data: resources}, {data: events}] = await Promise.all([promiseResources, promiseEvents]);

      scheduler.update({resources, events});
    },
    async queueLoad() {
      const {data} = await DayPilot.Http.get("/api/work_order_unscheduled_list.php");
      const events = data.map(item => ({...item, duration: DayPilot.Duration.ofMinutes(item.duration)}));
      unscheduled.update({events});
    },
    async queueTaskDelete(id) {
      await DayPilot.Http.post("/api/work_order_delete.php", {id});
      unscheduled.events.remove(id);
    },
    queueTaskForm() {
      const durations = [
        {id: 60, name: "1 hour"},
        {id: 90, name: "1.5 hours"},
        {id: 120, name: "2 hours"},
        {id: 150, name: "2.5 hours"},
        {id: 180, name: "3 hours"},
        {id: 210, name: "3.5 hours"},
        {id: 240, name: "4 hours"},
        {id: 270, name: "4.5 hours"},
        {id: 300, name: "5 hours"},
        {id: 330, name: "5.5 hours"},
        {id: 360, name: "6 hours"},
        {id: 390, name: "6.5 hours"},
        {id: 420, name: "7 hours"},
        {id: 450, name: "7.5 hours"},
        {id: 480, name: "8 hours"},
      ];

      const form = [
        {name: 'Description', id: 'text', type: 'text',},
        {type: 'select', id: 'duration', name: 'Duration', options: durations,},
        {
          type: 'select',
          id: 'color',
          name: 'Color',
          options: workOrderApp.colors
        },
      ];

      return form;
    },

    startEndFromMinutes(minutes) {
      const start = new DayPilot.Date("2000-01-01");
      const end = start.addMinutes(minutes);
      return {start, end};
    },
    async queueTaskAdd() {

      const form = workOrderApp.queueTaskForm();

      const data = {
        text: "Task",
        duration: 60
      };

      const modal = await DayPilot.Modal.form(form, data);

      if (modal.canceled) {
        return;
      }

      const params = {
        ...modal.result,
        ...workOrderApp.startEndFromMinutes(modal.result.duration)
      };

      const {data: created} = await DayPilot.Http.post("/api/work_order_unscheduled_create.php", params);

      unscheduled.events.add(created);

    },
    formatDuration(duration) {
      let result = duration.hours() + "h ";

      if (duration.minutes() > 0) {
        result += duration.minutes() + "m";
      }

      return result;
    },
    async queueTaskEdit(e) {
      const item = e.data;
      const form = workOrderApp.queueTaskForm();

      const data = {
        ...item,
        duration: new DayPilot.Duration(item.start, item.end).totalMinutes()
      };

      const modal = await DayPilot.Modal.form(form, data);

      if (modal.canceled) {
        return;
      }

      const params = {
        ...modal.result,
        ...workOrderApp.startEndFromMinutes(modal.result.duration)
      }

      const {data: updated} = await DayPilot.Http.post("/api/work_order_unscheduled_update.php", params);

      unscheduled.events.update(updated);

    },
    async queueTaskMove(e, position, external, source) {
      const id = e.id();
      const {data: item} = await DayPilot.Http.post("/api/work_order_move.php", {id, position});
      if (external) {
        source.events.remove(e);
      }
    },
    async schedulerTaskAdd(start, end, resource) {
      const modal = await DayPilot.Modal.prompt("Create a new task:", "Task 1");

      scheduler.clearSelection();
      if (!modal.result) {
        return;
      }

      const params = {
        text: modal.result,
        start: start,
        end: end,
        resource: resource
      };

      const {data: result} = await DayPilot.Http.post("/api/work_order_create.php", params);

      scheduler.events.add(result);

    },
    async schedulerTaskEdit(e) {
      const {data: resources} = await DayPilot.Http.get("/api/work_order_resources_flat.php");

      const form = [
        {
          id: 'text',
          name: 'Name',
        },
        {
          name: 'Start',
          id: 'start',
          dateFormat: 'd/M/yyyy h:mm tt',
          disabled: true
        },
        {
          id: 'end',
          name: 'End',
          dateFormat: 'd/M/yyyy h:mm tt',
          disabled: true
        },
        {
          type: 'select',
          id: 'resource',
          name: 'Employee',
          options: resources,
          disabled: true
        },
        {
          type: 'select',
          id: 'color',
          name: 'Color',
          options: workOrderApp.colors
        },
      ];

      const modal = await DayPilot.Modal.form(form, e.data);

      if (modal.canceled) {
        return;
      }

      await DayPilot.Http.post("/api/work_order_update.php", modal.result);

      const data = {
        ...e.data,
        text: modal.result.text,
        color: modal.result.color
      };

      scheduler.events.update(data);

    },
    async schedulerTaskMove(id, start, end, resource, external) {
      const params = {
        id,
        start,
        end,
        resource
      };

      await DayPilot.Http.post("/api/work_order_move.php", params);

      if (external) {
        unscheduled.events.remove(id);
      }
    },
    init() {
      workOrderApp.elements.addToQueue.addEventListener("click", () => {
        workOrderApp.queueTaskAdd();
      });

      workOrderApp.queueLoad();
      workOrderApp.schedulerLoad();
    }
  };


  workOrderApp.init();


</script>

</body>
</html>
History
September 30, 2024: PHP 8 compatibility, MySQL 8 compatibility, DayPilot Pro for JavaScript 2024.3, styling updates.
January 10, 2022: DayPilot Pro for JavaScript 2022.1, styling updates.
June 22, 2021: Initial version.