Features
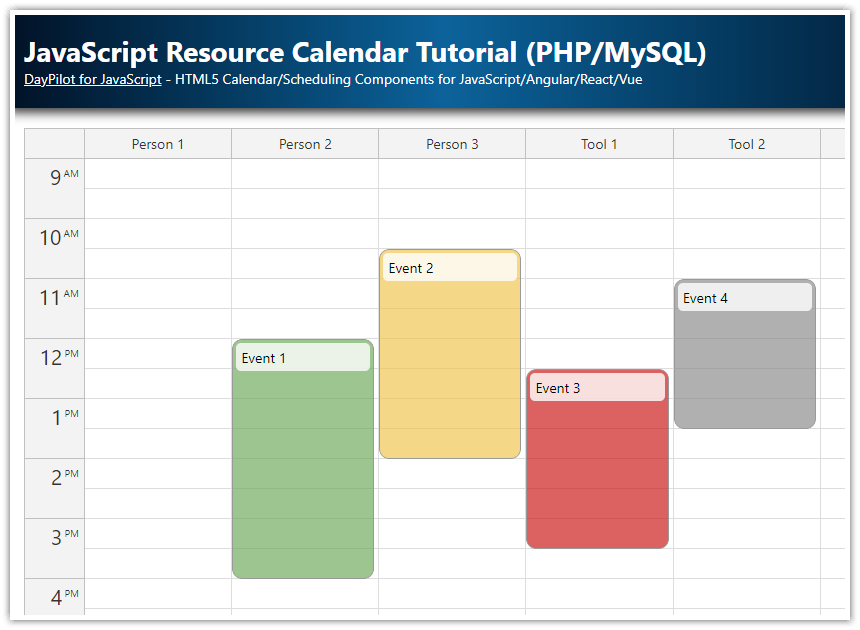
JavaScript resource calendar web application that displays calendar for multiple resources side by side (as columns).
The calendar/scheduler component provides built-in drag and drop support for creating, moving and resizing events.
You can load resources (columns) and events using a REST API.
The REST backend is implemented in PHP/MySQL.
Includes DayPilot Lite for JavaScript (open-source calendar/scheduler UI library).
This Resource Calendar tutorial is also available for popular frameworks:
Resource Calendar: Basic Configuration

The basic resource calendar configuration is easy - just create and instance of the JavaScript calendar component and set the viewType config property to "Resources".
You can define the resource calendar columns using the columns config property.
JavaScript (index.html)
<script src="js/daypilot/daypilot-all.min.js"></script>

<div id="dp"></div>

<script>
  const dp = new DayPilot.Calendar("dp", {
    viewType: "Resources",
    columns: [
      {id: 1, name: "Person 1"},
      {id: 2, name: "Person 2"},
      {id: 3, name: "Person 3"}
    ]
  });
  dp.init();
</script>
This code snippet initializes the calendar and binds it to the placeholder <div> specified using id attribute ("dp").
It changes the viewType to "Resources". This mode will display the specified resources as columns.
The columns are specified using columns.list property of the DayPilot.Calendar object or using the columns property of the options constructor parameter. This is a simple array of column objects, each with id and name property. This configuration uses the current date for the columns. You can also specify a custom date for each of the columns using date property:
const columns = [
  {id: 1, name: "Person 1", date: "2026-05-01"},
  {id: 2, name: "Person 2", date: "2026-05-01"},
  {id: 3, name: "Person 3", date: "2026-05-01"}
];

dp.update({columns});
If the date property is not specified, the value of startDate property will be used.
Loading Columns from MySQL Database

The static definition of columns only works for very simple scenarios. In most cases, you will want to load the resource calendar columns from a database. The calendar component offers a convenience method that loads the columns using an HTTP call from a remote REST API:
dp.columns.load("backend_resources.php");It loads the columns using a GET HTTP request and automatically updates the resource calendar as soon as the response is received. The specified URL must return a JSON array with the structure exactly matching the columns array structure described in the previous steps.
Here is a sample PHP source code that loads the columns from MySQL database and returns the JSON string in the required format.
PHP (backend_resources.php)
<?php
require_once '_db.php';

$scheduler_resources = $db->query('SELECT * FROM resources ORDER BY name');

class Resource {}

$resources = array();

foreach($scheduler_resources as $resource) {
  $r = new Resource();
  $r->id = $resource['id'];
  $r->name = $resource['name'];
  $resources[] = $r;
}

header('Content-Type: application/json');
echo json_encode($resources);
The JSON response looks like this:
[
  {"id":"1","name":"Person 1"},
  {"id":"2","name":"Person 2"},
  {"id":"3","name":"Person 3"},
  {"id":"4","name":"Tool 1"},
  {"id":"5","name":"Tool 2"},
  {"id":"6","name":"Tool 3"}
]
Loading Event Data from MySQL Database

Now when we have initialized the resource calendar and loaded the columns from the server we can load the calendar event data.
There is also a convenience method for this and the logic is very similar:
dp.events.load("backend_events.php");This call invokes a GET HTTP request to the specified URL. Note that the URL will be automatically extended with start and end query string parameters. The parameters are set according to the current view and you can use them on the server side to limit the SQL SELECT only to the date range that is currently visible in the calendar.
PHP (backend_events.php)
<?php
require_once '_db.php';

$stmt = $db->prepare('SELECT * FROM events WHERE NOT ((end <= :start) OR (start >= :end))');
$stmt->bindParam(':start', $_GET['start']);
$stmt->bindParam(':end', $_GET['end']);
$stmt->execute();
$result = $stmt->fetchAll();

class Event {}
$events = array();

foreach($result as $row) {
  $e = new Event();
  $e->id = $row['id'];
  $e->text = $row['name'];
  $e->start = $row['start'];
  $e->end = $row['end'];
  $e->color = $row['color'];
  $e->resource = $row['resource_id'];
  $events[] = $e;
}

header('Content-Type: application/json');
echo json_encode($events);
Resource Calendar: Drag and Drop Event Moving

Adding drag and drop functionality is even easier. Common drag and drop operations (including event moving and resizing) are enabled by default.
The only thing we need to add is a custom event handler (onEventMoved in case of event moving) that will notify the server about the operation. We will use it to call a REST endpoint that will save the change in our MySQL database.
JavaScript
<script>
  const dp = new DayPilot.Calendar("dp", {
    onEventMoved: async (args) => {
      const params = {
        id: args.e.id(),
        start: args.newStart,
        end: args.newEnd,
        resource: args.newResource
      };
      await DayPilot.Http.post("backend_move.php", params);
    },

    // ...

  });
</script>
PHP
<?php
require_once '_db.php';

$json = file_get_contents('php://input');
$params = json_decode($json);

$stmt = $db->prepare("UPDATE events SET start = :start, end = :end, resource_id = :resource WHERE id = :id");
$stmt->bindParam(':start', $params->start);
$stmt->bindParam(':end', $params->end);
$stmt->bindParam(':id', $params->id);
$stmt->bindParam(':resource', $params->resource);
$stmt->execute();

class Result {}
$response = new Result();
$response->result = 'OK';
$response->message = 'Update successful';

header('Content-Type: application/json');
echo json_encode($response);
Event Creation using Drag and Drop
You can add new events to the resource calendar using drag and drop. This feature is enabled by default (timeRangeSelectedHandling is set to "Enabled"). All you need to do is to add onTimeRangeSelected event handler.
Our event handler opens a modal dialog and asks for event text. When a user confirms the event text, we call "backend_event.php" script to create a new record in the database. The final step is to add the new event to the resource calendar using events.add() method:
<script>
  const dp = new DayPilot.Calendar("dp", {
    onTimeRangeSelected: async (args) => {
      const modal = await DayPilot.Modal.prompt("Create a new event:", "Event 1");
      dp.clearSelection();
      if (modal.canceled) {
        return;
      }

      const params = {
        start: args.start,
        end: args.end,
        text: modal.result,
        resource: args.resource
      };

      const {data} = await DayPilot.Http.post("backend_create.php", params);
      params.id = data.id;
      dp.events.add(params);
    },

    // ...

  });
</script>
Database Backend (SQLite and MySQL)
By default, the sample project uses SQLite database that is initialized automatically (daypilot.sqlite file is created automatically in the PHP project root - just make sure that the application has write permissions for the project folder). The SQLite database requires no configuration and is good for the initial testing.
In order to switch the backend storage to MySQL you need to edit _db.php file which looks like this:
<?php

// use sqlite
require_once '_db_sqlite.php';

// use MySQL
//require_once '_db_mysql.php';
In order to switch to MySQL you need to comment out the _db_sqlite.php include and enable _db_mysql.php.
Don't forget to update the MySQL connection details at the top of _db_mysql.php:
<?php
$host = "127.0.0.1";
$port = 3306;
$username = "username";
$password = "password";
$database = "resource-calendar";

// ...
The database will be created and initialized automatically if it doesn't exist. Just make sure that the specified user has the permission to create a new database.
MySQL Database Schema
CREATE TABLE IF NOT EXISTS `events` (
  `id` int(11) NOT NULL AUTO_INCREMENT,
  `name` text,
  `start` datetime DEFAULT NULL,
  `end` datetime DEFAULT NULL,
  `color` varchar(30),
  `resource_id` int(11) DEFAULT NULL,
  PRIMARY KEY (`id`)
);

CREATE TABLE IF NOT EXISTS `resources` (
  `id` int(11) NOT NULL AUTO_INCREMENT,
  `name` varchar(200) DEFAULT NULL,
  PRIMARY KEY (`id`)
);
Installation and Requirements
The project has been tested with PHP 8.3.
It uses PDO to access the database.
It requires
pdo_sqliteandpdo_mysqlextensions to be installed.
History
September 15, 2025: Upgraded to DayPilot Lite for JavaScript 2025.3.710. Event styling updated.
February 7, 2024: Upgraded to PHP 8. Upgraded to DayPilot Lite for JavaScript 2024.1.519.
May 25, 2022: Switched to DayPilot Lite for JavaScript 2022.2.382 (open-source). Using ES6 + async/await syntax.
November 21, 2020: Upgraded to DayPilot Pro for JavaScript 2020.4.4766
April 19, 2018: Initial release
 DayPilot