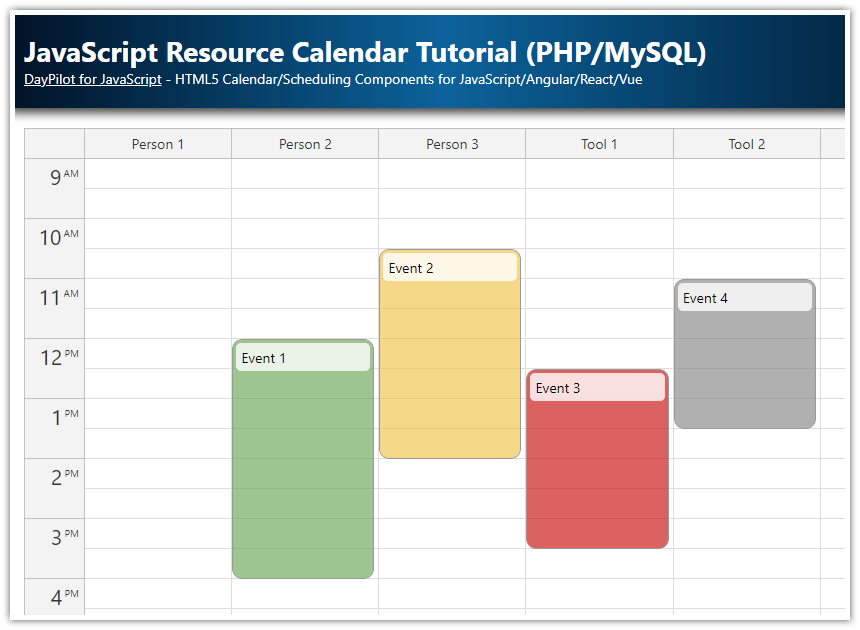
This tutorial shows how to build a HTML5 scheduler application. It displays multiple resources (grouped by category), with support for drag and drop operations (moving, resizing).
It uses the JavaScript/HTML5 Scheduler component from DayPilot Pro for JavaScript library.
Features
HTML5 scheduler showing a timeline for one month.
PHP backend with MySQL/SQLite database (PHP 8+) handles the database access using a HTTP/JSON API.
Resources (displayed as rows) are grouped by category (e.g., People, Tools).
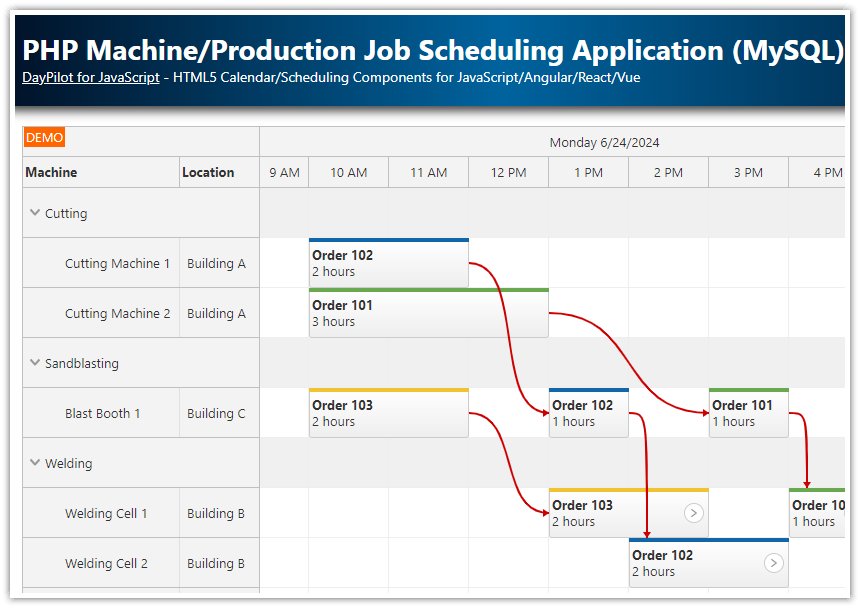
You can easily set the Scheduler scale and time header units.
Scheduler events can be created, moved and reszied using drag and drop.
Context menu provides access to additional operations (“Edit”, “Delete”).
Add icons and other visual elements to the events.
License
Licensed for testing and evaluation purposes. Please see the license agreement included in the sample project. You can use the source code of the tutorial if you are a licensed user of DayPilot Pro for JavaScript.
HTML5 Scheduler Initialization

To add the HTML5 Scheduler component to your application, the following steps are necessary:
1. Include the DayPilot library:
<script src="js/daypilot/daypilot-all.min.js" type="text/javascript"></script>2. Add a placeholder div to the HTML5 page:
<div id="scheduler"></div>
3. Add the initialization JavaScript code:
<script>
  const scheduler = new DayPilot.Scheduler("dp");
  scheduler.init();
</script>
Loading HTML5 Scheduler Resources

We will load the scheduler resources using a simple loadResources() method.
JavaScript
const app = {
  loadResources() {
    scheduler.rows.load("backend_resources.php");
  }
};
It uses the rows.load() method to request the resource data from the server-side backend_resources.php page.
We are loading the resources after the scheduler initialization (after the Scheduler init() method is called).
JavaScript
<script>

  const scheduler = new DayPilot.Scheduler("scheduler");
  scheduler.init();


  const app = {
    loadResources() {
      scheduler.rows.load("backend_resources.php");
    },
    init() {
      app.loadResources();
    }
  };

  app.init();


</script>
Sample JSON data (received from backend_resources.php). The data structure needs to follow the format described in the resources property documentation.
[
  {"id":"1","name":"Person 1"},
  {"id":"2","name":"Person 2"},
  {"id":"3","name":"Person 3"},
  {"id":"4","name":"Person 4"},
  {"id":"5","name":"Tool 1"},
  {"id":"6","name":"Tool 2"},
  {"id":"7","name":"Tool 3"},
  {"id":"8","name":"Tool 4"}
]
Scheduler Resource Tree

By default, the HTML5 Scheduler displays a flat list of resources as rows. It can also display the resources organized in a tree hierarchy with unlimited depth. You can enable the resource tree using the treeEnabled property.
JavaScript
<script>
  const scheduler = new DayPilot.Scheduler("scheduler", {
    treeEnabled: true
  });
  scheduler.init();

  // ...

</script>
It is necessary to modify the resources array to include the resource parents and children.
Sample JSON data:
[
  {"id":"group_1","name":"People","expanded":true,"children":
    [
      {"id":"1","name":"Person 1"},
      {"id":"2","name":"Person 2"},
      {"id":"3","name":"Person 3"},
      {"id":"4","name":"Person 4"}
    ]
  },
  {"id":"group_2","name":"Tools","expanded":true,"children":
    [
      {"id":"5","name":"Tool 1"},
      {"id":"6","name":"Tool 2"},
      {"id":"7","name":"Tool 3"},
      {"id":"8","name":"Tool 4"}
    ]
  }
]
The PHP backend script (backend_resources.php) loads the groups and resources from the MySQL database:
<?php
require_once '_db.php';

$scheduler_groups = $db->query('SELECT * FROM groups ORDER BY name');

class Group {
  public $id = "";
  public $name = "";
  public $expanded = false;
  public $children = array();
}
class Resource {
  public $id = "";
  public $name = "";
}

$groups = array();

foreach($scheduler_groups as $group) {
  $g = new Group();
  $g->id = "group_".$group['id'];
  $g->name = $group['name'];
  $g->expanded = true;
  $g->children = array();
  $groups[] = $g;

  $stmt = $db->prepare('SELECT * FROM resources WHERE group_id = :group ORDER BY name');
  $stmt->bindParam(':group', $group['id']);
  $stmt->execute();
  $scheduler_resources = $stmt->fetchAll();

  foreach($scheduler_resources as $resource) {
    $r = new Resource();
    $r->id = $resource['id'];
    $r->name = $resource['name'];
    $g->children[] = $r;
  }
}

header('Content-Type: application/json');
echo json_encode($groups);
Scheduler Scale (Grid Cell Duration)

The default Scheduler scale is set to display 1 day, divided to 24 one-hour cells. We will set the scale (cell duration) to 1 day and display the current month.
JavaScript:
const scheduler = new DayPilot.Scheduler("scheduler", {
  // cell duration
  scale: "Day",

  // display the current month
  startDate: DayPilot.Date.today().firstDayOfMonth(),
  days: dp.startDate.daysInMonth(),

});
The Scheduler also supports additional scale values:
"CellDuration"(custom number of minutes set using cellDuration property)"Manual"(manually created timeline)"Minute""Hour""Day""Week""Month""Quarter""Year"
Scheduler Time Headers

We will customize the time headers using timeHeaders array.
The first scheduler header row will display months (formatted as "July 2024")
The second scheduler header row will display days (formatted as "28")
JavaScript:
const scheduler = new DayPilot.Scheduler("scheduler", {
  timeHeaders: [
    { groupBy: "Month", format: "MMMM yyyy" },
    { groupBy: "Day", format: "d"}
  ],

  // ...
});
Horizontal Scrollbar (Automatic Width)

The Scheduler displays time uses a fixed cells width (40 pixels) in the default configuration.
In our application, we want to get rid of the horizontal scrollbar. We will use cellWidthSpec property to adjust the cell width automatically to match the total componnet width (100% of the HTML5 page).
const scheduler = new DayPilot.Scheduler("scheduler", {
  cellWidthSpec: "Auto",
  // ...
});
The cell width is adjusted automatically on window resize or DOM changes.

Loading Events

We will load the scheduler event data using the events.load() method in loadEvents().
const app = {

  // ...

  loadEvents() {
    scheduler.events.load("backend_events.php");
  }

};
The events.load() method calls the specified URL with start and end query string parameters holding the start and end of the current Scheduler grid view.
Sample JSON data:
[{
  "id": "12",
  "text": "Reservation",
  "start": "2024-07-03T00:00:00",
  "end": "2024-07-10T00:00:00",
  "resource": "5"
}, {
  "id": "13",
  "text": "Meeting",
  "start": "2024-07-06T00:00:00",
  "end": "2024-07-10T00:00:00",
  "resource": "2"
}]
PHP (backend_events.php)
<?php
require_once '_db.php';

$stmt = $db->prepare('SELECT * FROM events WHERE NOT ((end <= :start) OR (start >= :end))');
$stmt->bindParam(':start', $_GET['start']);
$stmt->bindParam(':end', $_GET['end']);
$stmt->execute();
$result = $stmt->fetchAll();

class Event {
  public $id = 0;
  public $text = "";
  public $start = "";
  public $end = "";
  public $resource = 0;
  public $bubbleHtml = "";
}

$events = array();

foreach($result as $row) {
  $e = new Event();
  $e->id = $row['id'];
  $e->text = $row['name'];
  $e->start = $row['start'];
  $e->end = $row['end'];
  $e->resource = $row['resource_id'];
  $e->bubbleHtml = "Event details: <br/>".$e->text;
  $events[] = $e;
}

header('Content-Type: application/json');
echo json_encode($events);
Displaying Event Details on Hover

It is possible to display a callout with custom HTML data on hover using DayPilot.Bubble. The bubble property is initialized with a standard DayPilot.Bubble instance by default:
const scheduler = new DayPilot.Scheduler("scheduler", {
  bubble: new DayPilot.Bubble(),
  // ...
});
The easiest way to specify the bubble HTML is to add it to the event data using the bubbleHtml property in backend_events.php:
[{
  "id": "12",
  "text": "Reservation",
  "start": "2024-07-03T00:00:00",
  "end": "2024-07-10T00:00:00",
  "resource": "5",
  "bubbleHtml": "Event details: <br\/>Reservation"
}, {
  "id": "13",
  "text": "Meeting",
  "start": "2024-07-06T00:00:00",
  "end": "2024-07-10T00:00:00",
  "resource": "2",
  "bubbleHtml": "Event details: <br\/>Meeting"
}]
You can also add it on the client side using onBeforeEventRender event handler.
Drag and Drop Event Moving

Drag and drop moving of events is enabled by default in the Scheduler.
We will use onEventMoved handler to notify the server backend about the change:
const scheduler = new DayPilot.Scheduler("scheduler", {

  onEventMoved: async args => {
    await DayPilot.Http.post("backend_move.php", {
      id: args.e.id(),
      newStart: args.newStart.toString(),
      newEnd: args.newEnd.toString(),
      newResource: args.newResource
    });
    scheduler.message("Moved.");
  },

  // ...

});
PHP (backend_move.php)
<?php
require_once '_db.php';

$json = file_get_contents('php://input');
$params = json_decode($json);

$stmt = $db->prepare("UPDATE events SET start = :start, end = :end, resource_id = :resource WHERE id = :id");
$stmt->bindParam(':id', $params->id);
$stmt->bindParam(':start', $params->newStart);
$stmt->bindParam(':end', $params->newEnd);
$stmt->bindParam(':resource', $params->newResource);
$stmt->execute();

class Result {
  public $result = '';
  public $message = '';
}

$response = new Result();
$response->result = 'OK';
$response->message = 'Update successful';

header('Content-Type: application/json');
echo json_encode($response);
Drag and Drop Event Resizing

The event resizing uses an event-handling mechanism similar to event moving.
The onEventResized event is called as soon as the event position is updated. We will use it to update the database using an AJAX call.
const scheduler = new DayPilot.Scheduler("scheduler", {

  onEventResized: async args => {
    await DayPilot.Http.post("backend_resize.php", {
      id: args.e.id(),
      newStart: args.newStart.toString(),
      newEnd: args.newEnd.toString()
    });
    scheduler.message("Resized.");
  },

  // ...

});
PHP (backend_resize.php)
<?php
require_once '_db.php';

$json = file_get_contents('php://input');
$params = json_decode($json);

$stmt = $db->prepare("UPDATE events SET start = :start, end = :end WHERE id = :id");
$stmt->bindParam(':id', $params->id);
$stmt->bindParam(':start', $params->newStart);
$stmt->bindParam(':end', $params->newEnd);
$stmt->execute();

class Result {
  public $result = '';
  public $message = '';
}

$response = new Result();
$response->result = 'OK';
$response->message = 'Update successful';

header('Content-Type: application/json');
echo json_encode($response);
Drag and Drop Event Creating

We will handle drag and drop time range selection to invoke a new event modal dialog and create the event.
There is no default action associated with a time range selecting event so we will need to define the logic in the onTimeRangeSelected event handler.
JavaScript
const scheduler = new DayPilot.Scheduler("scheduler", {

  onTimeRangeSelected: async args => {

    const form = [
      {name: "Text", id: "text"},
      {name: "Start", id: "start", dateFormat: "M/d/yyyy", timeFormat: "h:mm tt", type: "datetime"},
      {name: "End", id: "end", dateFormat: "M/d/yyyy", timeFormat: "h:mm tt", type: "datetime"},
      {name: "Resource", id: "resource", options: app.flatten(scheduler.resources)}
    ];

    const data = {
      start: args.start,
      end: args.end,
      resource: args.resource,
      text: "New event"
    };

    const modal = await DayPilot.Modal.form(form, data);
    scheduler.clearSelection();
    if (modal.canceled) {
      return;
    }

    const response = await DayPilot.Http.post("backend_create.php", modal.result);
    modal.result.id = response.data.id;
    scheduler.events.add(modal.result);
    scheduler.message("Created.");
  },

  // ...

});
Our onTimeRangeSelected event handler opens a dynamically-created modal dialog using DayPilot.Modal.form() and creates the new event in a database by calling backend_create.php endpoint.
For more information on using DayPilot.Modal.form() to create dynamic modal dialogs please see JavaScript Scheduler: How to Edit Multiple Fields using a Modal Dialog.

The server-side handler creates the event in the database and returns a custom message:

PHP (backend_create.php)
<?php
require_once '_db.php';

$json = file_get_contents('php://input');
$params = json_decode($json);

$stmt = $db->prepare("INSERT INTO events (name, start, end, resource_id) VALUES (:name, :start, :end, :resource)");
$stmt->bindParam(':start', $params->start);
$stmt->bindParam(':end', $params->end);
$stmt->bindParam(':name', $params->text);
$stmt->bindParam(':resource', $params->resource);
$stmt->execute();

class Result {
  public $result = '';
  public $message = '';
  public $id = 0;
}

$response = new Result();
$response->result = 'OK';
$response->message = 'Created with id: '.$db->lastInsertId();
$response->id = $db->lastInsertId();

header('Content-Type: application/json');
echo json_encode($response);
Event Editing using a Modal Dialog

You can invoke a modal dialog for editing event details using DayPilot.Modal.form(). The modal dialog provides a quick way to create an edit form programmatically. You can customize it further or replace it with a custom dialog solution that you already use in your application.
We will map the event click to opening the modal dialog with event details using the onClickEvent handler:
const scheduler = new DayPilot.Scheduler("scheduler", {

  onEventClick: args => {
    app.editEvent(args.e);
  },

  // ...

});


const app = {
  async editEvent(e) {
    const form = [
      {name: "Text", id: "text"},
      {name: "Start", id: "start", dateFormat: "M/d/yyyy", timeFormat: "h:mm tt", type: "datetime"},
      {name: "End", id: "end", dateFormat: "M/d/yyyy", timeFormat: "h:mm tt", type: "datetime"},
      {name: "Resource", id: "resource", options: app.flatten(scheduler.resources)}
    ];

    const data = e.data;

    const options = {
      focus: "text"
    };

    const modal = await DayPilot.Modal.form(form, data, options);
    scheduler.clearSelection();
    if (modal.canceled) {
      return;
    }

    const response = await DayPilot.Http.post("backend_update.php", modal.result);
    scheduler.events.update(modal.result);
    scheduler.message("Updated.");
  },

  // ...
};
The modal dialog will submit the data using an HTTP call to backend_update.php.
<?php
require_once '_db.php';

$json = file_get_contents('php://input');
$params = json_decode($json);

$stmt = $db->prepare("UPDATE events SET name = :name, start = :start, end = :end, resource_id = :resource WHERE id = :id");
$stmt->bindParam(':id', $params->id);
$stmt->bindParam(':name', $params->text);
$stmt->bindParam(':start', $params->start);
$stmt->bindParam(':end', $params->end);
$stmt->bindParam(':resource', $params->resource);
$stmt->execute();

class Result {
  public $result = '';
  public $message = '';
}

$response = new Result();
$response->result = 'OK';
$response->message = 'Update successful';

header('Content-Type: application/json');
echo json_encode($response);
Scheduler Event Context Menu

In this step, we will add a context menu with additional options (“Edit…”, “Delete”) to Scheduler events.
First, we need to define the context menu:
const scheduler = new DayPilot.Scheduler("scheduler", {
  contextMenu: new DayPilot.Menu({
    items: [
      {text: "Delete", onClick: args => app.deleteEvent(args.source)},
      {text: "Edit...", onClick: args => app.editEvent(args.source)},
    ]
  }),

  // ...

});
The context menu will open when the user right-clicks an event.
We will also use the onBeforeEventRender event to customize the events and add an icon using an active area. This icon will provide a hint that the context menu is available.
const scheduler = new DayPilot.Scheduler("scheduler", {

  // ...

  onBeforeEventRender: (args) => {

    args.data.areas = [
      {
        right: 5,
        top: 7,
        width: 25,
        height: 25,
        backColor: "#ffffff",
        padding: 4,
        symbol: "/icons/daypilot.svg#threedots-v",
        style: "border-radius: 50%;",
        action: "ContextMenu",
      }
    ];

  },

  // ...

});
The “Delete” menu item uses the app.deleteEvent() function to delete the event from the database and update the Scheduler view:
const app = {

  async deleteEvent(e) {
    await DayPilot.Http.post("backend_delete.php", {
      id: e.id()
    });
    scheduler.events.remove(e)
    scheduler.message("Deleted.");
  },

  // ...

};
See also event deleting.
MySQL Database Schema
By default, the PHP project uses SQLite database. The database file (daypilot.sqlite) will be created automatically, but PHP will need write permissions for the project folder. Do not use the SQLite backend in production.
To switch to MySQL database, edit _db.php file to look like this:
<?php

// use sqlite
require_once '_db_sqlite.php';

// use MySQL
//require_once '_db_mysql.php';
This is the DDL of the database schema used in this HTML5 Scheduler project. If you create the database (html5-scheduler) and set the MySQL connection string properties correctly (in _db_mysql.php), the schema will be created automatically.
CREATE TABLE IF NOT EXISTS `events` (
  `id` int(11) NOT NULL AUTO_INCREMENT,
  `name` text,
  `start` datetime DEFAULT NULL,
  `end` datetime DEFAULT NULL,
  `resource_id` int(11) DEFAULT NULL,
  PRIMARY KEY (`id`)
);

CREATE TABLE IF NOT EXISTS `groups` (
  `id` int(11) NOT NULL,
  `name` varchar(200) DEFAULT NULL,
  PRIMARY KEY (`id`)
);

CREATE TABLE IF NOT EXISTS `resources` (
  `id` int(11) NOT NULL AUTO_INCREMENT,
  `name` varchar(200) DEFAULT NULL,
  `group_id` int(11) DEFAULT NULL,
  PRIMARY KEY (`id`)
);
History
November 22, 2024: MySQL backend fixed.
June 22, 2024: Upgraded to PHP 8+, DayPilot Pro 2024.2.5957, ES6+ syntax. Improved styling. Context menu + icon added.
May 13, 2021: DayPilot Pro 2021.2.4972.
November 5, 2020: DayPilot Pro 2020.4.4736.
July 12, 2020: Modal dialogs switched to DayPilot.Modal.form(), jQuery dependency removed, MySQL support added, latest DayPilot Pro version (2020.3.4579).
June 27, 2017: Deleting code updated, DB init fixed, latest DayPilot Pro version (8.4.2911).
February 28, 2014: Initial release.