Overview
Learn how to load, create and customize links connecting tasks displayed in the React Scheduler component.
Links are a flexible way of displaying task dependencies, highlighting distance between events, showing the follow up actions, and connecting related tasks.
See how to set custom color, text, and style of links.
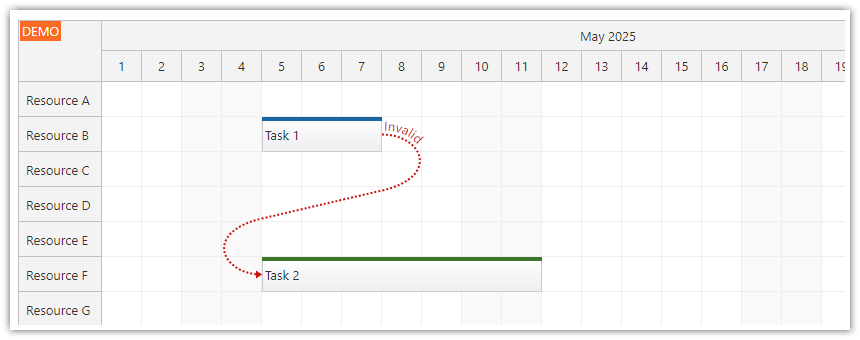
Set link properties conditionally, depending on the connect tasks, and highlight potential schedule issues.
Use drag and drop to create new links, context menu to edit or delete existing links.
Display additional links details on hover using a dynamic tooltip.
The React project includes a trial version of DayPilot Pro for JavaScript (see License below).
License
Licensed for testing and evaluation purposes. Please see the license agreement included in the sample project. You can use the source code of the tutorial if you are a licensed user of DayPilot Pro for JavaScript. Buy a license.
Link Use Cases
Links are powerful visual elements that let you visualize relations between tasks in the React Scheduler UI. Let’s take a look at how they can be used in planning and scheduling applications.
Show Dependencies between Tasks
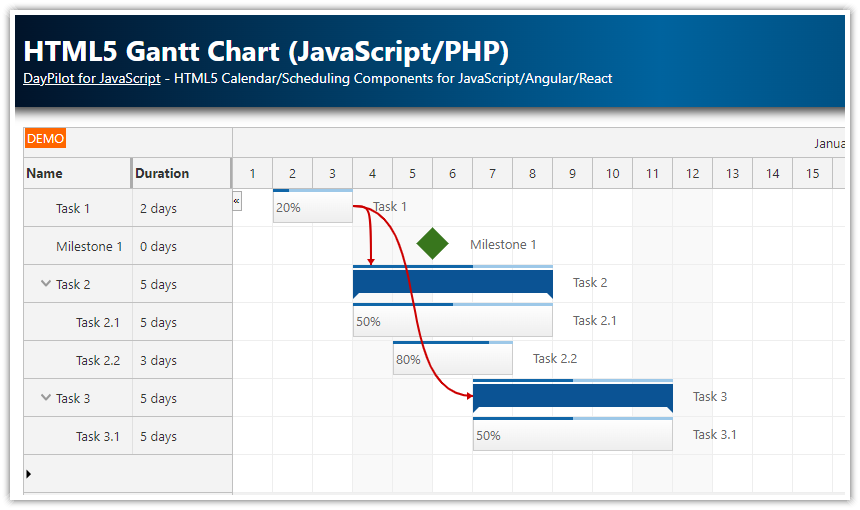
The link indicates that the first task must be completed before the second task can be started (like in the React Gantt Chart Tutorial).
Visualize Sequence of Operation
The link points to the next step in a sequence of tasks (like in the ASP.NET Core Machine Scheduling tutorial).
Connect Multiple representations of the same task
You can link the boxes representing assignments of the same task to multiple resources (like in the React Shift Scheduling tutorial).
Show Time between Tasks using Links
The links can display text above the line. You can use it to display additional description of the action or time between the connected tasks. You can find more in the ASP.NET Core Field Service Scheduling: Tasks, Routes, and Travel Time tutorial.
How to Show Links between Tasks in React Scheduler

In the React Scheduler component, you can load links using the links attribute. The value needs to be an array of link data objects. The data object must specify the source and target tasks using from and to properties.
There are couple of optional properties that you can define for links:
id- In some cases, it’s not necessary (e.g., if the links are generated dynamically to connect related events). If you store the links in the database or if you need to update them individually, it is necessary to specify the ID.type- The default link type is"FinishToStart". If you want to create a link that connects other endpoints than the end of the first task with the start of the second task, specify the corresponding link type.color- Set a custom link color.text- The Finish to Start links can display a custom text above the link line.
In this React example, we load the link data in a useEffect() block using a special links state variable.
import React, { useEffect, useState } from 'react';
import { DayPilot, DayPilotScheduler } from "daypilot-pro-react";

const Scheduler = () => {
  const [tasks, setTasks] = useState([]);
  const [resources, setResources] = useState([]);
  const [links, setLinks] = useState([]);

  useEffect(() => {

    const taskData = [
      {
        id: 1,
        text: "Event 1",
        start: "2025-05-02T00:00:00",
        end: "2025-05-05T00:00:00",
        resource: "A"
      },
      // ...
    ];
    setTasks(taskData);

    const linkData = [
      {id: 1, from: 1, to: 2},
      {id: 2, from: 1, to: 3},
      {id: 3, from: 3, to: 4}
    ];
    setLinks(linkData);

    const resourceData = [
      {name: "Resource A", id: "A"},
      {name: "Resource B", id: "B"},
      {name: "Resource C", id: "C"},
      {name: "Resource D", id: "D"},
      {name: "Resource E", id: "E"},
      {name: "Resource F", id: "F"},
      {name: "Resource G", id: "G"}
    ];
    setResources(resourceData);

  }, []);

  return (
    <div>
      <DayPilotScheduler
        events={tasks}
        resources={resources}
        links={links}
        ...
      />
    </div>
  );
}
export default Scheduler;
How to Set Links Properties Dynamically (Color, Text, CSS Class)

There is a special event handler called onBeforeLinkRender that allows you to set link properties dynamically, depending on custom field values or the connected events.
The following onBeforeLinkRender handler checks FinishToStart links and compares the end date of the source task with the start date of the target task. If the subsequent task begins too early, it changes the link style to "dotted" and adds the text "Invalid":
const onBeforeLinkRender = (args) => {
  const source = args.from;
  const target = args.to;
  const type = args.data.type || "FinishToStart";

  if (type === "FinishToStart" && source.end() > target.start()) {
    args.data.style = "dotted";
    args.data.text = "Invalid";
  }
};
This event handler is attached to the Scheduler using the onBeforeLinkRender attribute:
<DayPilotScheduler
  onBeforeLinkRender={onBeforeLinkRender}
/>
How to Create Links using Drag and Drop

To enable creation of links using drag and drop in the React Scheduler component, it is necessary to enable this option using the linkCreateHandling prop. In most cases, you will also want to define the onLinkCreate handler and use it to save the new link in the database using an HTTP call to the server.
Our onLinkCreate handler checks the link type, and open a modal dialog for entering link description if the link type is “FinishToStart”.
You can also see that the event handler cancels the default action (which is to display the link) using args.preventDefault(), creates a temporary link in gray color to highlight its future position, and asks for the text.
If you cancel the modal dialog, the link will not be created.
import React, { useEffect, useState } from 'react';
import { DayPilot, DayPilotScheduler } from "daypilot-pro-react";

const Scheduler = () => {

  // ...

  const onLinkCreate = async (args) => {

    if (args.type === "FinishToStart") {
      args.preventDefault();

      const tempLink = {
        from: args.from,
        to: args.to,
        id: DayPilot.guid(),
        type: args.type,
        color: "#cccccc"
      };
      scheduler.links.add(tempLink);

      const modal = await DayPilot.Modal.prompt("Link description:", "Link 1");

      scheduler.links.remove(tempLink);

      if (modal.canceled) {
        return;
      }

      scheduler.links.add({
        from: args.from,
        to: args.to,
        id: DayPilot.guid(),
        type: args.type,
        text: modal.result
      });
    }
  };

  // ...

  return (
    <div>
      <DayPilotScheduler
        ...
        linkCreateHandling={"Update"}
        onLinkCreate={onLinkCreate}
        ...
      />
    </div>
  );
}
export default Scheduler;
How to Create Context Menu for Deleting and Editing Task Links

To provide additional actions related to an existing link, we add a context menu using the contextMenuLink property.
The context menu defines two item:
Delete
Properties…
The “Delete” item removes the link from the Scheduler UI.
The “Properties…” icons opens a modal dialog that lets you edit link properties, such as type, color, and text.
const contextMenuLink = new DayPilot.Menu({
  items: [
    { text: "Delete", onClick: args => scheduler.links.remove(args.source) },
    { text: "-" },
    { text: "Properties...", onClick: args => editLink(args.source) }
  ]
});
JSX:
<DayPilotScheduler
  ...
  contextMenuLink={contextMenuLink}
  ...
/>
How to Show Bubble with Links Details on Hover

The React Scheduler component allows displaying custom tooltip when hovering the the link with a mouse cursor.
The tooltip can be defined using the linkBubble prop. The value is a DayPilot.Bubble object that specifies the tooltip appearance and behavior.
Since there is no default text that the tooltip would display, we use the onLoad event to define the content dynamically as HTML. Our onLoad handler loads details of the tasks connected by the link and shows the source and target task names.
const linkBubble = new DayPilot.Bubble({
  onLoad: args => {
    const link = args.source;
    const source = scheduler.events.find(link.data.from);
    const target = scheduler.events.find(link.data.to);
    args.html = `Link from <b>${source.data.text}</b> to <b>${target.data.text}</b>`;
  }
});
Full Source Code
Here is the full source code of our React Scheduler component that shows links connecting the tasks.
import React, { useEffect, useState } from 'react';
import { DayPilot, DayPilotScheduler } from "daypilot-pro-react";

const Scheduler = () => {
  const [tasks, setTasks] = useState([]);
  const [resources, setResources] = useState([]);
  const [links, setLinks] = useState([]);
  const [scheduler, setScheduler] = useState(null);
  const [startDate, setStartDate] = useState("2025-05-01");
  const [days, setDays] = useState(30);

  const linkForm = [
    {name: "Source", id: "source", disabled: true },
    {name: "Target", id: "target", disabled: true },
    {name: "Type", id: "type", type: "select", options: [
      {name: "Finish to Start", id: "FinishToStart"},
      {name: "Start to Start", id: "StartToStart"},
      {name: "Finish to Finish", id: "FinishToFinish"},
      {name: "Start to Finish", id: "StartToFinish"}
    ]},
    {name: "Color", id: "color", type: "select", options: [
      {name: "Gray", id: "#cccccc"},
      {name: "Green", id: "#38761d"},
      {name: "Yellow", id: "#f1c232"},
      {name: "Red", id: "#cc0000"}
    ]},
    {name: "Text", id: "text"},
  ];

  const onTimeRangeSelected = async (args) => {
    const modal = await DayPilot.Modal.prompt("Create a new task:", "Task 1");
    scheduler.clearSelection();
    if (modal.canceled) { return; }
    scheduler.events.add({
      start: args.start,
      end: args.end,
      id: DayPilot.guid(),
      resource: args.resource,
      text: modal.result
    });
  };

  const onLinkCreate = async (args) => {

    if (args.type === "FinishToStart") {
      args.preventDefault();

      const tempLink = {
        from: args.from,
        to: args.to,
        id: DayPilot.guid(),
        type: args.type,
        color: "#cccccc"
      };
      scheduler.links.add(tempLink);

      const modal = await DayPilot.Modal.prompt("Link description:", "Link 1");

      scheduler.links.remove(tempLink);

      if (modal.canceled) {
        return;
      }

      scheduler.links.add({
        from: args.from,
        to: args.to,
        id: DayPilot.guid(),
        type: args.type,
        text: modal.result
      });
    }
  };

  const onBeforeLinkRender = (args) => {
    const source = args.from;
    const target = args.to;
    const type = args.data.type || "FinishToStart";

    if (type === "FinishToStart" && source.end() > target.start()) {
      args.data.style = "dotted";
      args.data.text = "Invalid";
    }

  };

  const onLinkClick = (args) => {
    editLink(args.link.data);
  };

  const editLink = async (link) => {
    const source = scheduler.events.find(link.from);
    const target = scheduler.events.find(link.to);

    const data = {
      ...link,
      source: source?.data.text,
      target: target?.data.text,
      type: link.type || "FinishToStart",
      color: link.color || "#cc0000"
    };
    const modal = await DayPilot.Modal.form(linkForm, data);
    if (modal.canceled) {
      return;
    }
    console.log("modal.result", modal.result);
    scheduler.links.update(modal.result);
  }

  const contextMenuLink = new DayPilot.Menu({
    items: [
      { text: "Delete", onClick: args => scheduler.links.remove(args.source) },
      { text: "-" },
      { text: "Properties...", onClick: args => editLink(args.source) }
    ]
  });

  const linkBubble = new DayPilot.Bubble({
    onLoad: args => {
      const link = args.source;
      const source = scheduler.events.find(link.data.from);
      const target = scheduler.events.find(link.data.to);

      if (source && target) {
        args.html = `Link from <b>${source.data.text}</b> to <b>${target.data.text}</b>`;
      }
    }
  });

  useEffect(() => {

    const taskData = [
      {
        id: 1,
        text: "Task 1",
        start: "2025-05-02T00:00:00",
        end: "2025-05-05T00:00:00",
        resource: "A"
      },
      {
        id: 2,
        text: "Task 2",
        start: "2025-05-09T00:00:00",
        end: "2025-05-16T00:00:00",
        resource: "B",
        barColor: "#38761d",
        barBackColor: "#93c47d"
      },
      {
        id: 3,
        text: "Task 3",
        start: "2025-05-06T00:00:00",
        end: "2025-05-10T00:00:00",
        resource: "D",
        barColor: "#f1c232",
        barBackColor: "#f1c232"
      },
      {
        id: 4,
        text: "Task 4",
        start: "2025-05-11T00:00:00",
        end: "2025-05-17T00:00:00",
        resource: "F",
        barColor: "#cc0000",
        barBackColor: "#ea9999"
      }
    ];
    setTasks(taskData);

    const linkData = [
      {id: 1, from: 1, to: 2},
      {id: 2, from: 1, to: 3},
      {id: 3, from: 3, to: 4}
    ];
    setLinks(linkData);

    const resourceData = [
      {name: "Resource A", id: "A"},
      {name: "Resource B", id: "B"},
      {name: "Resource C", id: "C"},
      {name: "Resource D", id: "D"},
      {name: "Resource E", id: "E"},
      {name: "Resource F", id: "F"},
      {name: "Resource G", id: "G"}
    ];
    setResources(resourceData);

  }, []);

  return (
    <div>
      <DayPilotScheduler
        timeHeaders={[{groupBy: "Month"}, {groupBy: "Day", format: "d"}]}
        scale={"Day"}
        startDate={startDate}
        days={days}
        events={tasks}
        resources={resources}
        links={links}
        linkCreateHandling={"Update"}
        onBeforeLinkRender={onBeforeLinkRender}
        onTimeRangeSelected={onTimeRangeSelected}
        onLinkCreate={onLinkCreate}
        onLinkClick={onLinkClick}
        contextMenuLink={contextMenuLink}
        linkBubble={linkBubble}
        controlRef={setScheduler}
      />
    </div>
  );
}
export default Scheduler;
You can download the React project using the link at the top of the tutorial.
 DayPilot


