Overview
Use this visual tool to schedule your production workflow.
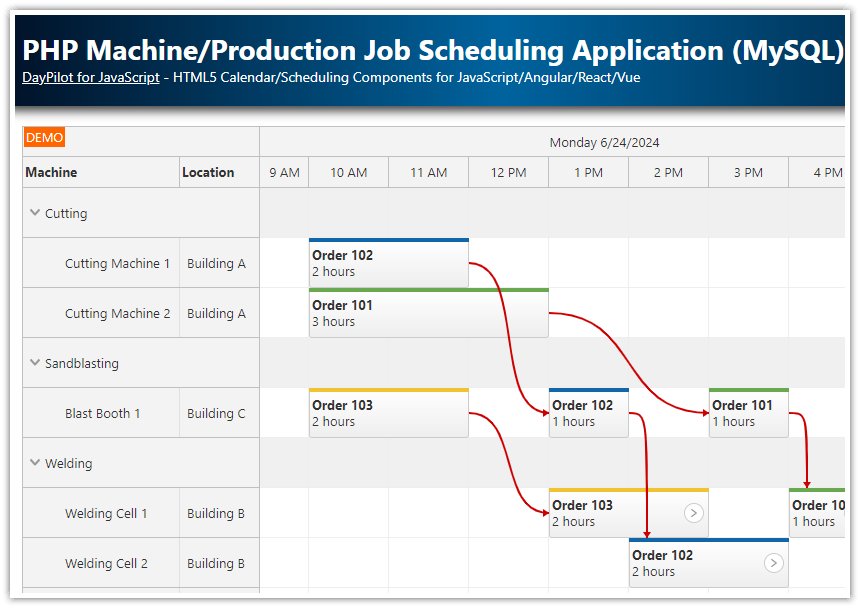
Jobs consist of multiple tasks, each of which is performed on a different machine.
Task dependencies are highlighted using links.
Use custom job colors to distinguish different tasks.
Use drag-and-drop functionality to adjust the schedule.
Easily review the availability of individual machines.
The frontend is created using HTML5 and JavaScript.
The backend is implemented using ASP.NET, Entity Framework, and SQL Server.
License
Licensed for testing and evaluation purposes. Please see the license agreement included in the sample project. You can use the source code of the tutorial if you are a licensed user of DayPilot Pro for JavaScript.
Visualize Your Production Workflow
This ASP.NET Core application lets you manage a production schedule of jobs that consist of multiple tasks performed on several types of machines. It’s suitable for planning jobs that are not of the same type. Jobs can require different production steps and each of the tasks can take different time.
We will use ASP.NET Core with Entity Framework and SQL Server to build the REST backend of our application.
The frontend will be created in HTML5 and JavaScript, using the JavaScript Scheduler component to display the main scheduling grid.
For an introduction to using the JavaScript Scheduler in ASP.NET Core applications, please see the ASP.NET Core Scheduler tutorial.
Machine Job Scheduling

We will start with a basic HTML5/JavaScript page and a minimal JavaScript Scheduler configuration generated using DayPilot Scheduler UI Builder:
Index.cshtml
<script src="~/lib/daypilot/daypilot-all.min.js" asp-append-version="true"></script>

<div id="scheduler"></div>

<script>
    const scheduler = new DayPilot.Scheduler("scheduler", {
        startDate: DayPilot.Date.today().firstDayOfMonth(),
        days: DayPilot.Date.today().daysInMonth(),
        scale: "Hour",
        businessBeginsHour: 9,
        businessEndsHour: 18,
        showNonBusiness: false,
        eventMoveSkipNonBusiness: true,
        timeHeaders: [
            { groupBy: "Day", format: "dddd M/d/yyyy" },
            { groupBy: "Hour" }
        ],
    });
    dp.init();
</script>
This configuration displays an empty Scheduler with no rows.
In order to display the main grid, we need to display our production machines in rows. The Scheduler can load the row data from a remote URL that returns a JSON array using rows.load() method. The content of the response will be assigned to the resources property so we need follow the structure in our REST endpoint.
JavaScript
const scheduler = new DayPilot.Scheduler("scheduler", {

    // ...

    treeEnabled: true,
    treePreventParentUsage: true,

    // ...

});
scheduler.init();

scheduler.rows.load("/api/Machines");
And this is the MachinesController class that defines the /api/Machines REST endpoint:
ASP.NET Core
[Route("api/[controller]")]
[ApiController]
public class MachinesController : ControllerBase
{
    private readonly ProductionContext _context;

    public MachinesController(ProductionContext context)
    {
        _context = context;
    }

    // GET: api/Machines
    [HttpGet]
    public async Task<ActionResult<IEnumerable>> GetMachines()
    {
        return await _context.Groups
            .Include(g => g.Machines)
            .Select(g => new {Id = "G" + g.Id, Expanded = true, Children = g.Machines, Name = g.Name})
            .ToListAsync();
    }

}
Create a New Production Job

Now we need to add the ability to create new production jobs using drag and drop.
The Scheduler enables time range selection by default, we just need to add an event handler that will open a modal dialog with details of the new job:

We use DayPilot.Modal.prompt() method to display the modal dialog (it’s a simple JavaScript prompt() method replacement - you can use DayPilot.Modal.form() to create modal dialogs with more complex forms).
When the user confirms the input by clicking “OK”, we will create a new task (and start a new job) using the /api/Tasks endpoint.
The task is added to the Scheduler using events.add() method in the success event handler.
JavaScript
const scheduler = new DayPilot.Scheduler("scheduler", {

    // ...

    onTimeRangeSelected: async args => {
        const modal = await DayPilot.Modal.prompt("Create a new job:", "Job")
        scheduler.clearSelection();
        if (modal.canceled) {
            return;
        }
        const params = {
            start: args.start,
            end: args.end,
            text: modal.result,
            resource: args.resource
        };
        const { data } = await DayPilot.Http.post("/api/Tasks", params);
        scheduler.events.add(data);
        scheduler.message("Job created");
    },

    // ...
});
And here is the implementation of the POST handler for /api/Tasks REST endpoint.
It’s a standard method generated using the API Controller scaffolding extensions in Visual Studio. It’s extended to handle the creation of follow-up tasks which we are going discuss later.
ASP.NET Core
// POST: api/Tasks
// To protect from overposting attacks, see https://go.microsoft.com/fwlink/?linkid=2123754
[HttpPost]
public async Task<ActionResult<Task>> PostTask(TaskWithLink task)
{
    Task previous = null;
    if (task.LinkFrom != null)
    {
        previous = await _context.Tasks.FindAsync(task.LinkFrom);
        if (previous == null)
        {
            return BadRequest();
        }
    }

    _context.Tasks.Add(task);
    await _context.SaveChangesAsync();

    if (previous != null)
    {
        previous.NextId = task.Id;
        task.Text = previous.Text;
        task.JobId = previous.JobId;
        task.Color = previous.Color;
        _context.Tasks.Update(previous);
    }
    else
    {
        task.JobId = task.Id;
        _context.Tasks.Update(task);
    }

    await _context.SaveChangesAsync();

    return CreatedAtAction("GetTask", new {id = task.Id}, task);
}
When the REST API call is completed the Scheduler displays the new task:

Production Workflow: Create a Next Task

Our application will support creating linked tasks using drag and drop. In the first step, we will customize the task appearance using the onBeforeEventRender event handler and add an icon that will let users create a follow-up task directly.
The follow-up icon is created using event active areas - custom elements added to the Scheduler events with a defined appearance and behavior.
Our active are will display a SVG icon defined using the
symbolproperty.The icon will be placed in the right part of the event (
rightandbottomproperties).The
actionis set to"Move"- that will activate event moving on mousedown.The
dataproperty holds"event-copy"string - that will let us recognize the drag action type later.
JavaScript
const scheduler = new DayPilot.Scheduler("scheduler", {

    // ...

    onBeforeEventRender: args => {
        args.data.barColor = args.data.color;

        const duration = new DayPilot.Duration(args.data.start, args.data.end);
        args.data.html = `<div><b>${args.data.text}</b><br>${duration.toString("h")} hours</div>`;

        if (args.data.nextId) {
            return;
        }
        args.data.areas = [
            {
                right: 5,
                top: 15,
                width: 20,
                height: 20,
                padding: 2,
                backColor: "#ffffff",
                fontColor: "#999999",
                style: "border-radius: 50%; border: 1px solid #ccc;",
                symbol: "/icons/daypilot.svg#minichevron-right-2",
                toolTip: "Drag to schedule the next step",
                action: "Move",
                data: "event-copy"
            }
        ];
    },

    // ...
});
This is how the drag handle icon looks now:

Now we will use the onEventMoving event handler to customize the appearance during dragging.
By default, the Scheduler displays a placeholder at the target location. In order to make clear that this is a follow-up task, but we will use the
onEventMovingevent handler to add a dynamic link from the source task.We will also perform a basic check of the constraints - it will not be possible to place the follow-up task before the end of the previous task. If the target position doesn’t meet the rule, we will disable it using
args.allowedproperty.
const scheduler = new DayPilot.Scheduler("scheduler", {

    // ...

    onEventMoving: args => {
        if (args.areaData && args.areaData === "event-copy") {
            args.link = {
                from: args.e,
                color: "#666"
            };
            args.start = args.end.addHours(-1);
            if (args.e.end() > args.start) {
                args.allowed = false;
                args.link.color = "red";
            }
        }
    },

    // ...
});
This is how the target placeholder with the link looks:

After dropping the placeholder at the desired location, the Scheduler fires onEventMove event handler.
We need to detect if the drag action was started by the active area (args.areaData === "event-copy"). In that case, we create the next task and a link from the source task.
We use a POST request to /api/Tasks like we did when creating a new job/task. This time, we specify the source task id using linkFrom property so it can be recognized on the server side.
When the POST request is complete, we display the new task using events.add(), create a link between the source and new tasks using links.add() and update the source event using events.update() (to hide the follow-up task drag handle).
var scheduler = new DayPilot.Scheduler("scheduler", {

    // ...

    onEventMove: async args => {
        if (args.areaData === "event-copy") {
            args.preventDefault();

            const params = {
                start: args.newStart,
                end: args.newEnd,
                resource: args.newResource,
                linkFrom: args.e.data.id
            };
            const { data } = await DayPilot.Http.post("/api/Tasks", params);

            // new task
            scheduler.events.add(data);

            // link
            scheduler.links.add({
                id: args.e.data.id,
                from: args.e.data.id,
                to: data.id
            });

            // update the source task
            args.e.data.nextId = data.id;
            scheduler.events.update(args.e);

            scheduler.message("Task created");

        }
        else {
            const params = {
                ...args.e.data,
                start: args.newStart,
                end: args.newEnd,
                resource: args.newResource
            };

            const { data } = await DayPilot.Http.put(`/api/Tasks/${args.e.data.id}`, params);
            console.log("Task moved.");
        }

    },

    // ...
});
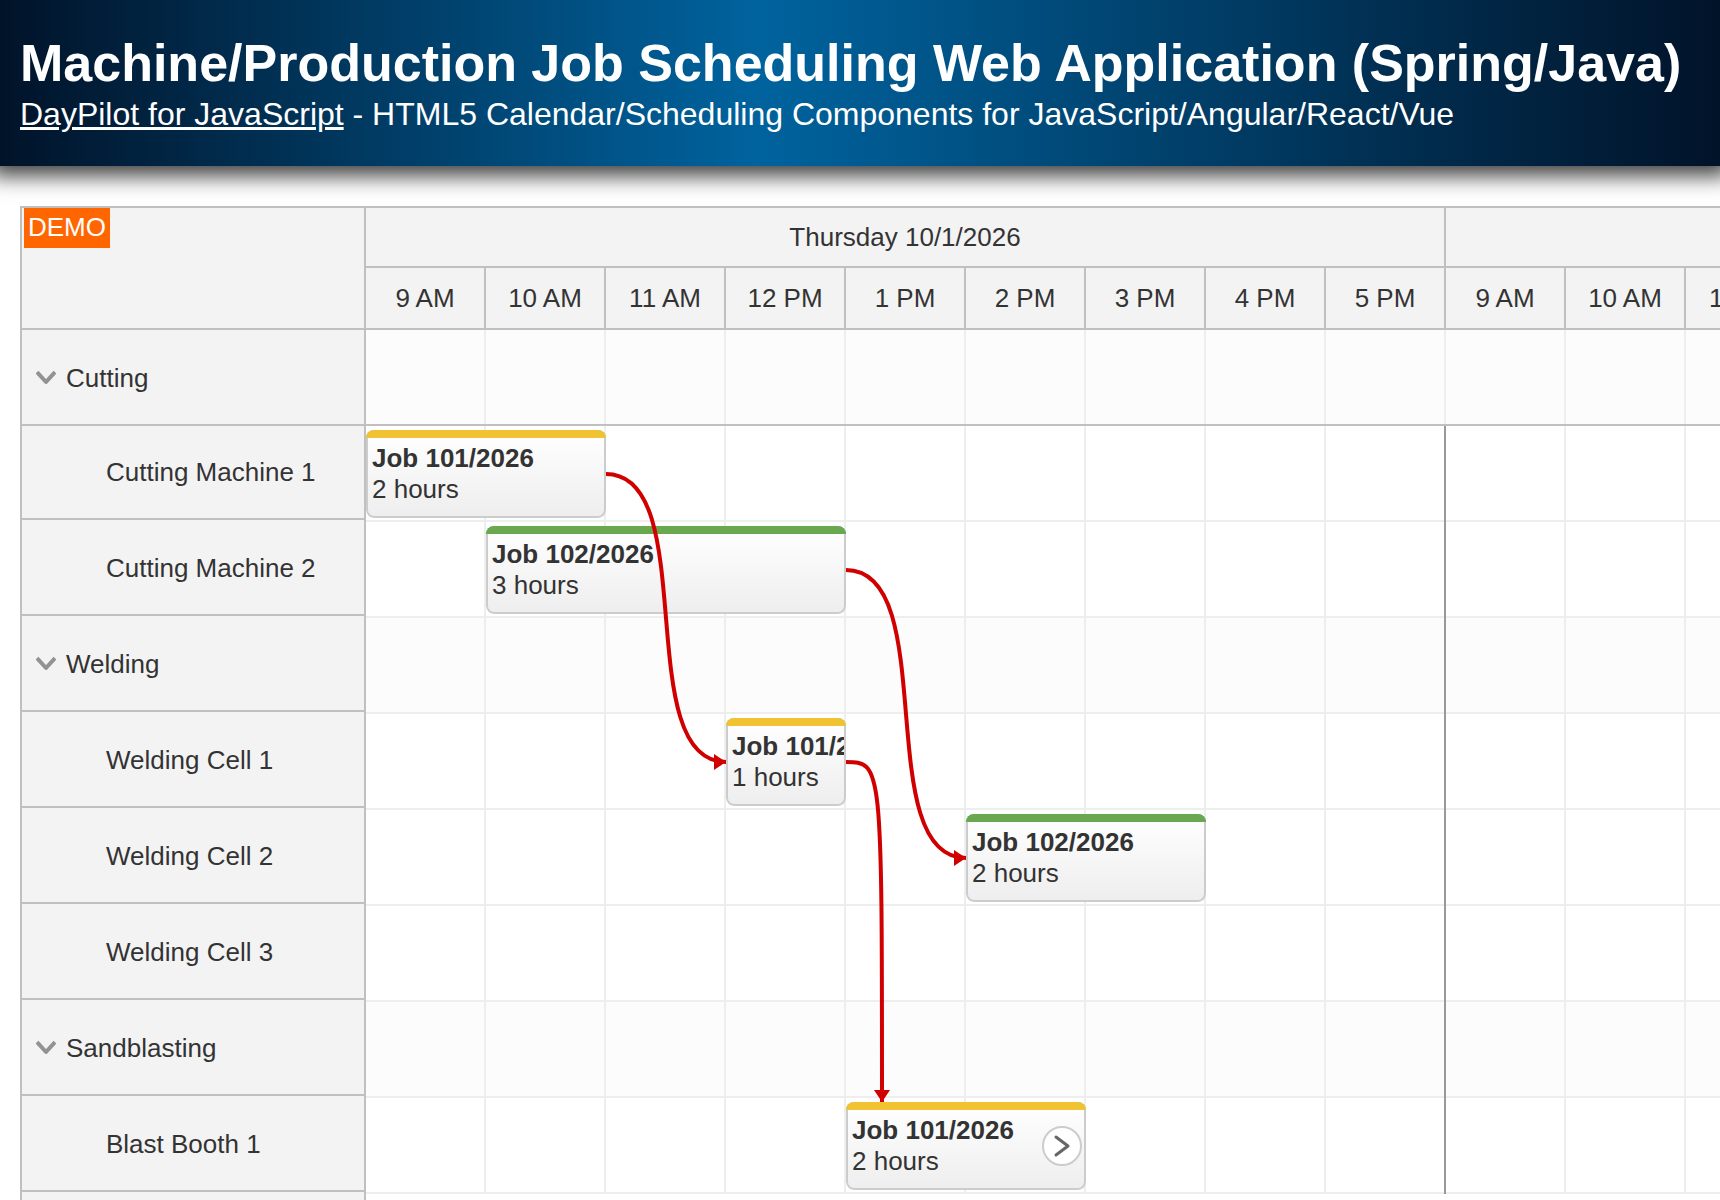
The is the workflow visualization after the additional task is created:

Production Workflow: Delete Tasks

In this step, we will add a context menu that will let us delete individual tasks.
The context menu can be defined using the contextMenu property. When clicking the “Delete” item, the Scheduler will call the onClick event handler which we will use to send a request to the ASP.NET Core backend (DELETE /api/Tasks/ID).
Context menu:
const scheduler = new DayPilot.Scheduler("scheduler", {

    // ...

    contextMenu: new DayPilot.Menu({
        items: [
            {
                text: "Delete",
                onClick: async args => {
                    const { data } = await DayPilot.Http.delete(`/api/Tasks/${args.source.data.id}`);
                    data.updated.forEach(d => {
                        scheduler.events.update(d);
                        scheduler.links.remove(d.id);
                    });
                    data.deleted.forEach(id => {
                        scheduler.events.remove(id);
                        scheduler.links.remove(id);
                    });
                    scheduler.message("Job deleted");
                }
            },
            {
                text: "-"
            },
            {
                text: "Blue",
                icon: "icon icon-blue",
                color: "#1155cc",
                onClick: args => app.updateColor(args.source, args.item.color)
            },
            {
                text: "Green",
                icon: "icon icon-green",
                color: "#6aa84f",
                onClick: args => app.updateColor(args.source, args.item.color)
            },
            {
                text: "Yellow",
                icon: "icon icon-yellow",
                color: "#f1c232",
                onClick: args => app.updateColor(args.source, args.item.color)
            },
            {
                text: "Red",
                icon: "icon icon-red",
                color: "#cc0000",
                onClick: args => app.updateColor(args.source, args.item.color)
            }
        ]
    }),

    // ...
});
The DeleteTask() method will also check if the tasks to be deleted has any follow-up tasks and delete them as well.
It returns a list of tasks that were deleted (deleted array) and updated (updated array).
ASP.NET Core (DELETE /api/Task)
[Route("api/[controller]")]
[ApiController]
public class TasksController : ControllerBase
{
    private readonly ProductionContext _context;

    public TasksController(ProductionContext context)
    {
        _context = context;
    }


    // DELETE: api/Tasks/5
    [HttpDelete("{id}")]
    public async Task<ActionResult<TaskChanges>> DeleteTask(int id)
    {
        var task = await _context.Tasks.FindAsync(id);
        if (task == null)
        {
            return NotFound();
        }

        var changes = new TaskChanges()
        {
            Deleted = new List<int>(),
            Updated = new List<Task>()
        };

        _context.Tasks.Remove(task);
        changes.Deleted.Add(task.Id);

        int? next = task.NextId;
        while (next != null)
        {
            var e = await _context.Tasks.FindAsync(next);
            if (e == null)
            {
                return BadRequest();
            }
            _context.Tasks.Remove(e);
            changes.Deleted.Add(e.Id);
            next = e.NextId;
        }

        var previous = await _context.Tasks.Where(e => e.NextId == id).FirstAsync();
        if (previous != null)
        {
            previous.NextId = null;
            _context.Tasks.Update(previous);
            changes.Updated.Add(previous);
        }


        await _context.SaveChangesAsync();

        return changes;
    }

}
Data Model: Entity Framework and SQL Server
The project includes an Entity Framework migration startup logic that will create and initialize the database DayPilot.TutorialAspNetCoreProduction.mdf connected using LocalDB (Program.cs).
The DB schema defines three database tables:
GroupsMachinesTasks
The Groups and Machines table will be initialized with resources.
Data.cs
using System;
using System.Collections.Generic;
using System.Text.Json.Serialization;
using Microsoft.EntityFrameworkCore;

namespace Project.Models
{
    public class ProductionContext : DbContext
    {
        public DbSet<Task> Tasks { get; set; }
        public DbSet<Machine> Machines { get; set; }
        public DbSet<Group> Groups { get; set; }

        public ProductionContext(DbContextOptions<ProductionContext> options) : base(options) { }

        protected override void OnModelCreating(ModelBuilder modelBuilder)
        {
            modelBuilder.Entity<Group>().HasData(new Group { Id = 1, Name = "Cutting" });
            modelBuilder.Entity<Group>().HasData(new Group { Id = 2, Name = "Welding" });
            modelBuilder.Entity<Group>().HasData(new Group { Id = 3, Name = "Sandblasting" });

            modelBuilder.Entity<Machine>().HasData(new Machine { Id = 1, Name = "Cutting Machine 1", GroupId = 1 });
            modelBuilder.Entity<Machine>().HasData(new Machine { Id = 2, Name = "Cutting Machine 2", GroupId = 1 });
            modelBuilder.Entity<Machine>().HasData(new Machine { Id = 3, Name = "Cutting Machine 3", GroupId = 1 });

            modelBuilder.Entity<Machine>().HasData(new Machine { Id = 4, Name = "Welding Cell 1", GroupId = 2 });
            modelBuilder.Entity<Machine>().HasData(new Machine { Id = 5, Name = "Welding Cell 2", GroupId = 2 });
            modelBuilder.Entity<Machine>().HasData(new Machine { Id = 6, Name = "Welding Cell 3", GroupId = 2 });

            modelBuilder.Entity<Machine>().HasData(new Machine { Id = 7, Name = "Blast Booth 1", GroupId = 3 });
            modelBuilder.Entity<Machine>().HasData(new Machine { Id = 8, Name = "Blast Booth 2", GroupId = 3 });

        }
    }

    public class Task
    {
        public int Id { get; set; }
        public DateTime Start { get; set; }
        public DateTime End { get; set; }

        [JsonPropertyName("resource")]
        public int ResourceId { get; set; }

        public string? Text { get; set; }

        public string? Color { get; set; }

        public int JobId { get; set; }

        public int? NextId { get; set; }
    }

    public class Group
    {
        public int Id { get; set; }
        public string Name { get; set; }

        [JsonPropertyName("children")]
        public ICollection<Machine> Machines { get; set; }

    }

    public class Machine
    {
        public int Id { get; set; }
        public string Name { get; set; }

        [JsonIgnore]
        public int GroupId { get; set; }
    }

}
Full Source Code
Here is the full source code of the client-side part of our ASP.NET Core production workflow scheduling project (Index.cshtml):
@page
@model IndexModel
@{
    ViewData["Title"] = "ASP.NET Core Production Workflow Scheduling Tutorial";
}

@section Head {
    <style type="text/css">
        .scheduler_default_main .scheduler_default_cell.scheduler_default_cellparent {
            background-color: #f0f0f0;
        }

        /* context menu icons */
        .icon:before {
            position: absolute;
            margin-left: 0;
            margin-top: 3px;
            width: 14px;
            height: 14px;
            content: '';
        }

        .icon-blue:before { background-color: #1155cc; }
        .icon-green:before { background-color: #6aa84f; }
        .icon-yellow:before { background-color: #f1c232; }
        .icon-red:before { background-color: #cc0000; }
    </style>
}

<script src="~/lib/daypilot/daypilot-all.min.js" asp-append-version="true"></script>

<div id="scheduler"></div>

<script>
    const scheduler = new DayPilot.Scheduler("scheduler", {
        eventHeight: 50,
        cellWidth: 60,
        startDate: DayPilot.Date.today().firstDayOfMonth(),
        days: DayPilot.Date.today().daysInMonth(),
        scale: "Hour",
        businessBeginsHour: 9,
        businessEndsHour: 18,
        showNonBusiness: false,
        eventMoveSkipNonBusiness: true,
        timeHeaders: [
            { groupBy: "Day", format: "dddd M/d/yyyy" },
            { groupBy: "Hour" }
        ],
        treeEnabled: true,
        treePreventParentUsage: true,
        linkBottomMargin: 20,
        onTimeRangeSelected: async args => {
            const modal = await DayPilot.Modal.prompt("Create a new job:", "Job")
            scheduler.clearSelection();
            if (modal.canceled) {
                return;
            }
            const params = {
                start: args.start,
                end: args.end,
                text: modal.result,
                resource: args.resource
            };
            const { data } = await DayPilot.Http.post("/api/Tasks", params);
            scheduler.events.add(data);
            scheduler.message("Job created");
        },
        onEventMove: async args => {
            if (args.areaData === "event-copy") {
                args.preventDefault();

                const params = {
                    start: args.newStart,
                    end: args.newEnd,
                    resource: args.newResource,
                    linkFrom: args.e.data.id
                };
                const { data } = await DayPilot.Http.post("/api/Tasks", params);

                // new task
                scheduler.events.add(data);

                // link
                scheduler.links.add({
                    id: args.e.data.id,
                    from: args.e.data.id,
                    to: data.id
                });

                // update the source task
                args.e.data.nextId = data.id;
                scheduler.events.update(args.e);

                scheduler.message("Task created");

            }
            else {
                const params = {
                    ...args.e.data,
                    start: args.newStart,
                    end: args.newEnd,
                    resource: args.newResource
                };

                const { data } = await DayPilot.Http.put(`/api/Tasks/${args.e.data.id}`, params);
                console.log("Task moved.");
            }

        },
        onEventResize: async args => {
            const params = {
                ...args.e.data,
                start: args.newStart,
                end: args.newEnd
            };

            const { data } = await DayPilot.Http.put(`/api/Tasks/${args.e.data.id}`, params);
            console.log("Task resized.")
        },
        onBeforeEventRender: args => {
            args.data.barColor = args.data.color;

            const duration = new DayPilot.Duration(args.data.start, args.data.end);
            args.data.html = `<div><b>${args.data.text}</b><br>${duration.toString("h")} hours</div>`;

            if (args.data.nextId) {
                return;
            }
            args.data.areas = [
                {
                    right: 5,
                    top: 15,
                    width: 20,
                    height: 20,
                    padding: 2,
                    backColor: "#ffffff",
                    fontColor: "#999999",
                    style: "border-radius: 50%; border: 1px solid #ccc;",
                    symbol: "/icons/daypilot.svg#minichevron-right-2",
                    toolTip: "Drag to schedule the next step",
                    action: "Move",
                    data: "event-copy"
                }
            ];
        },
        onEventMoving: args => {
            if (args.areaData && args.areaData === "event-copy") {
                args.link = {
                    from: args.e,
                };
                args.start = args.end.addHours(-1);
                if (args.e.end() > args.start) {
                    args.start = args.e.end();
                    args.end = args.start.addHours(1);
                }
            }
        },
        onEventClick: async args => {
            const modal = await DayPilot.Modal.prompt("Job name:", args.e.text());
            if (modal.canceled) {
                return;
            }

            const params = {
                text: modal.result
            };
            const { data } = await DayPilot.Http.put(`/api/Jobs/${args.e.data.jobId}`, params);
            data.updated.forEach(d => scheduler.events.update(d));
            scheduler.message("Text updated");
        },
        contextMenu: new DayPilot.Menu({
            items: [
                {
                    text: "Delete",
                    onClick: async args => {
                        const { data } = await DayPilot.Http.delete(`/api/Tasks/${args.source.data.id}`);
                        data.updated.forEach(d => {
                            scheduler.events.update(d);
                            scheduler.links.remove(d.id);
                        });
                        data.deleted.forEach(id => {
                            scheduler.events.remove(id);
                            scheduler.links.remove(id);
                        });
                        scheduler.message("Job deleted");
                    }
                },
                {
                    text: "-"
                },
                {
                    text: "Blue",
                    icon: "icon icon-blue",
                    color: "#1155cc",
                    onClick: args => app.updateColor(args.source, args.item.color)
                },
                {
                    text: "Green",
                    icon: "icon icon-green",
                    color: "#6aa84f",
                    onClick: args => app.updateColor(args.source, args.item.color)
                },
                {
                    text: "Yellow",
                    icon: "icon icon-yellow",
                    color: "#f1c232",
                    onClick: args => app.updateColor(args.source, args.item.color)
                },
                {
                    text: "Red",
                    icon: "icon icon-red",
                    color: "#cc0000",
                    onClick: args => app.updateColor(args.source, args.item.color)
                }
            ]
        })
    });
    scheduler.init();

    const app = {
        init() {
            scheduler.rows.load("/api/Machines");
            scheduler.events.load("/api/Tasks");
            scheduler.links.load("/api/Links");
        },
        async updateColor(e, color) {
            const params = {
                color
            };
            const { data } = await DayPilot.Http.put(`/api/Jobs/${e.data.jobId}`, params);
            data.updated.forEach(d => {
                scheduler.events.update(d);
            });
            scheduler.message("Color updated");
        }
    };
    app.init();

</script>
You can download the complete ASP.NET Core project using the link at the top of the tutorial.
History
September 29, 2024: Upgraded to .NET 8, DayPilot Pro for JavaScript 2024.3.6177; automatic SQL Server database initialization; SVG icon; new task logic updated.
May 29, 2023: Upgraded to .NET 7, DayPilot Pro for JavaScript 2023.2.5582; ES6+ syntax; errors fixed;
appobject.February 9, 2021: Initial version