DayPilot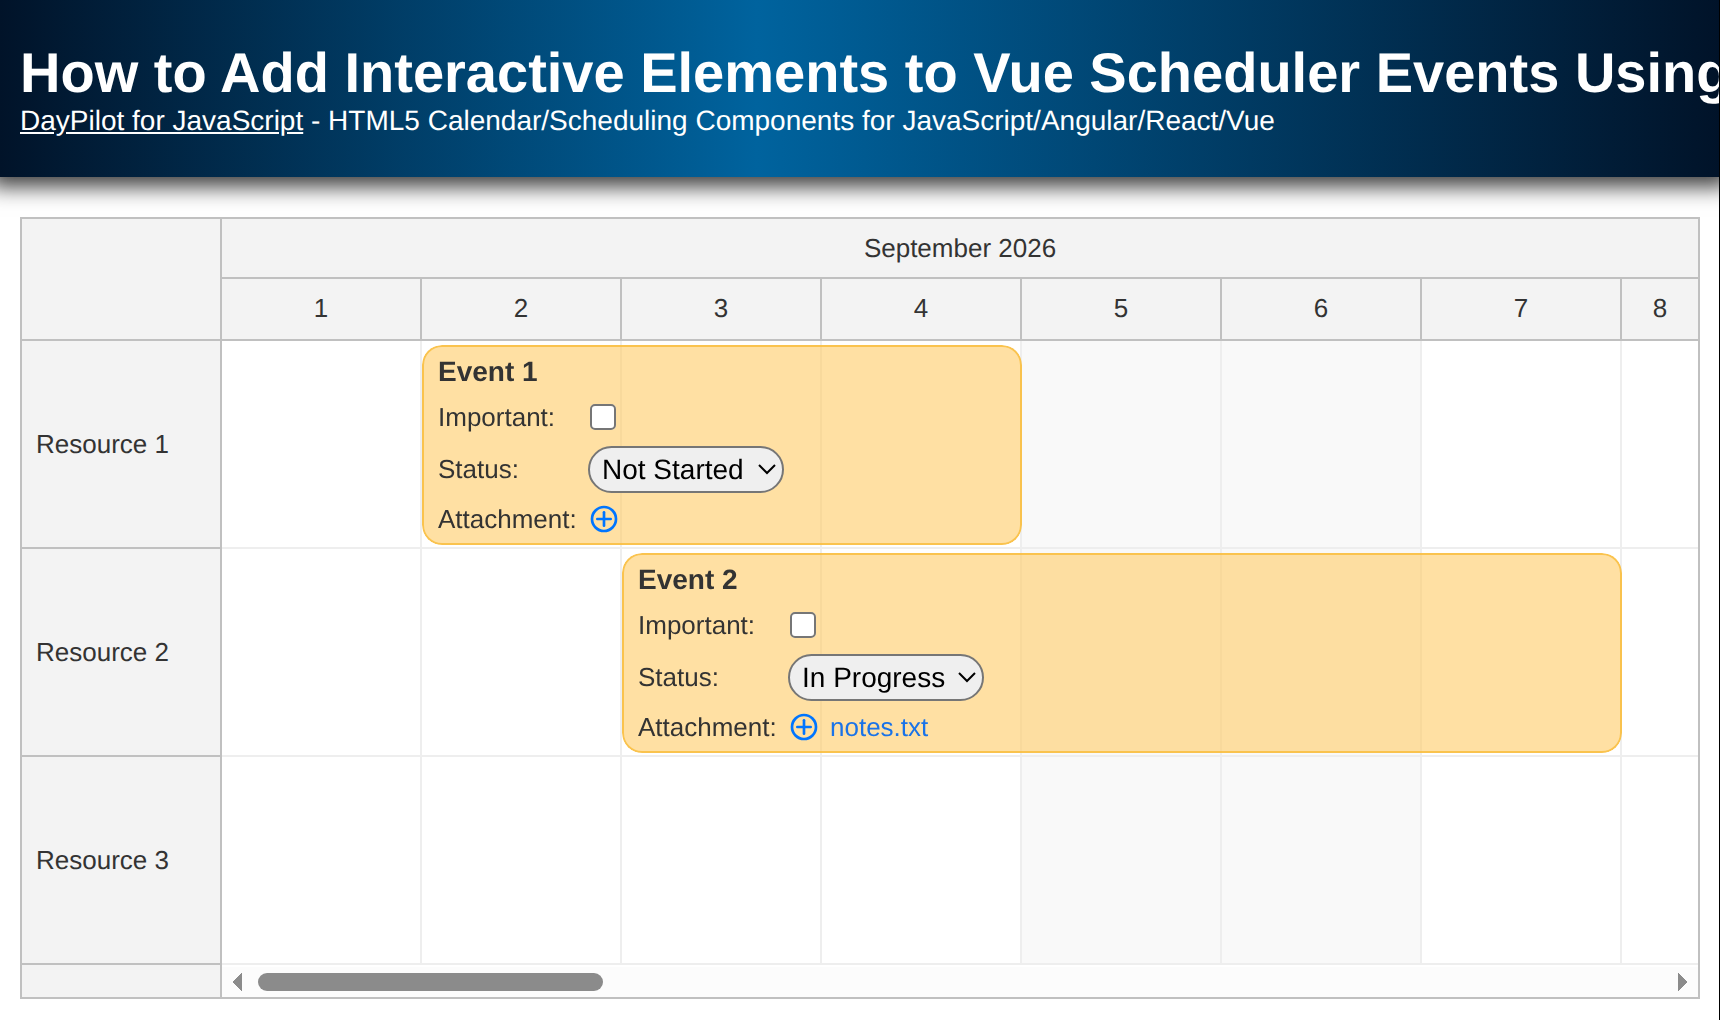
| Demo | |
|---|---|
| Downloads | |
| Repository | |
| Languages | JavaScript |
| Technologies | Vue.js |
| Code License | Apache License 2.0 (Open-Source) |
Overview
-
You can use Vue templates to define the content of Vue Scheduler event boxes.
-
Add a checkbox that marks the event as “Important”.
-
Use a drop-down list that sets the event status (e.g., “In Progress”).
-
Select a local file using a special icon and display a temporary attachment link in the event.
-
The Vue project includes the Vue package of the open-source DayPilot Lite for JavaScript scheduling library.
License
The tutorial source code and DayPilot Lite are available under the Apache License 2.0. See the licensing information included in the sample. A DayPilot Pro license is not required for this example. The separate commercial edition has its own DayPilot Pro licensing.
Using Vue Templates to Customize Appearance of Scheduler Events
In Vue, you can use templates to define content for named slots.
The Vue Scheduler component defines named slots for the following visual elements:
-
Events:
<template #event="{ event }"></template> -
Grid cells:
<template #cell="{ cell }"></template> -
Time headers:
<template #timeHeader="{ header }"></template> -
Row headers:
<template #rowHeader="{ row, x }"></template>
These slots are supported in Vue 3 with DayPilot Lite, including the time header and row header slots. This tutorial uses the event slot.
In addition to Vue templates, you can also customize the event content using the onBeforeEventRender event handler. The linked customization guides cover icons, time segments, drag handles and other active areas; availability of advanced options depends on the edition. This example uses standard HTML controls in the Lite event template.
A simple Vue template for the event slot can look like this:
<template>
  <DayPilotScheduler
      ...
      :events="events"
      :resources="resources"
      ...
  >
    <template #event="{ event }">
      <div class="event-body">
        <div class="event-title">{{ event.text() }}</div>
        <!-- ... -->
      </div>
    </template>

  </DayPilotScheduler>
</template>
You can see that the event template receives an event object (DayPilot.Event) which holds the event details.
Adding a Checkbox Using an Event Template
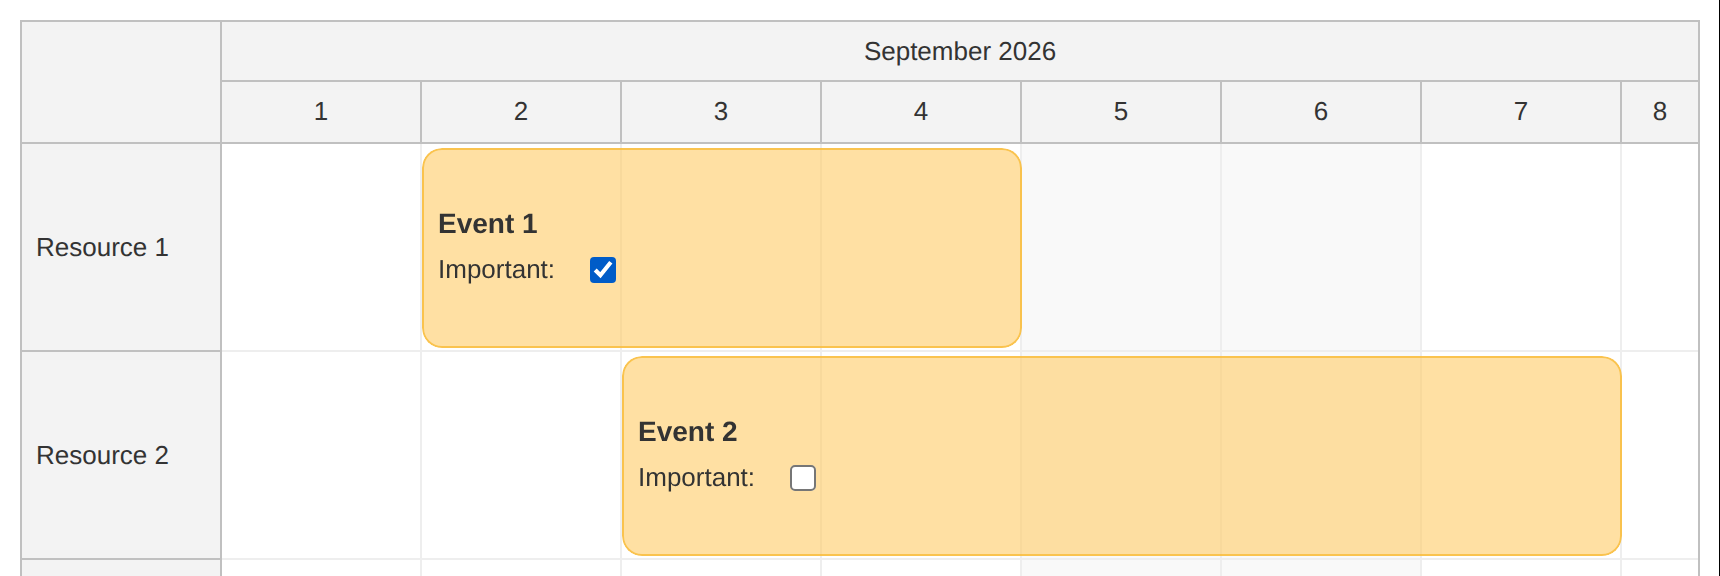
Let’s add a checkbox that will toggle the “Important” status of an event on click.
<template>
  <DayPilotScheduler
      ...
      :events="events"
      :resources="resources"
      ...
  >
    <template #event="{ event }">
      <div class="event-body">
        <div class="event-title">{{ event.text() }}</div>
        <!-- ... -->
        <div class="event-important">
          <label><span class="event-item-desc">Important:</span><input type="checkbox" v-model="event.data.important" @change="onImportantChange(event)" :title="'Mark as important'" /></label>
        </div>
        <!-- ... -->
      </div>
    </template>

  </DayPilotScheduler>
</template>
The v-model binding updates event.data.important. Initialize this custom property on each event, alongside the status and attachment fields. The sample places events in the current month:
const loadEvents = () => {
  events.value = [
    {
      id: 1,
      start: DayPilot.Date.today().firstDayOfMonth().addDays(1),
      end: DayPilot.Date.today().firstDayOfMonth().addDays(4),
      text: "Event 1",
      resource: "R1",
      important: false,
      status: 'Not Started',
      attachment: null
    },
    // ...
  ];
};
The onImportantChange event handler prints the change details to the JavaScript console:
const onImportantChange = (event) => {
  console.log(`Event ${event.text()} important: ${event.data.important}`);
};
Adding a Drop-Down List Using a Template
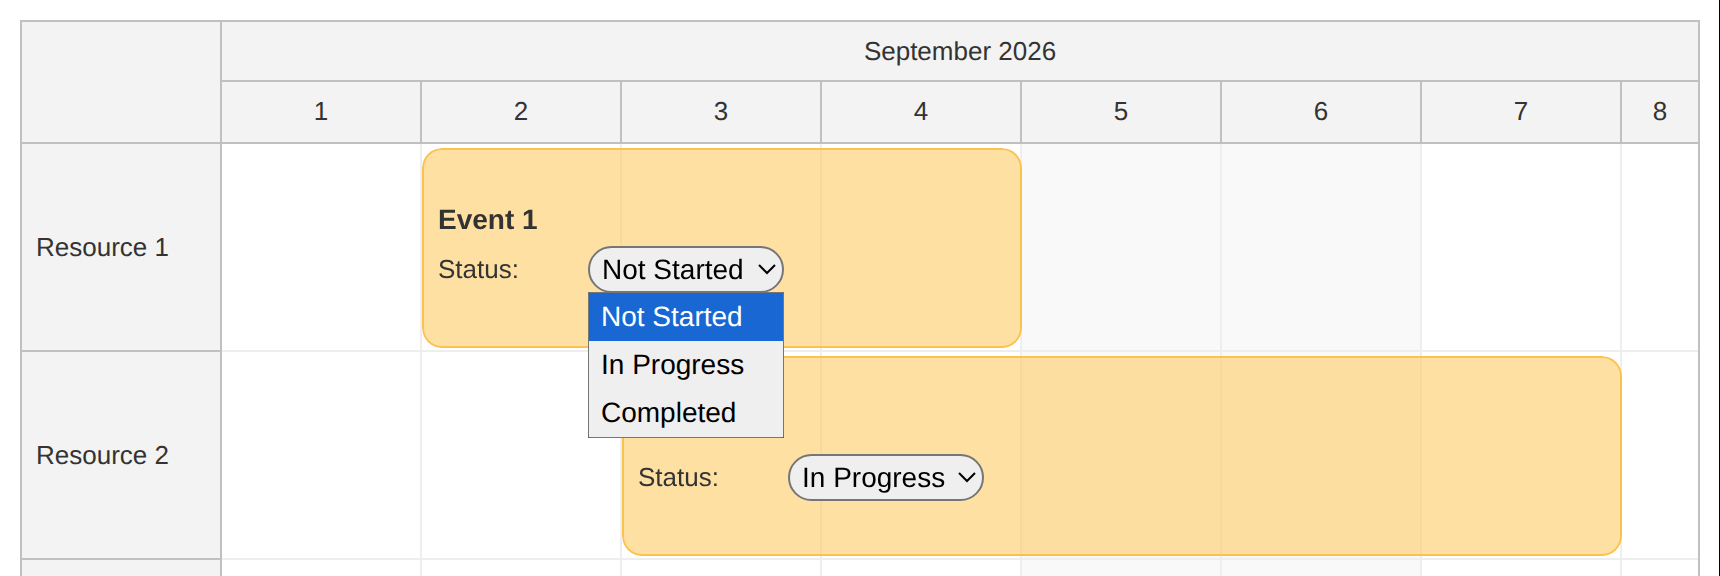
You can also add other HTML elements, such as a drop-down list.
The following Vue event template defines the drop-down list using a <select> element and includes three options (“Not Started”, “In Progress”, “Completed”).
The selected value (v-model) is bound to the status property of the event data object. The @mousedown.stop modifier keeps interaction with the list from starting a Scheduler drag. Both the checkbox and the list update browser state only; the change handlers log the values without saving them to a server.
<template>
  <DayPilotScheduler
      ...
      :events="events"
      :resources="resources"
      ...
  >
    <template #event="{ event }">
      <div class="event-body">
        <div class="event-title">{{ event.text() }}</div>
        <!-- ... -->
        <div class="event-status">
          <span class="event-item-desc">Status:</span>
          <select v-model="event.data.status" @change="onStatusChange(event)" @mousedown.stop>
            <option value="Not Started">Not Started</option>
            <option value="In Progress">In Progress</option>
            <option value="Completed">Completed</option>
          </select>
        </div>
        <!-- ... -->
      </div>
    </template>

  </DayPilotScheduler>
</template>
On change, the drop-down list calls the onStatusChange() function which prints the details to the JavaScript console:
const onStatusChange = (event) => {
  console.log(`Event ${event.text()} status changed to: ${event.data.status}`);
};
Adding an Attachment to the Vue Scheduler Event
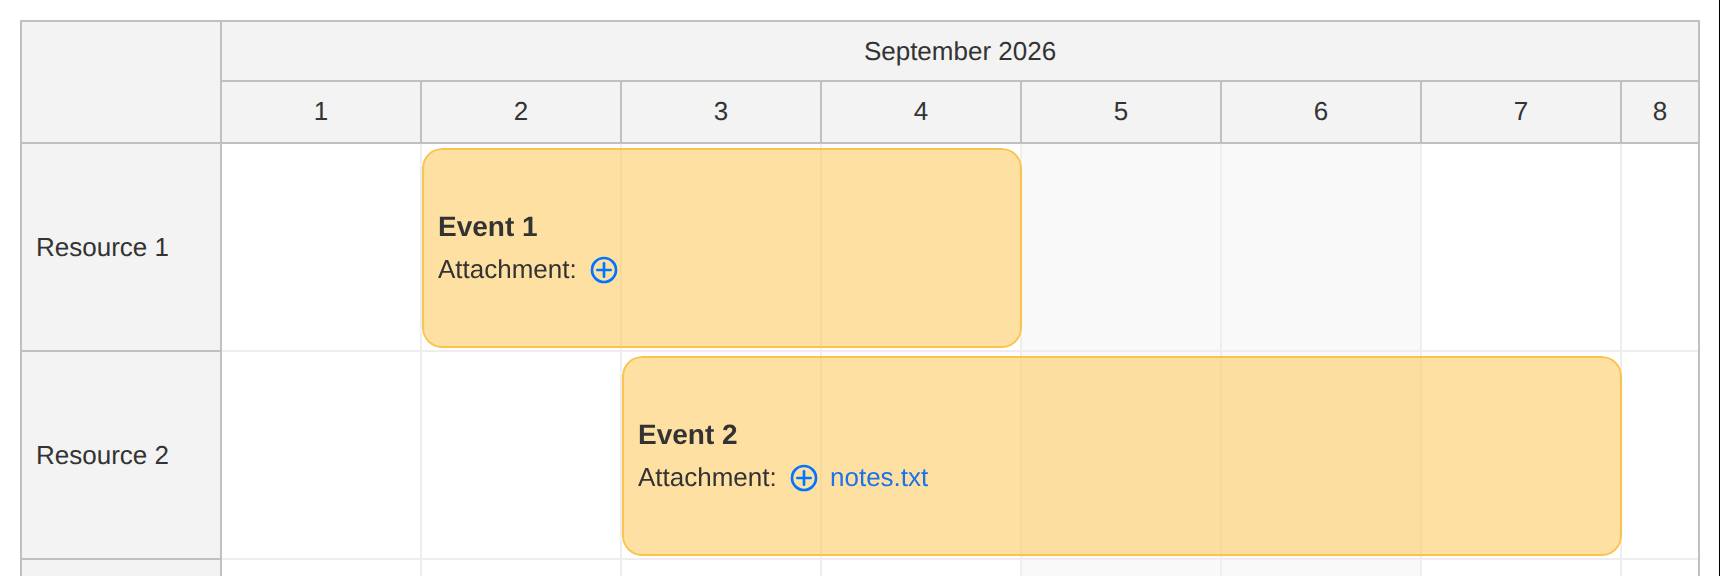
In the third example, we will include an <input type="file"> element in the Vue event template so users can select a local file. The browser creates a temporary object URL for that file and displays its name as a link. No file is uploaded to a server.
<template>
  <DayPilotScheduler
      ...
      :events="events"
      :resources="resources"
      ...
  >
    <template #event="{ event }">
      <div class="event-body">
        <div class="event-title">{{ event.text() }}</div>
        <!-- ... -->
        <div class="event-attachment">
          <span class="event-item-desc">Attachment:</span>
          <label class="file-label" :title="'Attach a file'">
            <input type="file" @change="onFileChange($event, event)" class="file-input" />
            <svg>
              <use xlink:href="/icons/daypilot.svg#plus-circle"></use>
            </svg>
          </label>
          <span v-if="event.data.attachment">
              <a :href="event.data.attachment.url" target="_blank">{{ event.data.attachment.name }}</a>
            </span>
        </div>
        <!-- ... -->
      </div>
    </template>

  </DayPilotScheduler>
</template>
The onFileChange() function reads the selected File, creates an object URL, and stores the name and URL in event.data.attachment:
const attachmentUrls = new Set();

const onFileChange = (e, event) => {
  const file = e.target.files[0];
  if (file) {
    if (event.data.attachment) {
      URL.revokeObjectURL(event.data.attachment.url);
      attachmentUrls.delete(event.data.attachment.url);
    }
    const url = URL.createObjectURL(file);
    attachmentUrls.add(url);
    event.data.attachment = {
      name: file.name,
      url: url
    };
    console.log(`File attached to event "${event.text()}": ${file.name}`);
  }
};

onUnmounted(() => {
  attachmentUrls.forEach((url) => URL.revokeObjectURL(url));
});
The link opens the selected file in a new tab while its object URL is valid. Replacing an attachment revokes the previous URL; unmounting the component releases all remaining URLs. These links are local to the current page session and must not be stored as permanent download URLs. Reloading resets the event fields and attachments. A persistent upload feature would require a backend to store the file and return a durable URL.
Full Source Code
Here is the full source code of our Vue Scheduler component that customizes the event content using a named Vue template.
<template>
  <DayPilotScheduler
      scale="Day"
      :eventHeight="100"
      :cellWidth="100"
      :rowHeaderWidth="100"
      :durationBarVisible="false"
      :eventBorderRadius="10"
      :rowMarginTop="2"
      :rowMarginBottom="2"
      :days="DayPilot.Date.today().daysInMonth()"
      :startDate="DayPilot.Date.today().firstDayOfMonth()"
      :timeHeaders="[ { groupBy: 'Month' }, { groupBy: 'Day', format: 'd' } ]"
      :floatingEvents="false"
      @timeRangeSelected="onTimeRangeSelected"
      :events="events"
      :resources="resources"
      ref="schedulerRef"
  >
    <template #event="{ event }">
      <div class="event-body">
        <div class="event-title">{{ event.text() }}</div>
        <div class="event-important">
          <label><span class="event-item-desc">Important:</span><input type="checkbox" v-model="event.data.important" @change="onImportantChange(event)" :title="'Mark as important'" /></label>
        </div>
        <div class="event-status">
          <span class="event-item-desc">Status:</span>
          <select v-model="event.data.status" @change="onStatusChange(event)" @mousedown.stop>
            <option value="Not Started">Not Started</option>
            <option value="In Progress">In Progress</option>
            <option value="Completed">Completed</option>
          </select>
        </div>
        <div class="event-attachment">
          <span class="event-item-desc">Attachment:</span>
          <label class="file-label" :title="'Attach a file'">
            <input type="file" @change="onFileChange($event, event)" class="file-input" />
            <svg>
              <use xlink:href="/icons/daypilot.svg#plus-circle"></use>
            </svg>
          </label>
          <span v-if="event.data.attachment">
              <a :href="event.data.attachment.url" target="_blank">{{ event.data.attachment.name }}</a>
            </span>
        </div>
      </div>
    </template>

  </DayPilotScheduler>
</template>

<script setup>
import { DayPilot, DayPilotScheduler } from '@daypilot/daypilot-lite-vue';
import { ref, onMounted, onUnmounted } from 'vue';

const events = ref([]);
const resources = ref([]);

const onTimeRangeSelected = async (args) => {
  const scheduler = args.control;
  const modal = await DayPilot.Modal.prompt("Create a new event:", "Event 1");
  scheduler.clearSelection();
  if (modal.canceled) { return; }
  scheduler.events.add({
    start: args.start,
    end: args.end,
    id: DayPilot.guid(),
    resource: args.resource,
    text: modal.result,
    important: false,
    status: 'Not Started',
    attachment: null
  });
};

const onImportantChange = (event) => {
  console.log(`Event ${event.text()} important: ${event.data.important}`);
};

const onStatusChange = (event) => {
  console.log(`Event ${event.text()} status changed to: ${event.data.status}`);
};

const attachmentUrls = new Set();

const onFileChange = (e, event) => {
  const file = e.target.files[0];
  if (file) {
    if (event.data.attachment) {
      URL.revokeObjectURL(event.data.attachment.url);
      attachmentUrls.delete(event.data.attachment.url);
    }
    const url = URL.createObjectURL(file);
    attachmentUrls.add(url);
    event.data.attachment = {
      name: file.name,
      url: url
    };
    console.log(`File attached to event "${event.text()}": ${file.name}`);
  }
};

onUnmounted(() => {
  attachmentUrls.forEach((url) => URL.revokeObjectURL(url));
});

const schedulerRef = ref(null);

const loadEvents = () => {
  events.value = [
    {
      id: 1,
      start: DayPilot.Date.today().firstDayOfMonth().addDays(1),
      end: DayPilot.Date.today().firstDayOfMonth().addDays(4),
      text: "Event 1",
      resource: "R1",
      important: false,
      status: 'Not Started',
      attachment: null
    },
    {
      id: 2,
      start: DayPilot.Date.today().firstDayOfMonth().addDays(2),
      end: DayPilot.Date.today().firstDayOfMonth().addDays(7),
      text: "Event 2",
      resource: "R2",
      important: false,
      status: 'In Progress',
      attachment: null
    }
  ];
};

const loadResources = () => {
  resources.value = [
    { name: "Resource 1", id: "R1" },
    { name: "Resource 2", id: "R2" },
    { name: "Resource 3", id: "R3" }
  ];
};

onMounted(() => {
  loadResources();
  loadEvents();
});
</script>

<style>
#app .scheduler_default_event .scheduler_default_event_inner {
  background: #ffcc6699;
  border: 1px solid rgba(248, 185, 50, 0.75);
}

</style>
<style scoped>

.event-body {
  padding: 5px;
}

.event-title {
  font-size: 14px;
  font-weight: bold;
  color: #333;
  flex-grow: 1;
  margin-right: 5px;
}

.event-actions input[type="checkbox"] {
  margin-right: 10px;
  cursor: pointer;
}

.file-input {
  display: none;
}

.file-label {
  cursor: pointer;
  font-size: 16px;
}

.file-label svg {
  width: 16px;
  height: 16px;
  color: #0075ff;
}

.event-body select {
  padding: 2px;
  border-radius: 15px;
}

.event-important {
  margin-top: 5px;
}

.event-important label {
  display: flex;
  align-items: center;
  gap: 2px;
}

.event-item-desc {
  width: 70px;
}

.event-status {
  margin-top: 5px;
  display: flex;
  align-items: center;
  gap: 5px;
}

.event-attachment {
  margin-top: 5px;
  display: flex;
  align-items: center;
  gap: 5px;
}

.event-attachment label {
  display: flex;
  align-items: center;
  gap: 5px;
}

.event-attachment a {
  color: #1a73e8;
  text-decoration: none;
}

.event-attachment a:hover {
  text-decoration: underline;
}

.important .event-title {
  color: red;
}

</style>
You can also download the complete Vue 3 project using the link at the top of this article.