DayPilot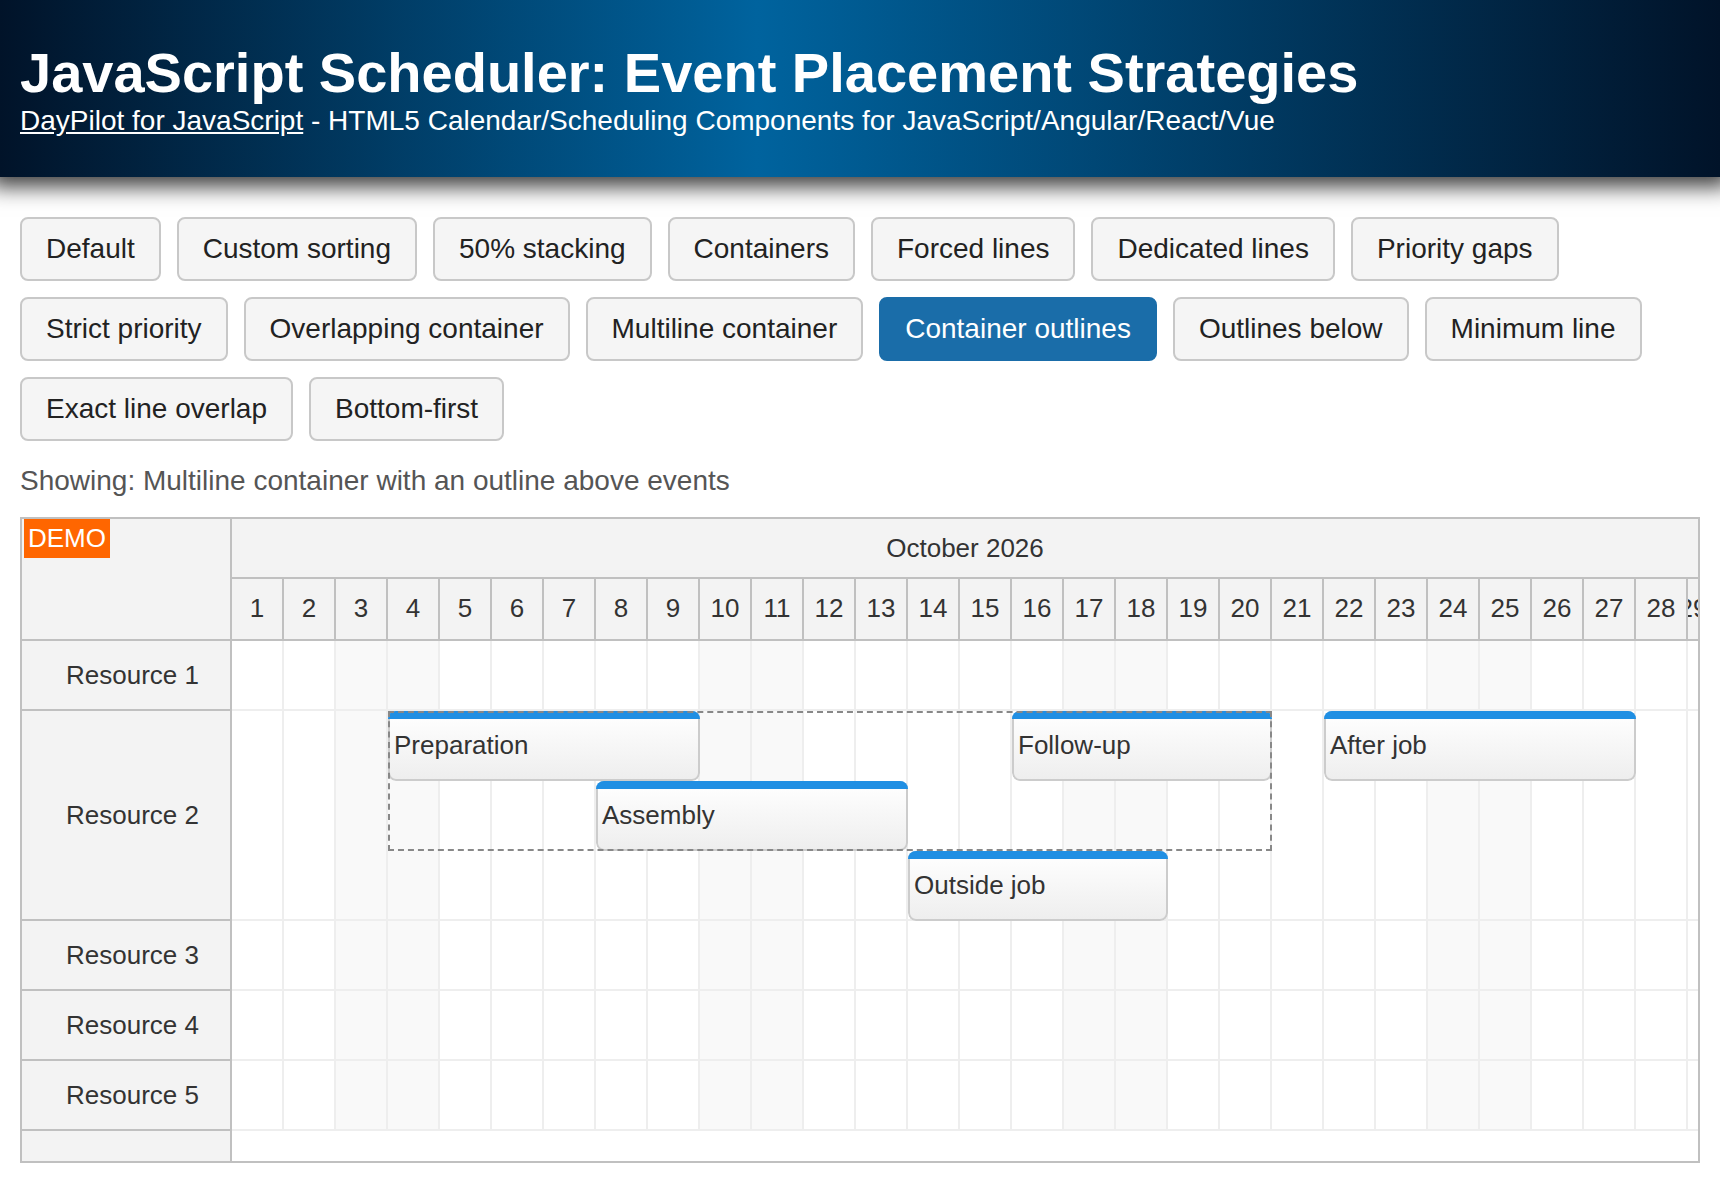
| Demo | |
|---|---|
| Downloads | |
| Languages | JavaScript |
Features
The JavaScript Scheduler component includes several options for adjusting event placement within a row.
-
event sorting - custom ordering and strict priority placement of overlapping events
-
event stacking - an option to compact the view by specifying the vertical overlap of concurrent events
-
event containers - group related events in one line by default, or use multiple lines with optional outlines
-
exact or minimum line - force a zero-based line index or start searching for free space at a minimum index
-
dedicated line - require an event to be displayed in a new line used exclusively by that event
-
bottom-first placement - reverse the visual line order within each row
You can compare the strategies in the JavaScript Scheduler Event Placement Strategies demo. The downloadable sample includes a toolbar that switches between the configurations on one page. Dragging to a specific line and Gantt views are related topics linked under See Also; they are not strategy modes in this sample.
The sample includes a trial version of DayPilot Pro for JavaScript (see also License below).
License
Licensed for testing and evaluation purposes. Please see the license agreement included in the sample project. You can use the source code of the tutorial if you are a licensed user of DayPilot Pro for JavaScript.
Default Event Position: Row vs. Line
The row is determined by the resource property of the event data object.
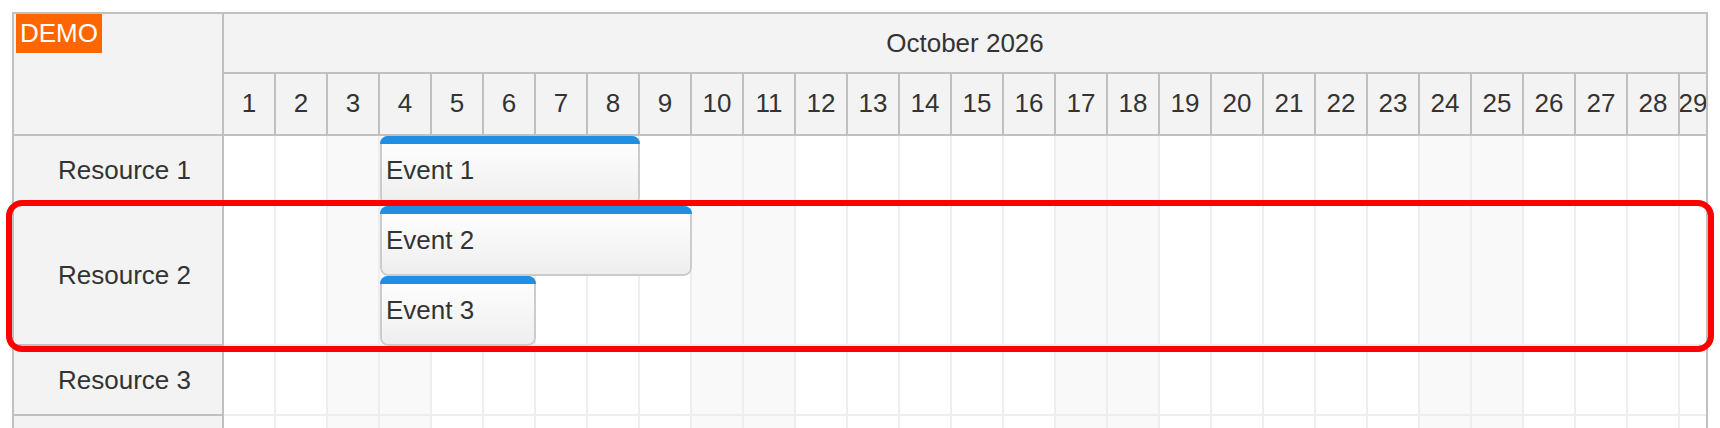
If there are multiple concurrent events, each of them will be placed in a special line within the row.
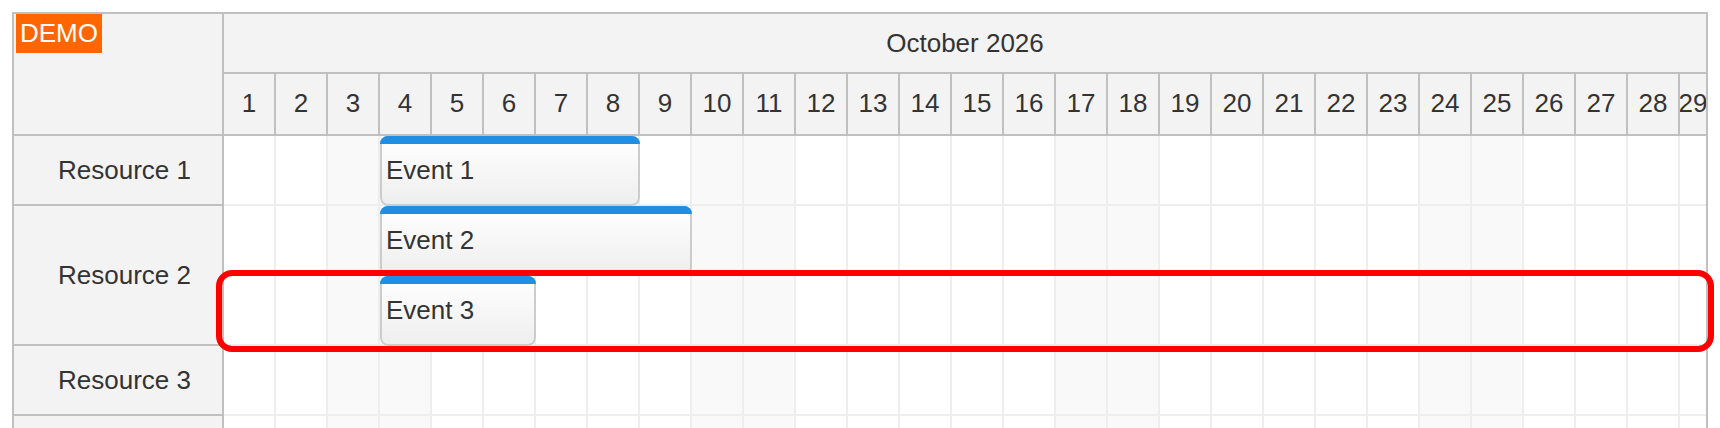
The exact line is calculated using the following rules:
-
The events that start first will be placed first.
-
If multiple events have the same start, the longer ones will be placed first.
-
Each event will be placed in the topmost available line.
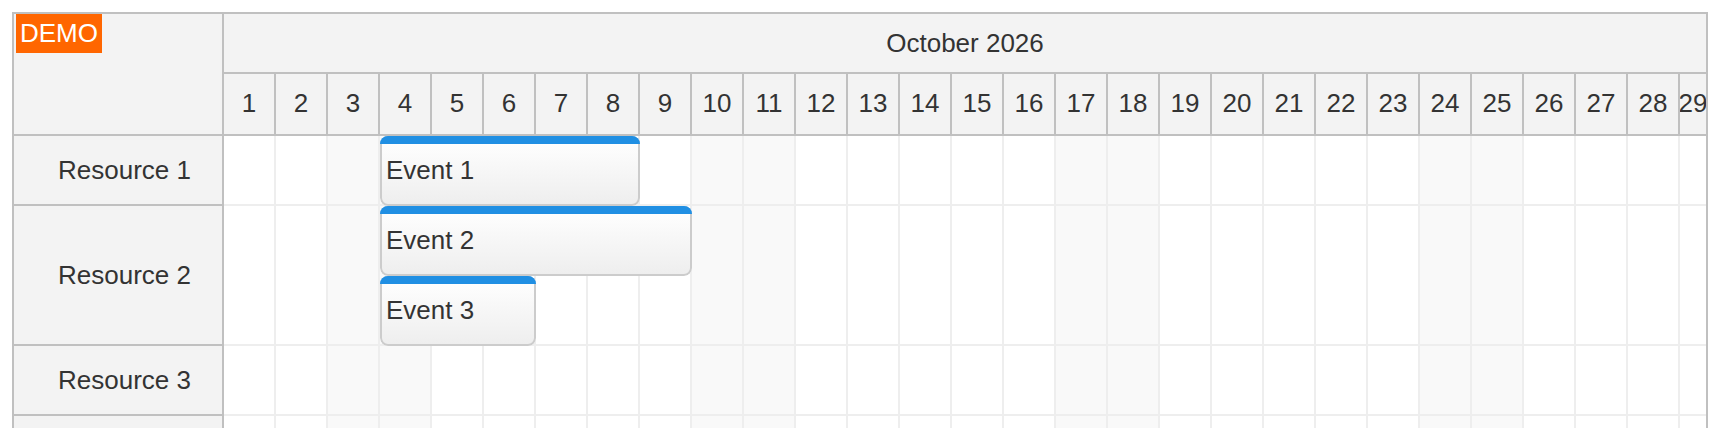
This default sorting rule can be described as start asc, end desc. The sample derives its visible range from the current month, so the same placement rules remain easy to inspect without relying on a fixed historical date:
const start = DayPilot.Date.today().firstDayOfMonth();Event Sorting
The default event sorting rule of start asc, end desc can be overridden by specifying custom sort fields. This affects the vertical position within a row, but it does not force the event into a specific line: the topmost available line is still used.
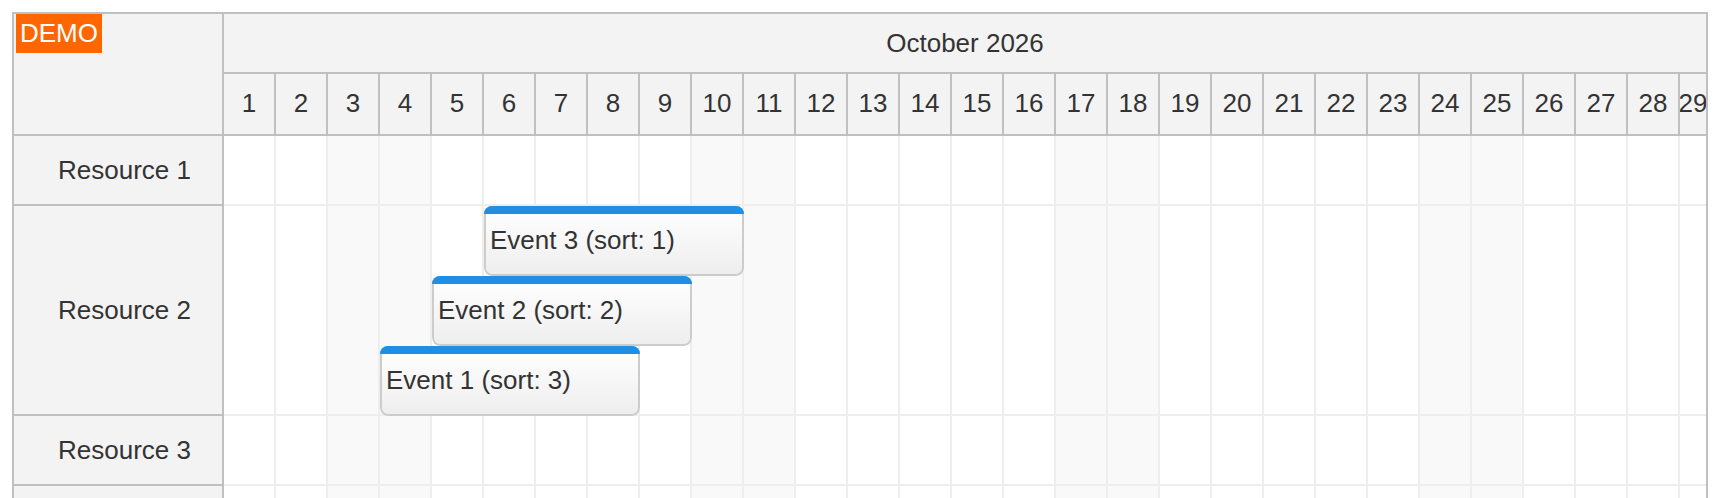
The sorting strategy assigns a numeric value in each event’s sort array to each event and sets the sort direction to ascending. Because smaller values come first, Event 3 is placed above Event 2 and Event 1:
sorting: {
  name: "Custom event sorting",
  sortDirections: ["asc"],
  events: [
    {
      start: start.addDays(3),
      end: start.addDays(8),
      id: 1,
      resource: "R2",
      text: "Event 1 (sort: 3)",
      sort: [3]
    },
    {
      start: start.addDays(4),
      end: start.addDays(9),
      id: 2,
      resource: "R2",
      text: "Event 2 (sort: 2)",
      sort: [2]
    },
    {
      start: start.addDays(5),
      end: start.addDays(10),
      id: 3,
      resource: "R2",
      text: "Event 3 (sort: 1)",
      sort: [1]
    }
  ]
},
Strict Priority Placement
Ordinary sorting chooses which event to place first, then uses any available gap. Select Priority gaps: Short high occupies line 0 until day 9, while Long high runs in line 1 until day 16. Low starts on day 10, so it can use the empty space in line 0 even though it overlaps Long high.
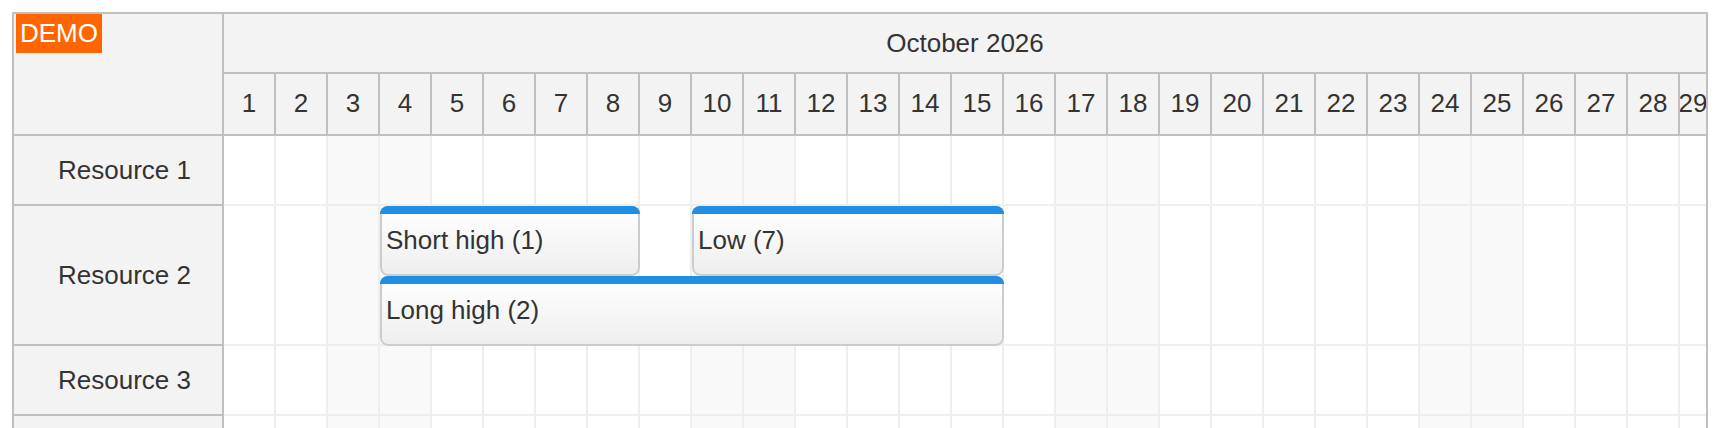
Select Strict priority to enable eventSortStrictEnabled. With the same events, Low uses line 2. The free space above Long high stays empty because the overlapping higher-priority event must remain above Low.
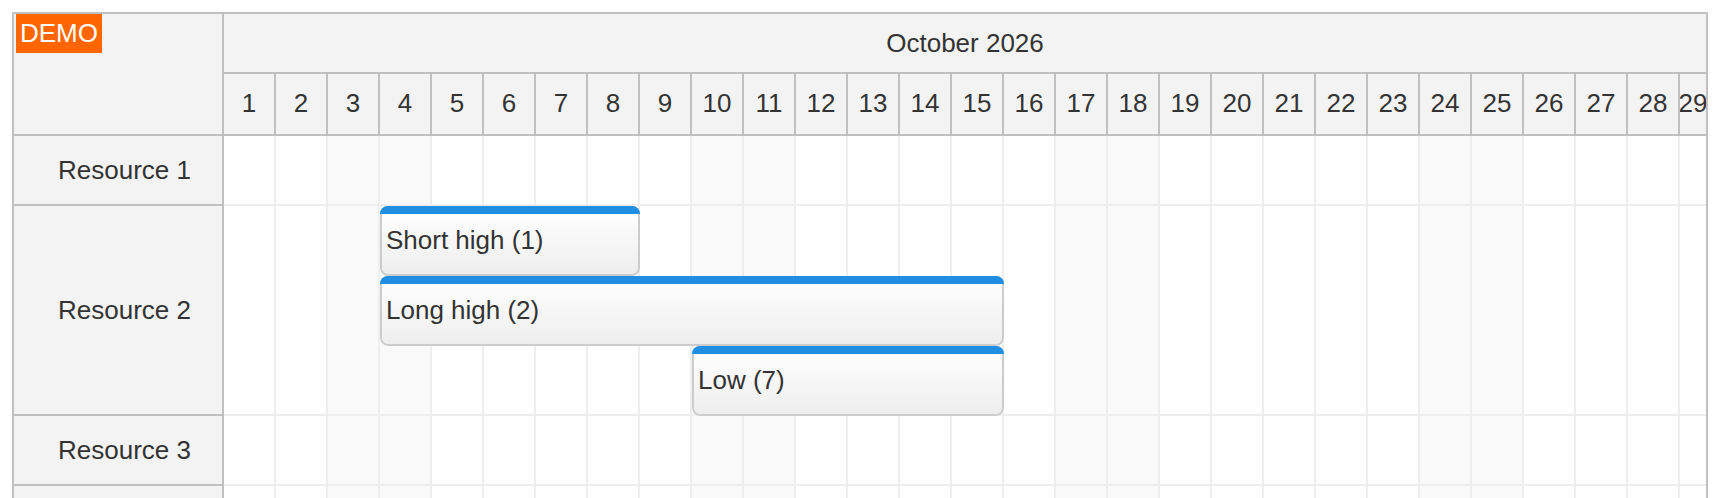
The sample uses two ascending sort fields. The first number is the priority; the second is a tie-breaker. Each position in sortDirections corresponds to the same position in an event’s sort array. Here, 1 precedes 2, which precedes 7. A descending direction reverses the comparison for that field.
const priorityEvents = [
  {id: 1, resource: "R2", start: start.addDays(3), end: start.addDays(8), text: "Short high (1)", sort: [1, 1]},
  {id: 2, resource: "R2", start: start.addDays(3), end: start.addDays(15), text: "Long high (2)", sort: [2, 1]},
  {id: 3, resource: "R2", start: start.addDays(9), end: start.addDays(15), text: "Low (7)", sort: [7, 1]}
];
The Strict priority entry in the strategy selector supplies this configuration:
sortDirections: ["asc", "asc"],
eventSortStrictEnabled: true,
events: priorityEvents
Strict sorting needs custom sort directions and values, and cannot be combined with groupConcurrentEvents. Equal priorities still pack compactly, and disjoint time ranges can share lines. It does not assign a permanent line per priority. Explicit line assignments still apply; containers are placed as units using their first sorted member’s priority.
Stacking of Overlapping Events
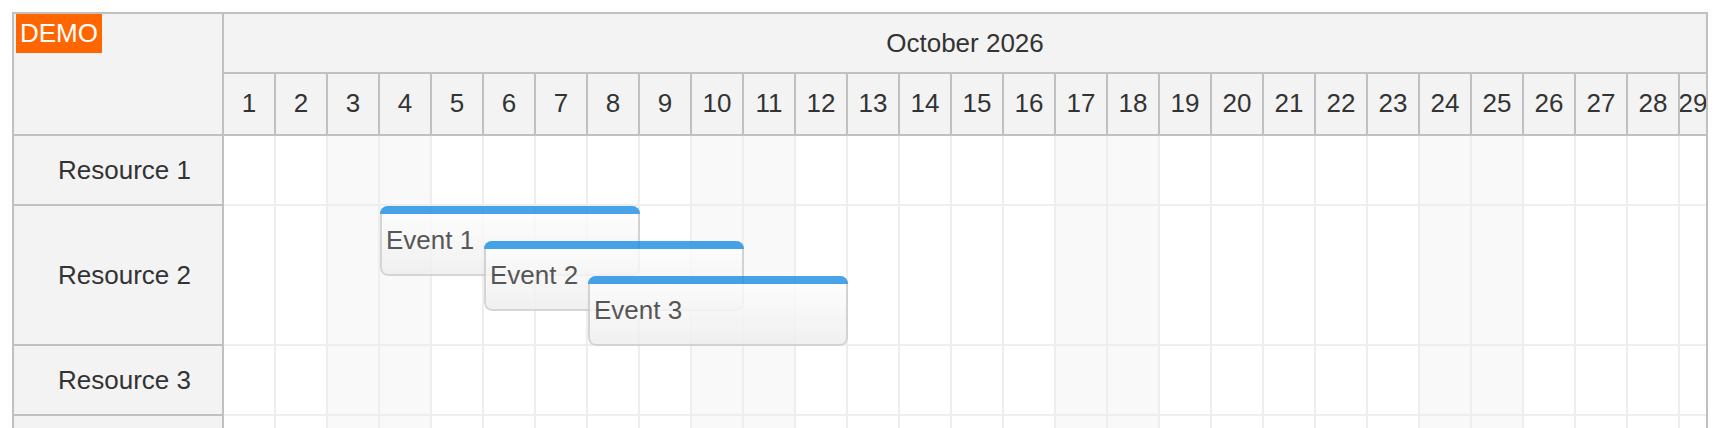
By default, the lines within a row do not overlap. In some cases, you may want to make the view more compact by setting a percentage of line height overlap using eventStackingLineHeight. This property accepts a percentage value from 0 to 100. The default value is 100, which gives every line its full height. A smaller value compacts the view.
The following strategy uses eventStackingLineHeight: 50:
stacking: {
  name: "Overlapping lines at 50% height",
  eventStackingLineHeight: 50,
  events: [
    {
      start: start.addDays(3),
      end: start.addDays(8),
      id: 1,
      resource: "R2",
      text: "Event 1"
    },
    {
      start: start.addDays(5),
      end: start.addDays(10),
      id: 2,
      resource: "R2",
      text: "Event 2"
    },
    {
      start: start.addDays(7),
      end: start.addDays(12),
      id: 3,
      resource: "R2",
      text: "Event 3"
    }
  ]
},
The sample also makes events slightly transparent in this mode so that the text of a partially covered event remains readable:
.stacking-mode .scheduler_default_event {
  opacity: 0.82;
}
Event Containers
All previous examples used the default event line assignment rule. Sometimes, it is useful to display several related events in the same line. The Scheduler supports this scenario through virtual event containers. Specify the same container value in the event data objects (DayPilot.Event.data). By default (eventContainersMultiLineEnabled: false), members with the same container ID in the same resource row share a line, with no unrelated events placed between them. Overlapping members can therefore cover each other. The container’s placement reserves the span from its earliest start to its latest end.
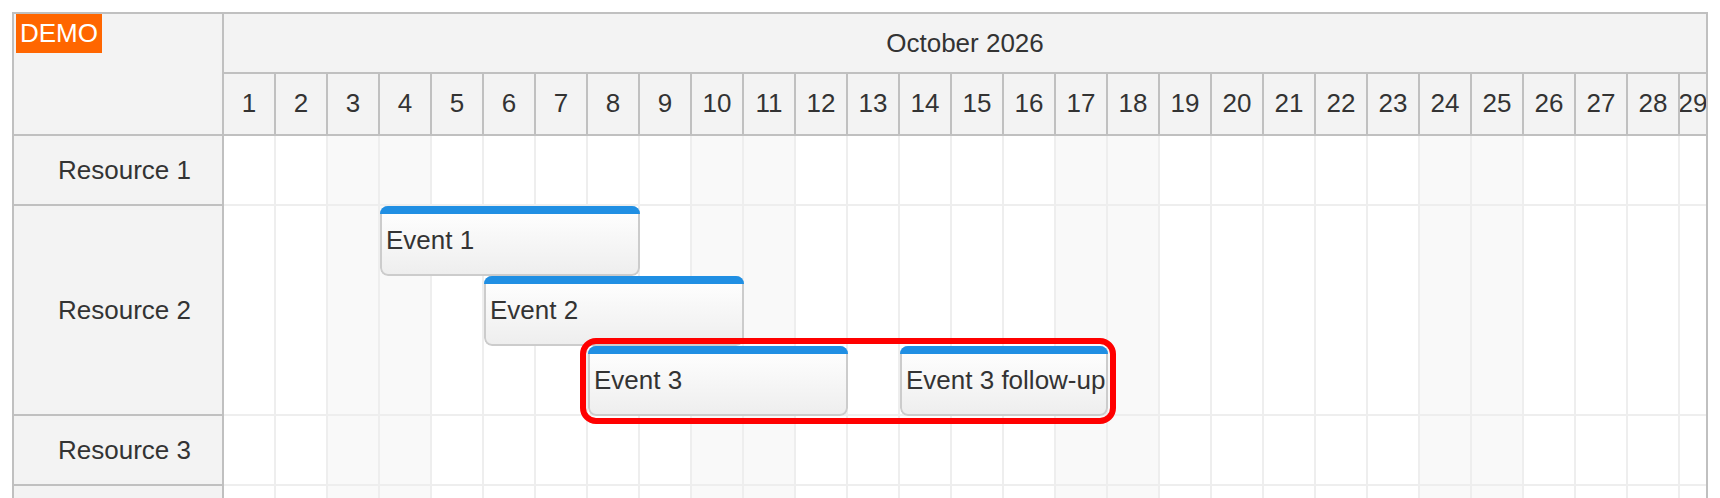
In this example, Event 3 and its follow-up use the same series-1 container ID:
containers: {
  name: "Related events in a virtual container",
  events: [
    {
      start: start.addDays(3),
      end: start.addDays(8),
      id: 1,
      resource: "R2",
      text: "Event 1"
    },
    {
      start: start.addDays(5),
      end: start.addDays(10),
      id: 2,
      resource: "R2",
      text: "Event 2"
    },
    {
      start: start.addDays(7),
      end: start.addDays(12),
      id: 3,
      resource: "R2",
      text: "Event 3",
      container: "series-1"
    },
    {
      start: start.addDays(13),
      end: start.addDays(17),
      id: 4,
      resource: "R2",
      text: "Event 3 follow-up",
      container: "series-1"
    }
  ]
},
Multiline Containers
Select Overlapping container to see the default behavior with Preparation and Assembly overlapping. Their shared container: "job-1" keeps them on one line:
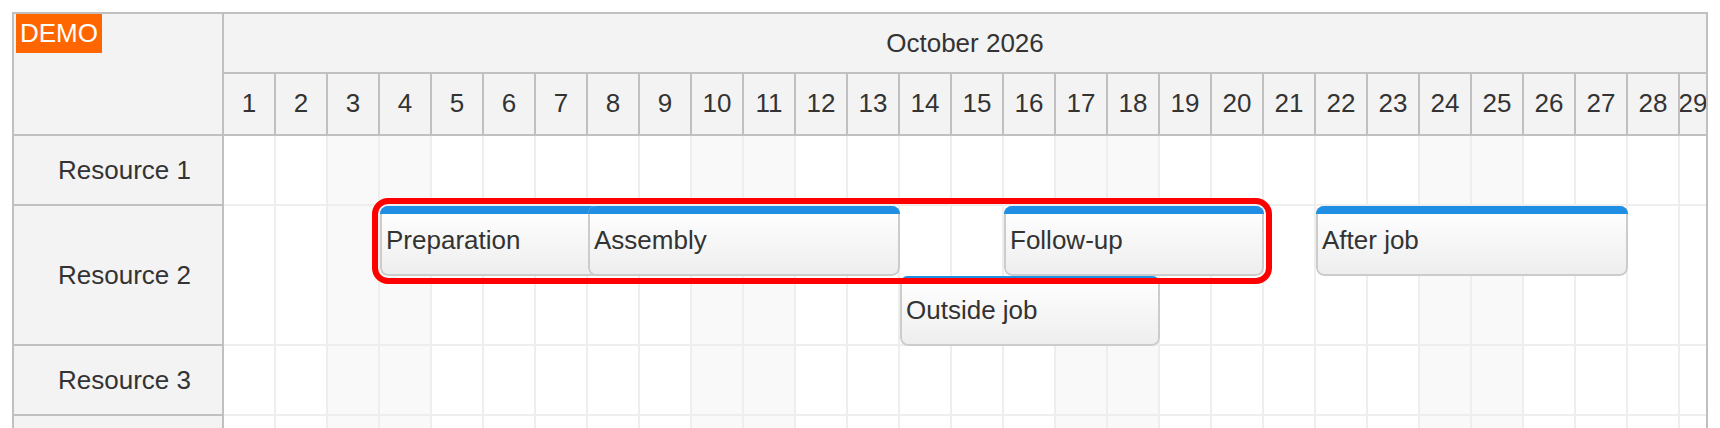
Select Multiline container to enable eventContainersMultiLineEnabled. Preparation and Assembly now occupy separate lines. Follow-up starts later and reuses the first container line.
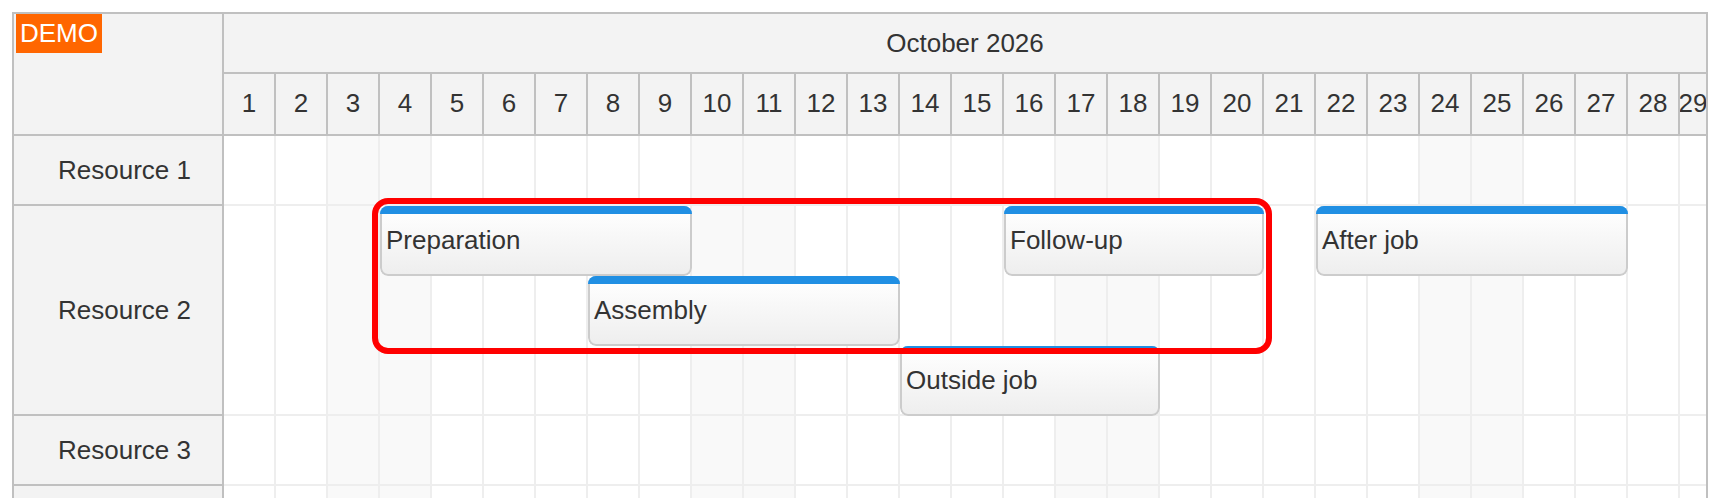
const containerEvents = [
  {id: 1, resource: "R2", start: start.addDays(3), end: start.addDays(9), text: "Preparation", container: "job-1"},
  {id: 2, resource: "R2", start: start.addDays(7), end: start.addDays(13), text: "Assembly", container: "job-1"},
  {id: 3, resource: "R2", start: start.addDays(15), end: start.addDays(20), text: "Follow-up", container: "job-1"},
  {id: 4, resource: "R2", start: start.addDays(13), end: start.addDays(18), text: "Outside job"},
  {id: 5, resource: "R2", start: start.addDays(21), end: start.addDays(27), text: "After job"}
];
In this mode, the selector applies:
eventContainersMultiLineEnabled: true,
events: containerEvents
The container spans days 4–20 (its end is exclusive on day 21) and occupies two lines. That whole rectangle is reserved during automatic placement, including the gap before Follow-up. Outside job therefore uses a third line even though parts of the container appear empty. After job starts beyond the reserved span and can reuse the top line.
Container Outlines
Select Container outlines to show the boundary with eventContainersVisible. The dashed outline makes the reserved rectangle easier to see:
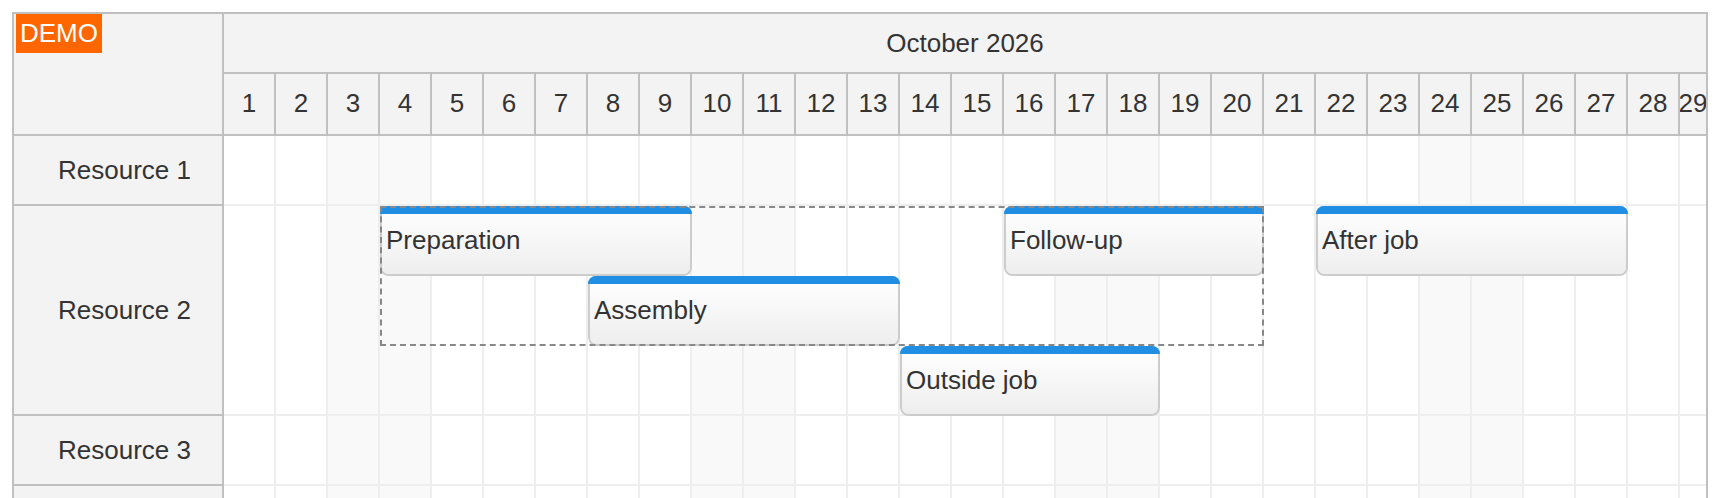
eventContainersMultiLineEnabled: true,
eventContainersVisible: true,
eventContainersLayer: "Above",
events: containerEvents
eventContainersLayer controls drawing order: "Above" is the default; Outlines below uses "Below", where event backgrounds may cover coincident border edges. Both modes keep the same positions. Outlines also work with single-line containers.
This is a visual aid, not a group drag or resize handle. Mouse actions pass through to individual events and the grid in both layers. Outlines are omitted from image exports and cannot be combined with groupConcurrentEvents. Multiline placement and outline visibility are separate settings.
Forcing a Specific Line
Use the event data line property to specify the exact line in which an event should be displayed. The value is a zero-based index, so line: 0 selects the first line within the row.
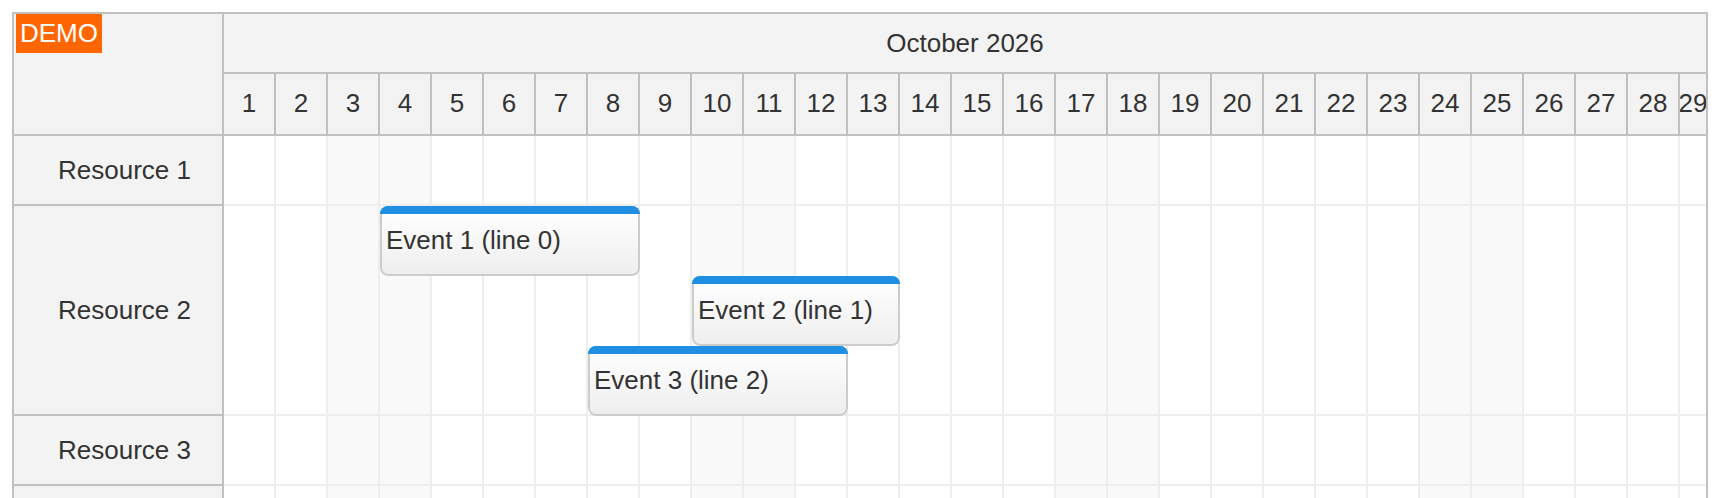
The events below use line indexes 0, 1, and 2. Explicit indexes reserve the requested vertical positions even though the event time ranges do not all overlap:
forcing: {
  name: "Events forced to zero-based line indexes",
  events: [
    {
      start: start.addDays(3),
      end: start.addDays(8),
      id: 1,
      resource: "R2",
      text: "Event 1 (line 0)",
      line: 0
    },
    {
      start: start.addDays(9),
      end: start.addDays(13),
      id: 2,
      resource: "R2",
      text: "Event 2 (line 1)",
      line: 1
    },
    {
      start: start.addDays(7),
      end: start.addDays(12),
      id: 3,
      resource: "R2",
      text: "Event 3 (line 2)",
      line: 2
    }
  ]
},
Minimum Line Placement
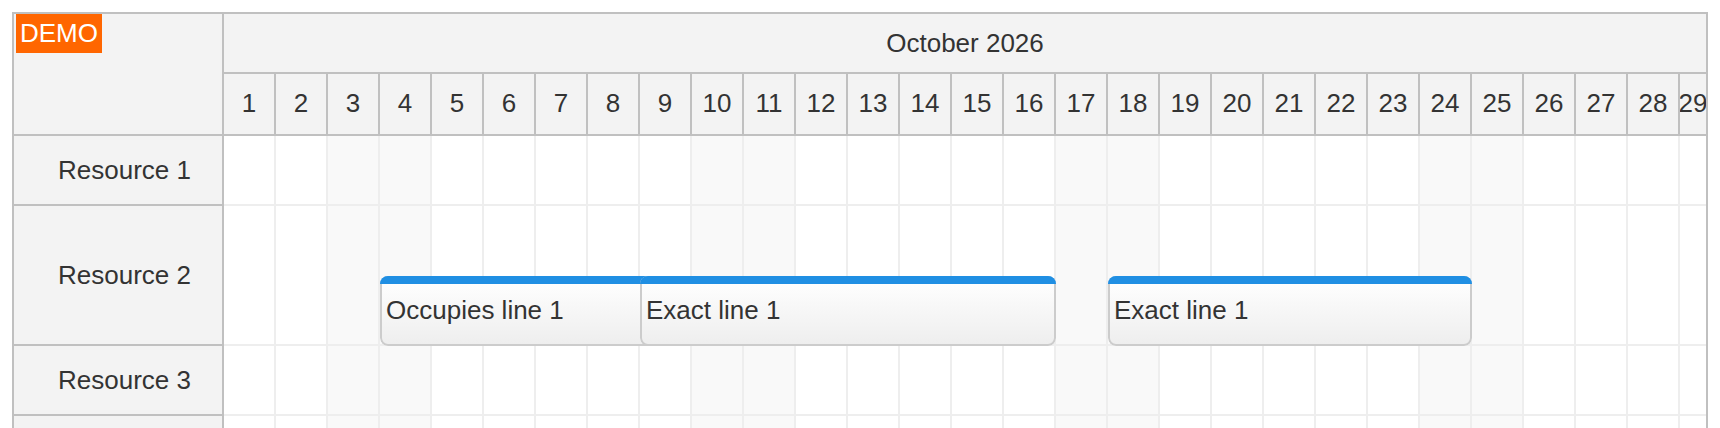
The event data property minLine sets a lower bound on the zero-based line index instead of forcing an exact position. Select Minimum line: Occupies line 1 blocks the requested line for Minimum 1, so that event moves to line 2. The later Minimum 1 (free) event uses line 1 because it is available then. Line 0 stays unused.
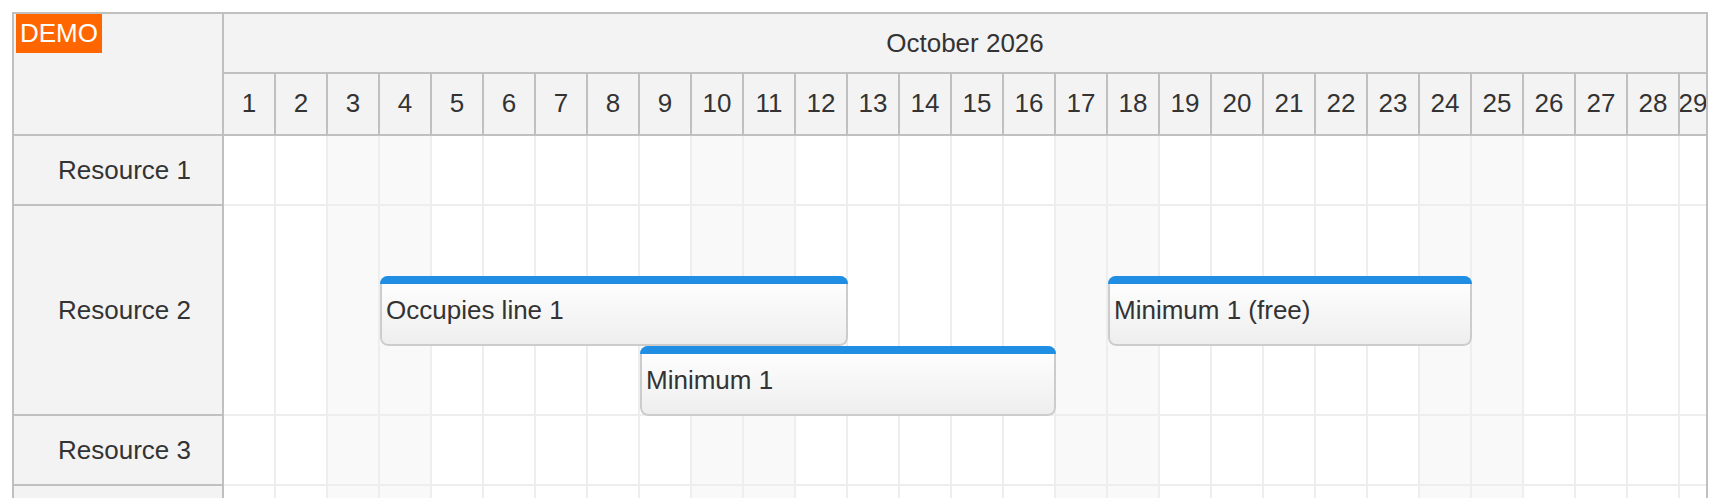
const minimumEvents = [
  {id: 1, resource: "R2", start: start.addDays(3), end: start.addDays(12), text: "Occupies line 1", line: 1},
  {id: 2, resource: "R2", start: start.addDays(8), end: start.addDays(16), text: "Minimum 1", minLine: 1},
  {id: 3, resource: "R2", start: start.addDays(17), end: start.addDays(24), text: "Minimum 1 (free)", minLine: 1}
];
Select Exact line overlap for the same times with line: 1 on every event. Unlike minLine, an exact assignment does not search for a free line: overlapping events remain on line 1 and can obscure each other. Choose a minimum for automatic collision avoidance below a reserved area; use exact lines when your application owns the layout.
Dedicated Line
You can also use line: "dedicated" to place an event in its own line. The first available line is used, and no other event will be rendered in that line. This is useful when an event needs exclusive vertical space even if its time range does not overlap the neighboring events.
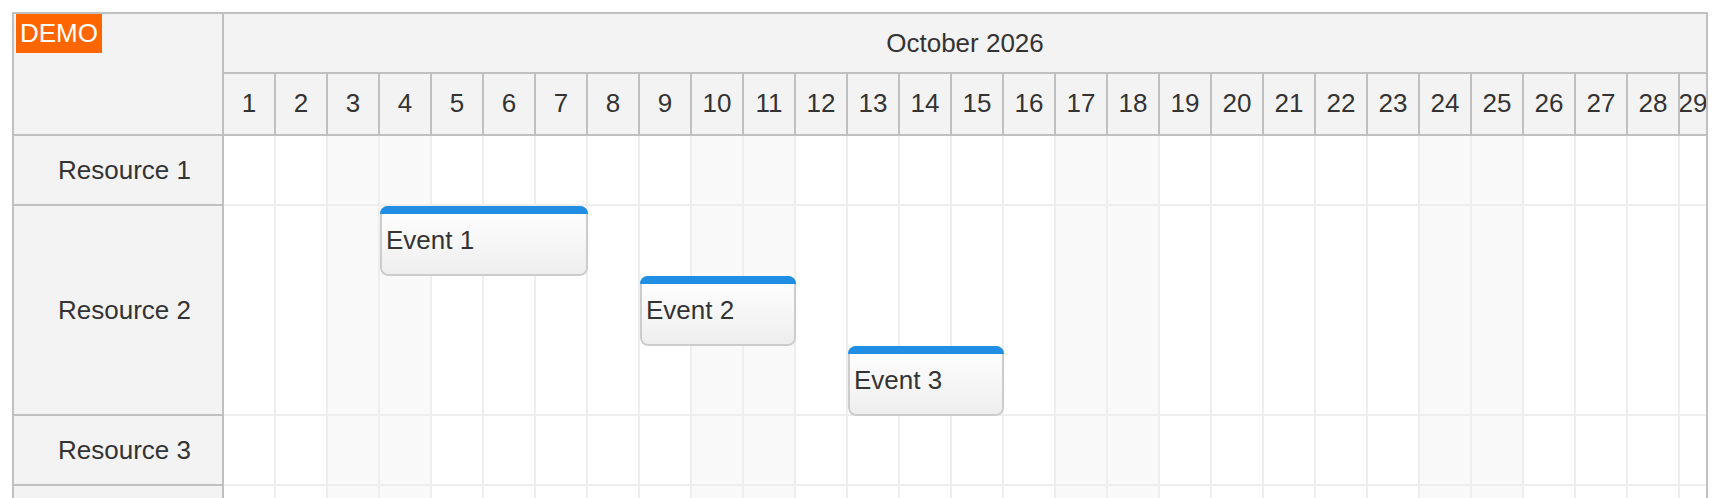
dedicated: {
  name: "Exclusive dedicated lines",
  events: [
    {
      start: start.addDays(3),
      end: start.addDays(7),
      id: 1,
      resource: "R2",
      text: "Event 1",
      line: "dedicated"
    },
    {
      start: start.addDays(8),
      end: start.addDays(11),
      id: 2,
      resource: "R2",
      text: "Event 2",
      line: "dedicated"
    },
    {
      start: start.addDays(12),
      end: start.addDays(15),
      id: 3,
      resource: "R2",
      text: "Event 3",
      line: "dedicated"
    }
  ]
}
Bottom-First Placement
rowReverseLines reverses the line order after events have been loaded and sorted. Select Bottom-first to compare the same strict-priority data with the Strict priority mode:
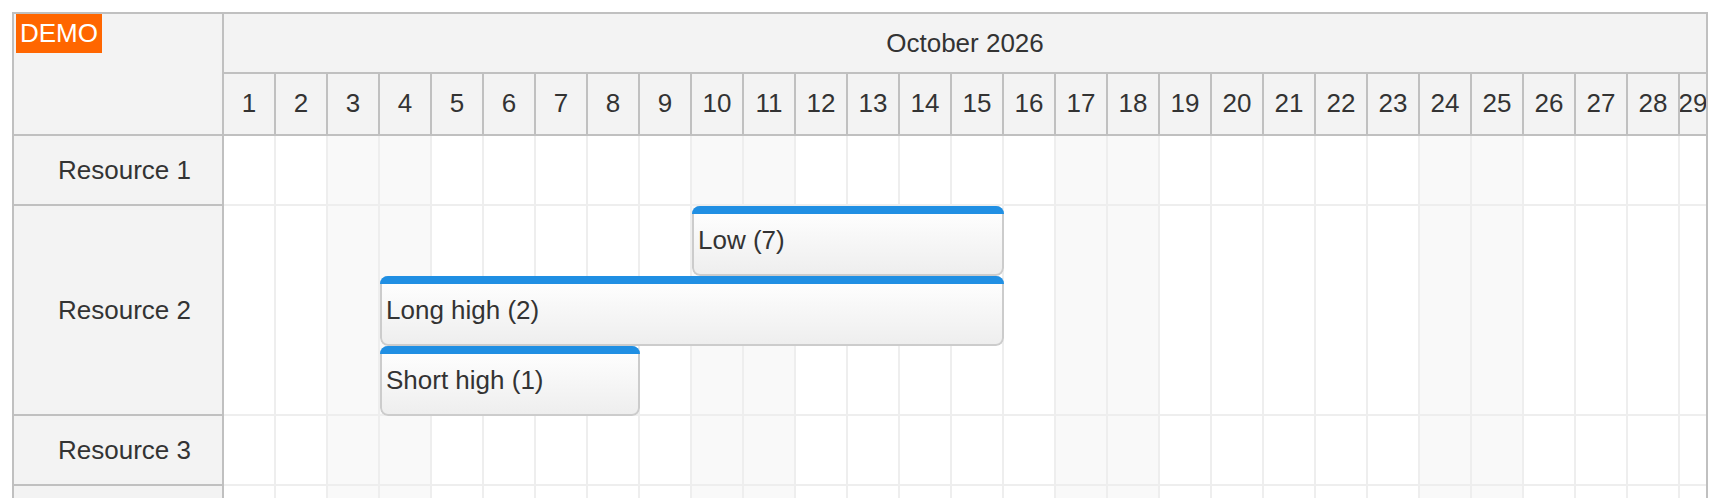
sortDirections: ["asc", "asc"],
eventSortStrictEnabled: true,
rowReverseLines: true,
// Keep reversed line heights consistent in this library build.
eventContainersMultiLineEnabled: true,
events: priorityEvents
The example also enables multiline container layout to avoid clipped reversed rows in the bundled library. These events have no container IDs, so they remain independent events.
The priority values still sort ascending, but the visual direction is reversed: Short high is at the bottom, Long high is above it, and Low is above Long high. This affects line priority as well as visual order; the lower lines are used first. Decide whether “higher priority” should read from the top or the bottom before combining it with strict sorting.
Switching Strategies
The sample applies each strategy to the same Scheduler. Every switch resets options that other modes may have enabled, including sorting, stacking, outlines, multiline placement and reversed lines. It also loads fresh event objects so moving, resizing or adding an event does not change the next comparison.
showStrategy(key) {
  const strategy = this.strategies[key];
  dp.update({
    // Fresh objects restore the example after moving, resizing, or creating events.
    events: strategy.events.map(event => ({...event, sort: event.sort ? [...event.sort] : undefined})),
    sortDirections: strategy.sortDirections || [],
    eventStackingLineHeight: strategy.eventStackingLineHeight ?? 100,
    eventSortStrictEnabled: strategy.eventSortStrictEnabled ?? false,
    eventContainersMultiLineEnabled: strategy.eventContainersMultiLineEnabled ?? false,
    eventContainersVisible: strategy.eventContainersVisible ?? false,
    eventContainersLayer: strategy.eventContainersLayer ?? "Above",
    rowReverseLines: strategy.rowReverseLines ?? false,
    groupConcurrentEvents: false
  });
  // ...
}
See Also
These topics are outside the strategy selector. Drag placement lets the user choose a line interactively. The legacy Scheduler viewType: "Gantt" generates one row per event, but the documentation says it has been superseded by the dedicated Gantt component since DayPilot Pro 7.9.
History
-
October 2026: Added strict sorting, multiline containers and outlines, minimum lines, and bottom-first placement. Updated the sample to DayPilot Pro 2026.4.7068 and refreshed the screenshots.
-
July 2026: Updated the sample and code examples to use the current DayPilot Scheduler API and a current-month timeline.