")
Requirements
-
Node.js 20+
-
npm
-
PHP 8+ with PDO SQLite support
-
Optional:
pdo_mysqlfor MySQL orpdo_pgsqlfor PostgreSQL
Overview
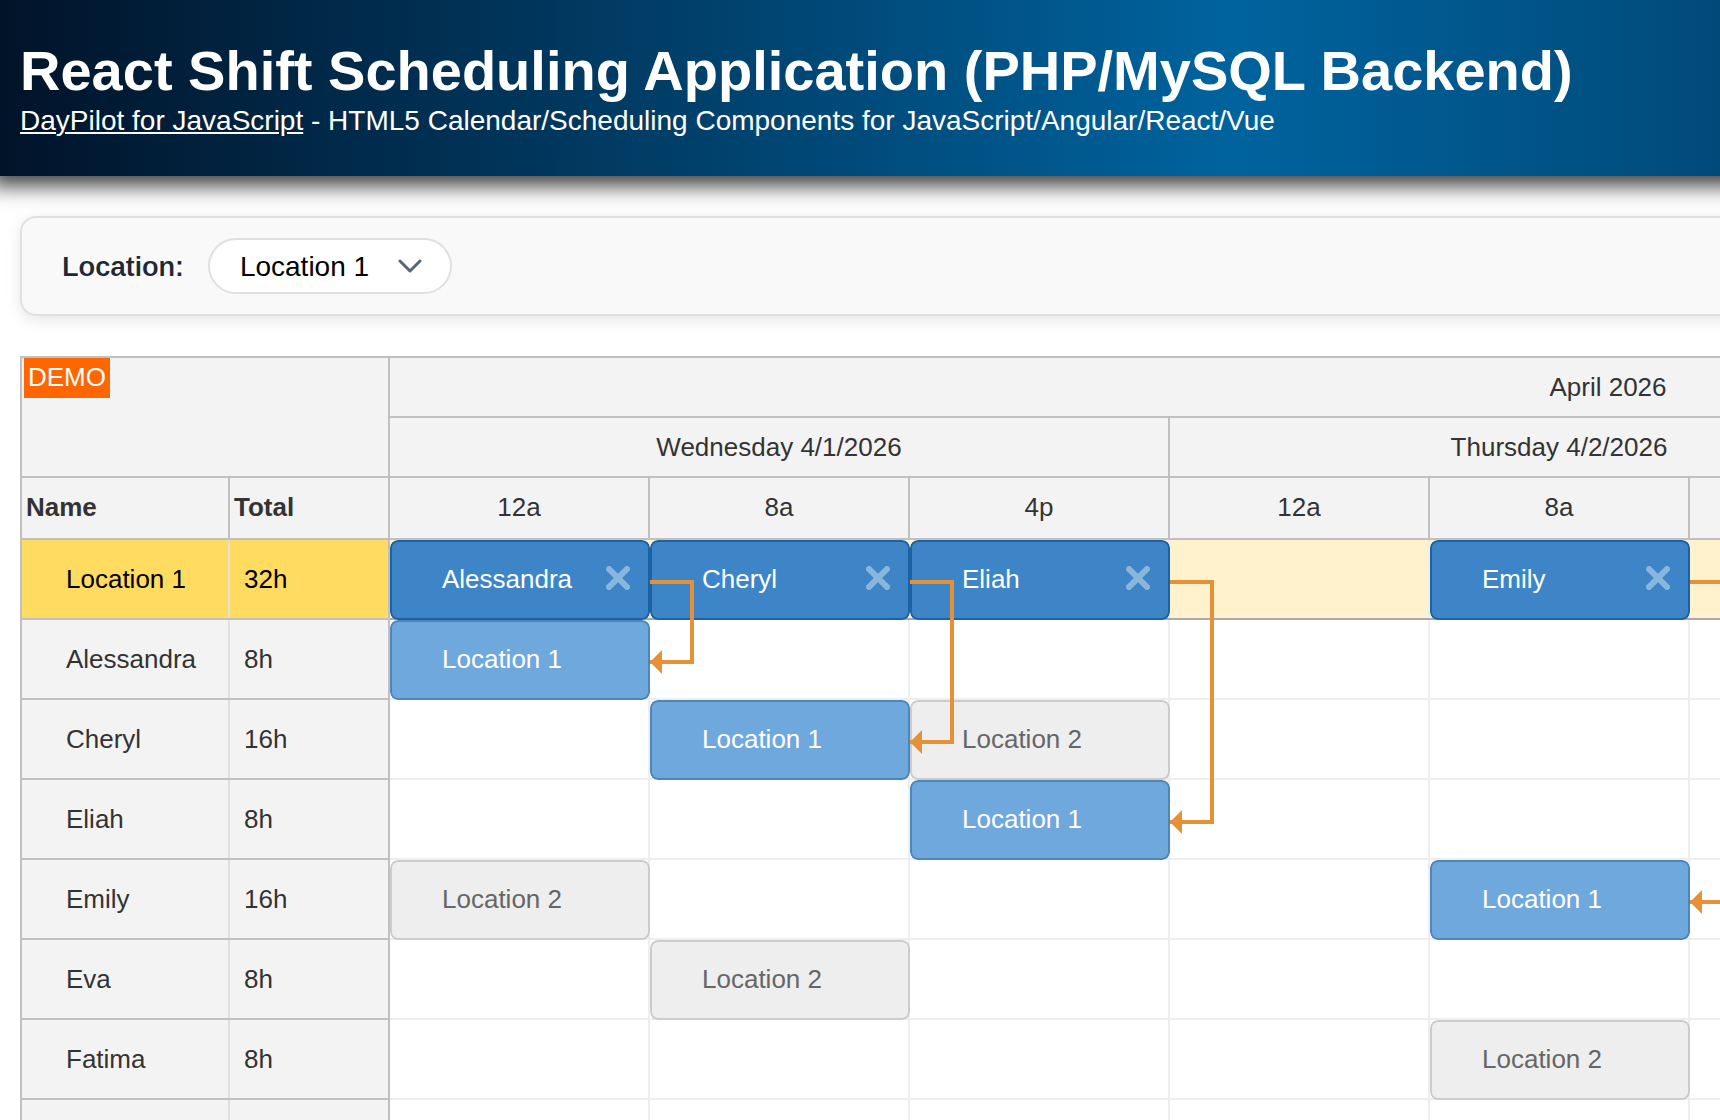
This tutorial shows how to build a quick-start JavaScript Scheduler application using the open-source DayPilot Lite for JavaScript package, a Vite frontend, and a plain PHP backend. The frontend is generated using the DayPilot UI Builder javascript-npm target, and the Scheduler loads room data and bookings from a PHP 8 HTTP/JSON API.
-
Builder-generated frontend stored in
frontend/ -
Plain PHP 8 backend stored in
backend/ -
Current-month Scheduler in day scale
-
Dynamic loading of resources and events from the backend
-
Event creating, moving, resizing, editing, and deleting
-
SQLite by default, with optional MySQL and PostgreSQL configuration
Project Structure
The project uses a split layout. The frontend app lives in frontend, and the backend API lives in backend.
project/
  frontend/
    index.html
    package.json
    vite.config.js
    public/
      icons/daypilot.svg
    src/
      app.js
      styles.css
  backend/
    public/index.php
    router.php
    .env.example
    database/
      schema.sqlite.sql
      schema.mysql.sql
      schema.pgsql.sql
    src/
      Config.php
      Router.php
      Controller/SchedulerController.php
      Database/ConnectionFactory.php
      Database/SchemaManager.php
      Repository/EventRepository.php
      Repository/ResourceRepository.php
This keeps the frontend easy to run with npm, while also making the PHP side structured enough to explain cleanly in the article.
Create the Frontend Project
Start with the DayPilot UI Builder. Choose the Scheduler component, select the javascript-npm target, and download the generated project. In this tutorial, the generated frontend is stored in frontend/.
The generated frontend/index.html file keeps the standard DayPilot blue header. The application shell itself stays compact and only adds a thin status bar above the Scheduler:
<div class="app-shell">
  <div class="status-bar status-bar--info" id="status-bar">
    <div class="status-bar__message" id="status-message">Loading rooms and bookings from the PHP backend...</div>
    <div class="status-bar__counts">
      <span><strong id="resource-count">0</strong> rooms</span>
      <span><strong id="event-count">0</strong> bookings</span>
    </div>
  </div>

  <div id="dp"></div>
</div>
To run the project in development, start the PHP API and the Vite frontend separately:
cd frontend
npm install

cd ..
php -S 127.0.0.1:8000 backend/router.php

cd frontend
npm run dev
The frontend uses a Vite proxy, so local /api/* requests go to the PHP server automatically:
import { defineConfig } from "vite";

export default defineConfig({
  server: {
    proxy: {
      "/api": {
        target: "http://127.0.0.1:8000",
        changeOrigin: true,
      },
    },
  },
});
Load Resources and Events from the PHP API
The frontend keeps the main control flow in frontend/src/app.js. The initial load is straightforward:
-
request the room list from
/api/resources -
request the visible date range from
/api/events -
apply both arrays in a single Scheduler update

let resources = [];
let events = [];

async function loadInitialData() {
  setStatus("Loading rooms and bookings from the PHP backend...", "info");

  const [resourcesResponse, eventsResponse] = await Promise.all([
    DayPilot.Http.get("/api/resources"),
    DayPilot.Http.get(`/api/events?${currentRange()}`),
  ]);

  resources = resourcesResponse.data;
  events = eventsResponse.data;

  scheduler.update({
    days: visibleDays,
    events,
    resources,
    startDate: visibleStart,
  });

  updateCounts();
}
This keeps the frontend readable and avoids separate resource and event updates during startup.
DayPilot Lite also includes rows.load() and events.load() helpers for binding URLs directly to the Scheduler. In this project, the requests stay in app.js so the frontend/backend flow remains easy to follow, while the returned JSON still uses the standard event data object structure.
The backend routes are intentionally small. The controller reads the visible range from the request and delegates the actual filtering to EventRepository:
public function resources(): void
{
    JsonResponse::send($this->resources->all());
}

public function events(Request $request): void
{
    $start = $this->normalizeDate((string) $request->query('start', ''));
    $end = $this->normalizeDate((string) $request->query('end', ''));

    JsonResponse::send($this->events->findInRange($start, $end));
}
The resource array still follows the resources property format. The resource data also includes room metadata (location, capacity, accent) that the row headers can display directly.
Configure the Scheduler Appearance
The Scheduler configuration stays compact, but the sample adds a few Lite-safe touches that make the UI look like a real starter app instead of a raw grid.

The sample keeps the default Lite styling, but custom CSS themes are supported as well. If you want to generate your own theme, the online theme designer is the fastest way to start.
-
row header customization shows the room name, location, seat count, and a small accent dot
-
custom event appearance uses
tags.typeto distinguish meetings, training sessions, and maintenance windows -
weekends and today are highlighted directly in the grid and the day headers
-
a calendar icon in the upper-left corner opens a popup date picker for jumping to another month
const scheduler = new DayPilot.Scheduler("dp", {
  rowMarginTop: 2,
  rowMarginBottom: 2,
  eventHeight: 44,
  eventBorderRadius: 18,
  eventPadding: 8,
  timeHeaders: [
    { groupBy: "Month", format: "MMMM yyyy" },
    { groupBy: "Day", format: "d" },
  ],
  onBeforeCornerRender: (args) => {
    args.areas = [{
      left: "calc(50% - 10px)",
      top: "calc(50% - 10px)",
      width: 20,
      height: 20,
      symbol: "icons/daypilot.svg#calendar",
      style: "cursor: pointer",
      onClick: (clickArgs) => openDatePicker(clickArgs.originalEvent.currentTarget),
    }];
  },
  onBeforeRowHeaderRender: (args) => {
    const room = args.row.data;
    args.row.html = `<div class="room-card"><div class="room-heading"><span class="room-dot" style="background: ${room.accent}"></span><span class="room-name">${room.name}</span></div><div class="room-meta"><span>${room.location}</span><span class="room-capacity">${room.capacity} seats</span></div></div>`;
  },
  onBeforeEventRender: (args) => {
    const typeId = args.data.tags?.type || "meeting";
    const type = eventTypes[typeId] || eventTypes.meeting;

    args.data.backColor = type.backColor;
    args.data.borderColor = type.borderColor;
    args.data.cssClass = `event-type event-type--${typeId}`;
    args.data.fontColor = type.fontColor;
  },
});
The date picker itself is just a small helper that changes the visible month and reloads the events for the new range:
function openDatePicker(target) {
  const picker = new DayPilot.DatePicker({
    date: selectedDate,
    resetTarget: false,
    target,
    onTimeRangeSelect: async (args) => {
      args.preventDefault();
      picker.close();

      selectedDate = args.start.getDatePart();
      visibleStart = selectedDate.firstDayOfMonth();
      visibleDays = visibleStart.daysInMonth();

      scheduler.update({
        days: visibleDays,
        startDate: visibleStart,
      });

      await loadEvents(`Showing ${selectedDate.toString("MMMM d, yyyy")}.`);
    },
  });

  picker.show();
}
If you want to explore this pattern in more detail, see also JavaScript Scheduler: Date Picker in the Upper-Left Corner.
Drag and Drop Event Creating
To create a new event, drag over a free time range in any room row. The onTimeRangeSelected event handler opens a modal form built using DayPilot.Modal.form(). If you need more background on replacing the built-in browser prompt, see also JavaScript Prompt Replacement.

const eventForm = [
  { name: "Event", id: "text" },
  { name: "Type", id: "tags.type", type: "select", options: eventTypeOptions },
];

async function createEvent(args) {
  const modal = await DayPilot.Modal.form(eventForm, {
    tags: { type: "meeting" },
    text: "New booking",
  });

  scheduler.clearSelection();

  if (modal.canceled) {
    return;
  }

  const response = await DayPilot.Http.post("/api/events", {
    start: args.start.toString(),
    end: args.end.toString(),
    resource: args.resource,
    text: modal.result.text.trim(),
    tags: { type: modal.result.tags?.type || "meeting" },
  });

  events = [...events, response.data.event];
  scheduler.events.add(response.data.event);
}

The matching backend endpoint is POST /api/events. The controller validates the payload, checks the resource id, and stores the event using the repository layer.
Move and Resize Existing Events
Drag and drop operations stay simple on the client. While the user is dragging, DayPilot shows the event in its temporary position; when the drop is confirmed, both moving and resizing call the same updateEvent() helper, which sends a full event payload using PUT /api/events/{id}.

onEventMoved: async (args) => {
  await updateEvent({
    id: args.e.id(),
    text: args.e.text(),
    start: args.newStart.toString(),
    end: args.newEnd.toString(),
    resource: args.newResource,
    tags: { type: args.e.data.tags?.type || "meeting" },
  });
},

onEventResized: async (args) => {
  await updateEvent({
    id: args.e.id(),
    text: args.e.text(),
    start: args.newStart.toString(),
    end: args.newEnd.toString(),
    resource: args.e.data.resource,
    tags: { type: args.e.data.tags?.type || "meeting" },
  });
},
The backend router keeps the update path explicit:
if (preg_match('#^/api/events/([^/]+)$#', $path, $matches) === 1) {
    $id = $matches[1];

    if ($method === 'PUT') {
        $this->controller->updateEvent($id, $request);
    }

    if ($method === 'DELETE') {
        $this->controller->deleteEvent($id);
    }
}
Edit and Delete Existing Events
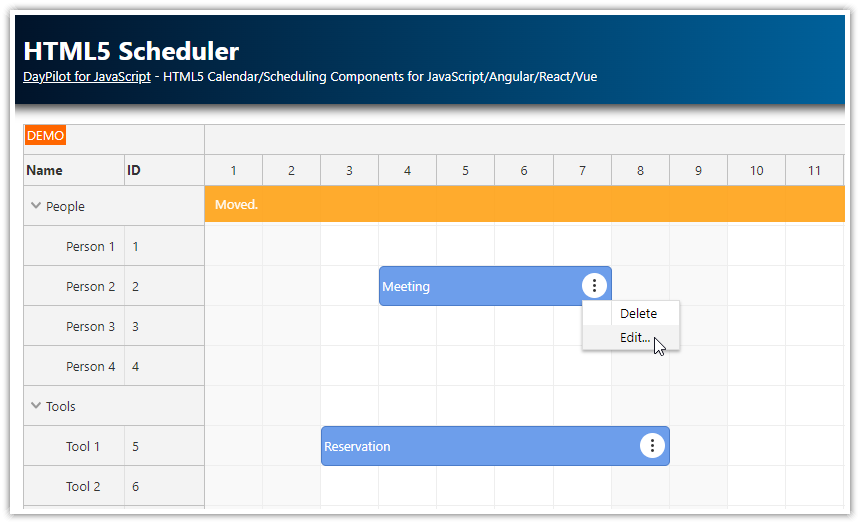
The event action button opens the same context menu that is available on right click. It gives you a compact place for edit and delete commands without adding extra toolbar buttons to the page.

onEventClick: async (args) => {
  await editEvent(args.e);
},

contextMenu: new DayPilot.Menu({
  items: [
    {
      text: "Edit...",
      symbol: "icons/daypilot.svg#edit",
      onClick: async (args) => {
        await editEvent(args.source);
      },
    },
    {
      text: "Delete",
      symbol: "icons/daypilot.svg#trash",
      onClick: async (args) => {
        await deleteEvent(args.source);
      },
    },
  ],
}),
Clicking an event opens the same modal form with the existing values preloaded:

The delete operation maps directly to DELETE /api/events/{id}. On success, the frontend removes the event from the local array and from the Scheduler control.
Build the PHP Backend and Router
The backend uses plain PHP, but the responsibilities are split into small pieces:
-
bootstrap.phpwires together the configuration, database connection, schema manager, repositories, controller, and router -
Router.phpmatches HTTP method + path combinations -
SchedulerController.phpvalidates requests and returns JSON responses -
repositories execute SQL and map database rows to Scheduler data objects
function createApplication(): App
{
    $projectRoot = dirname(__DIR__);
    $config = Config::load($projectRoot);
    $connection = (new ConnectionFactory())->create($config);

    (new SchemaManager($connection, $config))->ensureReady();

    $resourceRepository = new ResourceRepository($connection);
    $eventRepository = new EventRepository($connection);
    $controller = new SchedulerController($resourceRepository, $eventRepository);
    $router = new Router($controller);

    return new App($router);
}
private function toEvent(array $event): array
{
return [
'end' => $event['end_value'],
'id' => (string) $event['id'],
'resource' => $event['resource_id'],
'start' => $event['start_value'],
'tags' => [
'type' => $event['type_value'],
],
'text' => $event['name'],
];
}
SchemaManager initializes the selected database automatically and seeds a room-booking dataset on the first run, so the quick-start project works immediately after launch.
Database Schema
The default SQLite database uses two simple tables: one for resources and one for events. This is the exact DDL from backend/database/schema.sqlite.sql:
CREATE TABLE IF NOT EXISTS resources (
    id TEXT PRIMARY KEY,
    name TEXT NOT NULL,
    location TEXT NOT NULL,
    capacity INTEGER NOT NULL,
    accent TEXT NOT NULL
);

CREATE TABLE IF NOT EXISTS events (
    id INTEGER PRIMARY KEY AUTOINCREMENT,
    name TEXT NOT NULL,
    start_value TEXT NOT NULL,
    end_value TEXT NOT NULL,
    resource_id TEXT NOT NULL,
    type_value TEXT NOT NULL DEFAULT 'meeting',
    FOREIGN KEY (resource_id) REFERENCES resources(id)
);
The MySQL and PostgreSQL schema files keep the same logical structure, so switching database drivers does not require any frontend changes.
Optional MySQL and PostgreSQL Configuration
SQLite is the default because it keeps the sample easy to run. If you want to switch to MySQL or PostgreSQL, copy backend/.env.example to backend/.env and update the driver and connection settings:
DB_DRIVER=sqlite
DB_SQLITE_PATH=backend/storage/quick-start-project.sqlite

# Optional MySQL configuration
# DB_DRIVER=mysql
# DB_HOST=127.0.0.1
# DB_PORT=3306
# DB_NAME=daypilot_quick_start
# DB_USER=root
# DB_PASSWORD=

# Optional PostgreSQL configuration
# DB_DRIVER=pgsql
# DB_HOST=127.0.0.1
# DB_PORT=5432
# DB_NAME=daypilot_quick_start
# DB_USER=postgres
# DB_PASSWORD=postgres
The backend loads the driver-specific schema automatically from backend/database/, so each database type has its own SQL file:
-
schema.sqlite.sql -
schema.mysql.sql -
schema.pgsql.sql
License
Apache License 2.0
History
-
April 19, 2026: Refreshed as a Lite-based npm quick-start project with a modern PHP 8 JSON backend, dynamic resource/event loading, richer section-specific screenshots, and optional MySQL/PostgreSQL configuration.
-
September 29, 2021: Original tutorial published.