Overview
Extend the Vue Scheduler component with unlimited undo/redo functionality.
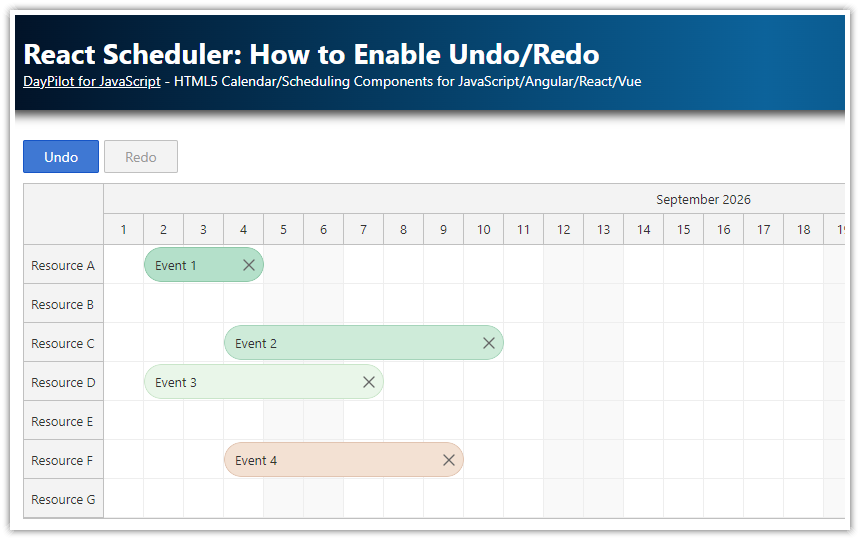
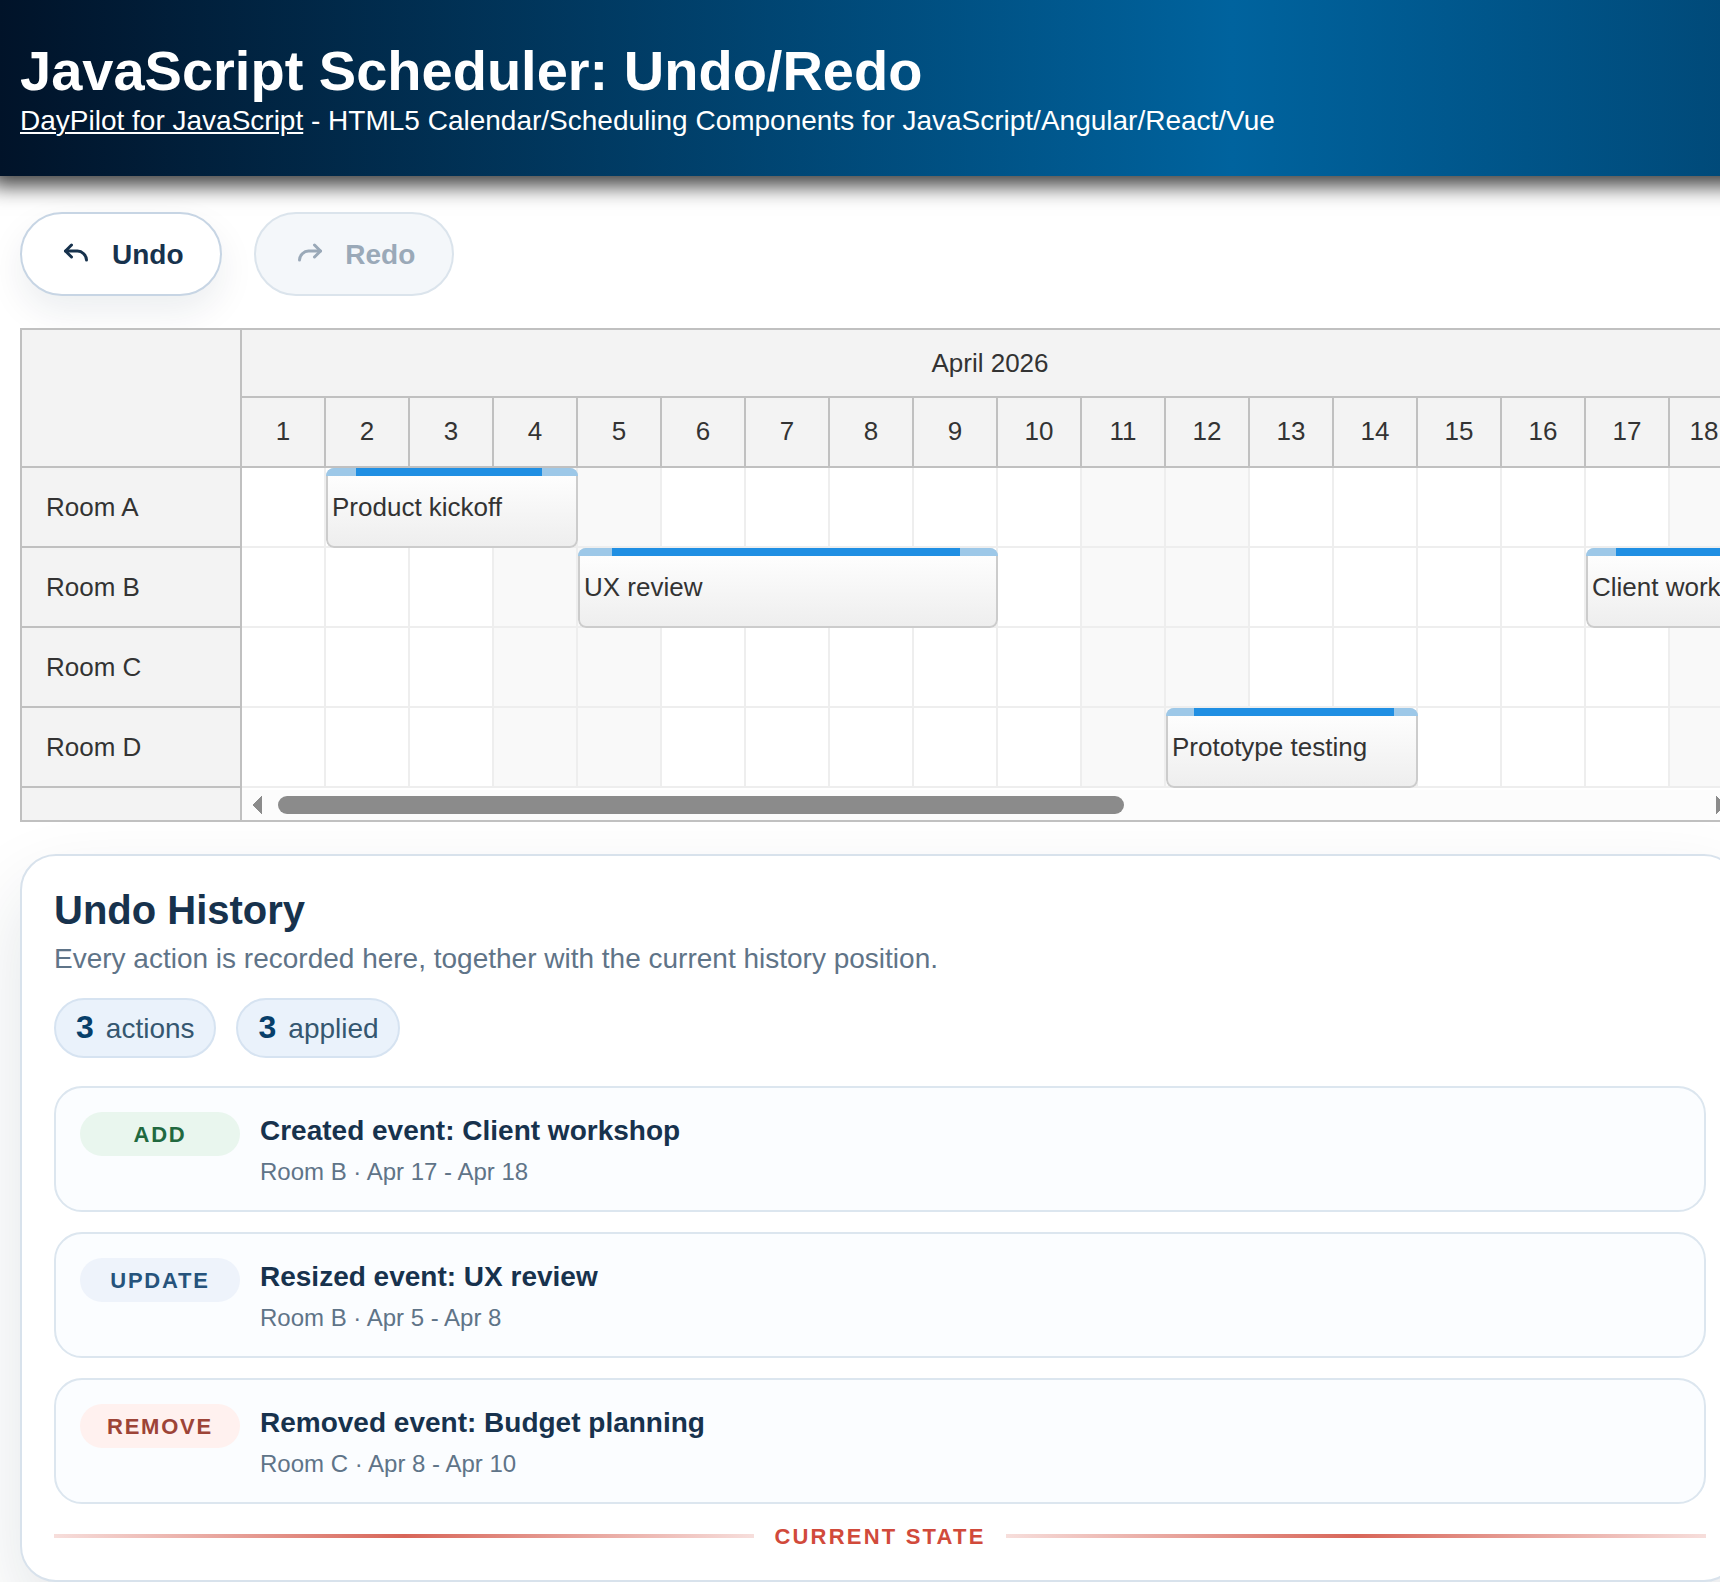
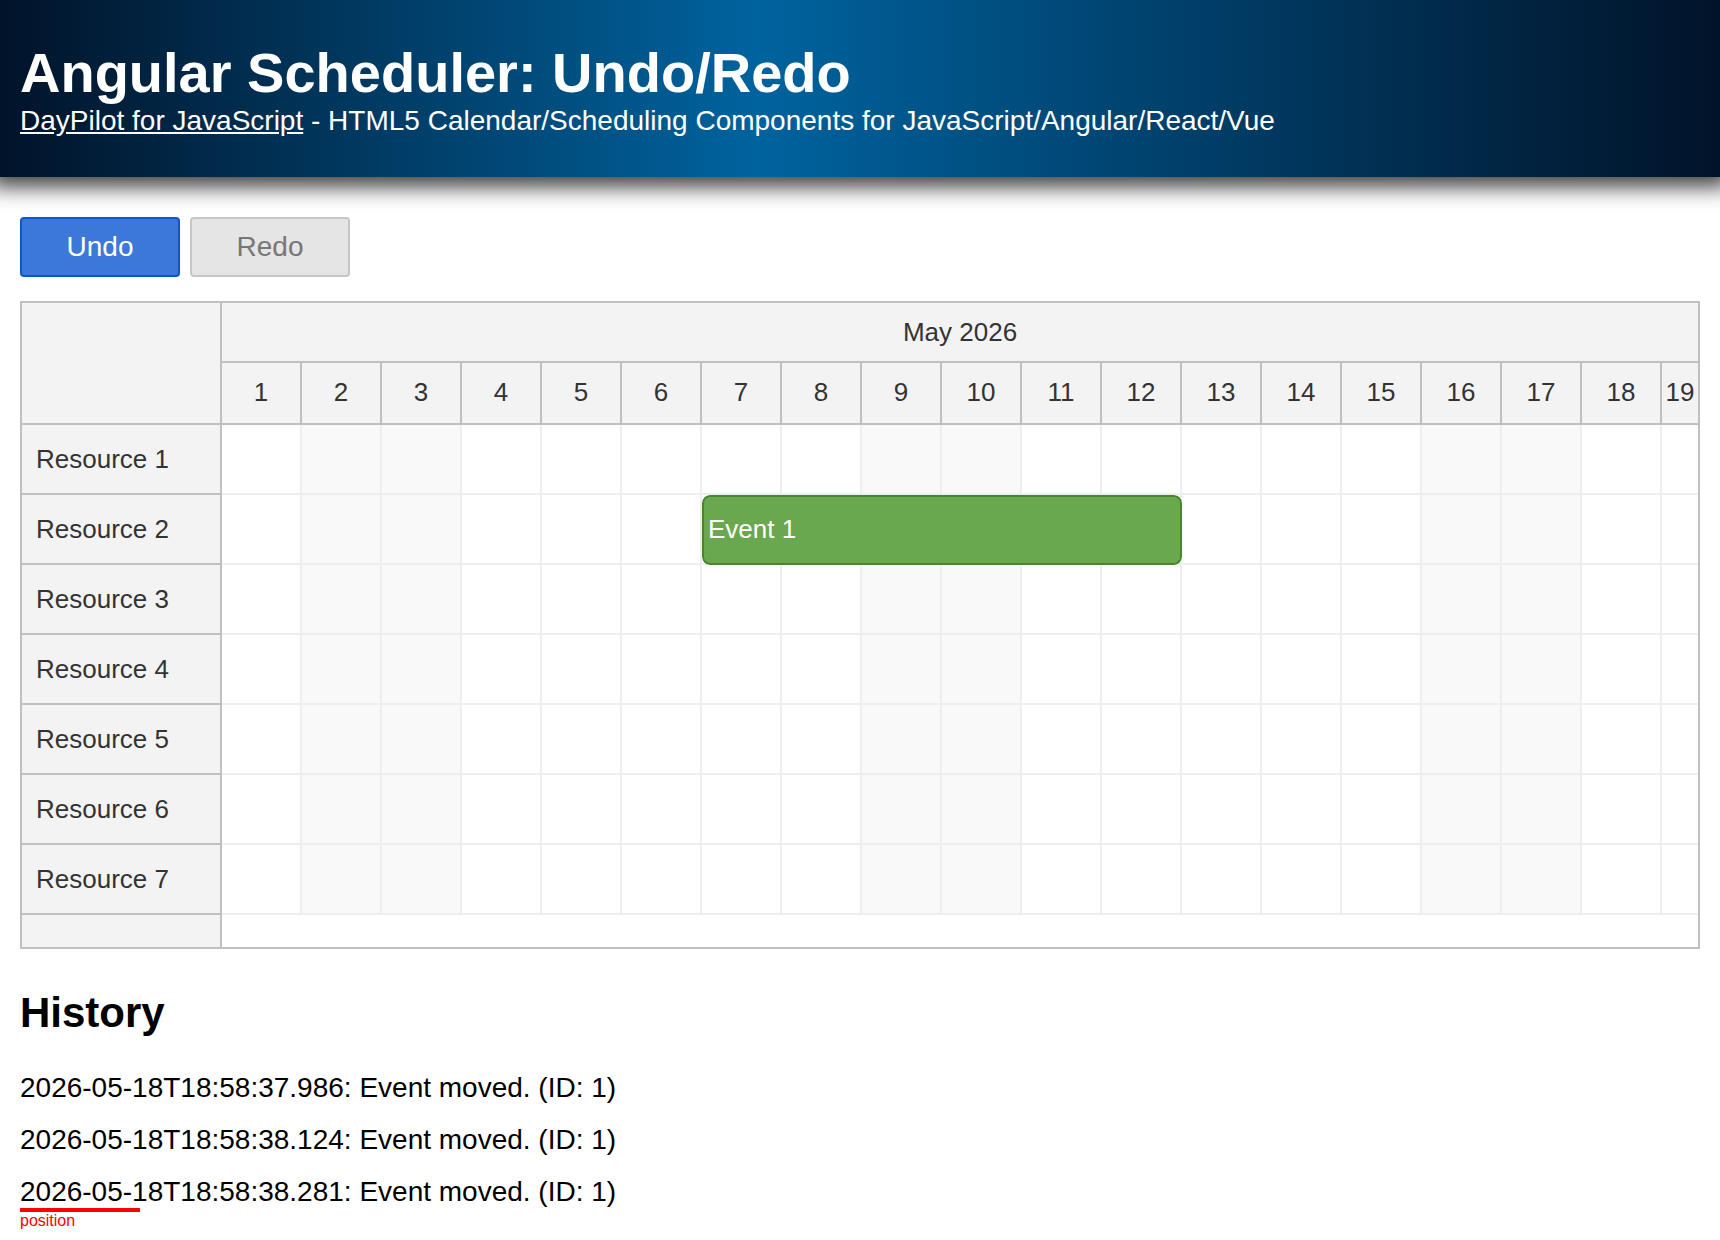
The Undo and Redo buttons are only enabled if the action is allowed.
See the history of all actions and the current position.
License
This project uses the Vue package from the open-source DayPilot Lite for JavaScript scheduling library.
Introduction to the Vue Scheduler component
For an introduction to using the Vue Scheduler component please see the tutorial:
This undo/redo tutorial assumes that you are familiar with the Vue Scheduler component basics.
How to implement undo/redo for the Vue Scheduler?

The attached projects includes an UndoService class which contains the implementation of the undo/redo logic.
You need to feed it with the initial event set and record all actions.
The service maintains a history of all actions performed.
The service can return information about the last action so you can perform the “undo” action.
It also maintains the current position in the history and if available, you can get information about the next action and perform “redo”.
Each history item stores the type of operation (add/edit/remove) and the event state before (previous) and after (current) the action. It also stores a text comment that contains details about the action.
How to record Vue Scheduler drag and drop actions in undo/redo history?

In order to perform the undo/redo, you need to use the UndoService class and record all changes performed by the user.
First, you need to create an instance of the UndoService:
const service = reactive(new UndoService())Before you start recording the user drag and drop actions using the UndoService, you need to save the initial state of the event data set using the initialize() method:
const loadEvents = () => {
  const list = [
    { id: 1, start: '2026-08-03T00:00:00', end: '2026-08-08T00:00:00', text: 'Event 1', resource: 'R4' },
    { id: 2, start: '2026-08-04T00:00:00', end: '2026-08-10T00:00:00', text: 'Event 2', resource: 'R2' }
  ]
  events.value = list
  service.initialize(list)
}

// ...

onMounted(() => {
  loadEvents()
  // ...
});
Now you can record the actions. You need to record every change made to the events, either using the UI or using the direct API.
To record changes made by the user using the Scheduler UI, you can use the following events handlers:
onEventMoved: fired when an event has been moved
onEventResized: fired when an event has been resized
onTimeRangeSelected: fired when a time range has been selected, that is usually mapped to new event creation
onClickevent of the active area with the “delete” icon: fired when the event is removed
Here is the logic that uses the drag and drop event handlers to record the actions:
<template>
  <DayPilotScheduler
      ...
      :resources="resources"
      :events="events"
      @timeRangeSelected="onTimeRangeSelected"
      @eventMoved="onEventMoved"
      @eventResized="onEventResized"
      @eventDeleted="onEventDeleted"
      @beforeEventRender="onBeforeEventRender"
  />

</template>

<script setup>
import { ref, onMounted, computed, reactive } from 'vue'
import { DayPilot, DayPilotScheduler } from '@daypilot/daypilot-lite-vue'
import { UndoService } from '@/undo/UndoService'

const service = reactive(new UndoService())

const schedulerRef = ref(null)
const scheduler = computed(() => schedulerRef.value?.control)

const resources = ref([])
const events = ref([])

const onTimeRangeSelected = async (args) => {
  const dp = args.control
  const modal = await DayPilot.Modal.prompt('Create a new event:', 'Event 1')
  dp.clearSelection()
  if (modal.canceled) return

  const data = {
    start: args.start,
    end: args.end,
    id: DayPilot.guid(),
    resource: args.resource,
    text: modal.result
  }
  dp.events.add(data)
  service.add(data, 'New event created')
}

const onEventMoved = (args) => {
  service.update(args.e.data, 'Event moved')
}

const onEventResized = (args) => {
  service.update(args.e.data, 'Event resized')
}

const onEventDeleted = (args) => {
  service.remove(args.e.data, 'Event removed')
}

const onBeforeEventRender = (args) => {
  args.data.areas = [
    {
      top: 5,
      right: 5,
      width: 24,
      height: 24,
      padding: 3,
      symbol: '/icons/daypilot.svg#x-2',
      backColor: '#ed9337',
      fontColor: '#fff',
      style: 'border-radius: 50%;',
      onClick: (clickArgs) => {
        const event = clickArgs.source
        scheduler.value.events.remove(event)
        service.remove(event.data, 'Event removed')
      }
    }
  ]
}
The UndoService provides the following methods for recording the changes:
add()update()remove()
These methods have two parameters:
item- the changed object (with the exception ofremove(), it is the new state of the object); the object has to be serializable usingJSON.stringify()text- a text description of the change (optional)
The UndoService saves the change in the history, keeping the old and new state. It also advances the current position in the history.
How to add an Undo button to the Vue Scheduler?

The “Undo” button state is set to disabled if the UndoService doesn’t allow performing the “undo” action. You can read the state using canUndo property.
<template>
  <button @click="undo" :disabled="!service.canUndo">Undo</button>
  <DayPilotScheduler ... />
</template>
Once the user clicks the “Undo” button you need to get the previous operation from the undo history using undo() method and revert the operation:
If the action was "add" you need to remove the event using
events.remove()method.If the action was "update" you need to restore the previous event state that is stored in the
previousproperty of the history item.If the action was "remove" you need to add the event back to the Vue Scheduler using
events.add()method. The original event is stored in thepreviousproperty of the history item.
The undo service automatically updates the history and the current position within the history.
const undo = () => {
  const item = service.undo()
  if (!item) return

  switch (item.type) {
    case 'add':
      scheduler.value.events.remove(item.id)
      break
    case 'remove':
      scheduler.value.events.add(item.previous)
      break
    case 'update':
      scheduler.value.events.update(item.previous)
      break
  }
}
How to add a Redo button to the Vue Scheduler?

The Redo button is only enabled if the history has at least item and the current position isn’t after the last item.
<template>
  <!-- ... -->
  <button @click="redo" :disabled="!service.canRedo">Redo</button>
  <DayPilotScheduler ... />
</template>
After clicking the “Redo” button, you need to replay the action returned by the redo() method of the UndoService:
const redo = () => {
  const item = service.redo()
  if (!item) return

  switch (item.type) {
    case 'add':
      scheduler.value.events.add(item.current)
      break
    case 'remove':
      scheduler.value.events.remove(item.id)
      break
    case 'update':
      scheduler.value.events.update(item.current)
      break
  }
}
Full Source Code
Here is the full source code of our Vue Scheduler component example that implements undo/redo for drag and drop actions:
<template>
  <div class="buttons">
    <button @click="undo" :disabled="!service.canUndo">Undo</button>
    <button @click="redo" :disabled="!service.canRedo">Redo</button>
  </div>

  <DayPilotScheduler
      ref="schedulerRef"
      :timeHeaders="timeHeaders"
      scale="Day"
      :days="days"
      :startDate="startDate"
      :durationBarVisible="false"
      :eventHeight="34"
      :resources="resources"
      :events="events"
      @timeRangeSelected="onTimeRangeSelected"
      @eventMoved="onEventMoved"
      @eventResized="onEventResized"
      @eventDeleted="onEventDeleted"
      @beforeEventRender="onBeforeEventRender"
  />

  <h2>History</h2>
  <div
      v-for="(item, i) in service?.history"
      :key="i"
      :class="{ highlighted: service.position === i }"
      class="history-item"
  >
    [{{ i }}] {{ item.type }} - {{ item.text }}
  </div>
  <div :class="{ highlighted: service.history.length && service.position === service.history.length }"></div>
</template>

<script setup>
import { ref, onMounted, computed, reactive } from 'vue'
import { DayPilot, DayPilotScheduler } from '@daypilot/daypilot-lite-vue'
import { UndoService } from '@/undo/UndoService'

const service = reactive(new UndoService())

const schedulerRef = ref(null)
const scheduler = computed(() => schedulerRef.value?.control)

const timeHeaders = [{ groupBy: 'Month' }, { groupBy: 'Day', format: 'd' }]
const days = 31
const startDate = '2026-08-01'

const resources = ref([])
const events = ref([])

const onTimeRangeSelected = async (args) => {
  const modal = await DayPilot.Modal.prompt('Create a new event:', 'Event 1')
  scheduler.value.clearSelection()
  if (modal.canceled) {
    return
  }

  const data = {
    start: args.start,
    end: args.end,
    id: DayPilot.guid(),
    resource: args.resource,
    text: modal.result
  }
  scheduler.value.events.add(data)
  service.add(data, 'New event created')
}

const onEventMoved = (args) => {
  service.update(args.e.data, 'Event moved')
}

const onEventResized = (args) => {
  service.update(args.e.data, 'Event resized')
}

const onEventDeleted = (args) => {
  service.remove(args.e.data, 'Event removed')
}

const onBeforeEventRender = (args) => {
  args.data.areas = [
    {
      top: 5,
      right: 5,
      width: 24,
      height: 24,
      padding: 3,
      symbol: '/icons/daypilot.svg#x-2',
      backColor: '#ed9337',
      fontColor: '#fff',
      style: 'border-radius: 50%;',
      onClick: (clickArgs) => {
        const event = clickArgs.source
        scheduler.value.events.remove(event)
        service.remove(event.data, 'Event removed')
      }
    }
  ]
}

const loadEvents = () => {
  const list = [
    { id: 1, start: '2026-08-03T00:00:00', end: '2026-08-08T00:00:00', text: 'Event 1', resource: 'R4' },
    { id: 2, start: '2026-08-04T00:00:00', end: '2026-08-10T00:00:00', text: 'Event 2', resource: 'R2' }
  ]
  events.value = list
  service.initialize(list)
}

const loadResources = () => {
  resources.value = [
    { name: 'Resource 1', id: 'R1' },
    { name: 'Resource 2', id: 'R2' },
    { name: 'Resource 3', id: 'R3' },
    { name: 'Resource 4', id: 'R4' },
    { name: 'Resource 5', id: 'R5' },
    { name: 'Resource 6', id: 'R6' },
    { name: 'Resource 7', id: 'R7' }
  ]
}

const undo = () => {
  const item = service.undo()
  if (!item) return

  switch (item.type) {
    case 'add':
      scheduler.value.events.remove(item.id)
      break
    case 'remove':
      scheduler.value.events.add(item.previous)
      break
    case 'update':
      scheduler.value.events.update(item.previous)
      break
  }
}

const redo = () => {
  const item = service.redo()
  if (!item) return

  switch (item.type) {
    case 'add':
      scheduler.value.events.add(item.current)
      break
    case 'remove':
      scheduler.value.events.remove(item.id)
      break
    case 'update':
      scheduler.value.events.update(item.current)
      break
  }
}

onMounted(() => {
  loadResources()
  loadEvents()
})
</script>


<style>

body .scheduler_default_event_inner {
  border-radius: 25px;
  background: #ffcc99;
  color: #333;
  border: 1px solid #ed9337;
  padding: 5px;
}

body .scheduler_default_event {
  border-radius: 25px;
  box-shadow: 0 2px 4px rgba(0, 0, 0, 0.1);
}

.scheduler_default_shadow {
  border-radius: 25px;
}

.scheduler_default_shadow_inner {
  border-radius: 25px;
  background: #ffcc99;
  color: #333;
  border: 1px solid #ed9337;
  padding: 5px;
}

</style>

<style scoped>
h2 {
  margin-top: 10px;
  margin-bottom: 30px;
  padding-top: 10px;
}

.history-item {
  background-color: #f9f9f9;
  border: 1px solid #e0e0e0;
  padding: 10px;
  margin-bottom: 4px;
  border-radius: 4px;
  transition: background-color 0.3s, box-shadow 0.3s;
  box-shadow: 0 2px 4px rgba(0, 0, 0, 0.1);
}

.highlighted {
  position: relative;
  margin-top: 20px;
}

.highlighted::before {
  content: 'Position';
  position: absolute;
  left: 20px;
  top: -20px;
  color: #3c78d8;
  font-size: 14px;
}

.highlighted::after {
  content: '';
  position: absolute;
  left: 5px;
  top: -15px;
  width: 10px;
  height: 10px;
  background-color: #3c78d8;
  border-radius: 50%;
}

.buttons {
  margin-bottom: 10px;
  display: inline-flex;
}

.buttons button {
  background-color: #3c78d8;
  color: white;
  border: 0;
  padding: .5rem 1rem;
  width: 80px;
  cursor: pointer;
  margin-right: 1px;
  transition: all 0.2s;
  box-shadow: 0 4px 6px rgba(0,0,0,0.08);
  box-sizing: border-box;
}

.buttons button:last-child {
  margin-right: 0;
}

.buttons button.selected {
  background-color: #1c4587;
  box-shadow: 0 3px 5px rgba(0,0,0,0.1);
}

.buttons button:disabled {
  background-color: #d3d3d3;
  color: #333;
  cursor: not-allowed;
}

.buttons button:first-child {
  border-top-left-radius: 30px;
  border-bottom-left-radius: 30px;
}

.buttons button:last-child {
  border-top-right-radius: 30px;
  border-bottom-right-radius: 30px;
}

.buttons button:not(:disabled):hover {
  background-color: #2f66c4;
  box-shadow: 0 5px 7px rgba(0,0,0,0.1);
}

.buttons button:active {
  box-shadow: 0 2px 4px rgba(0,0,0,0.1);
}

</style>
You can find the source code of the UndoService class in the full project that can be downloaded at the top of this tutorial.