Features
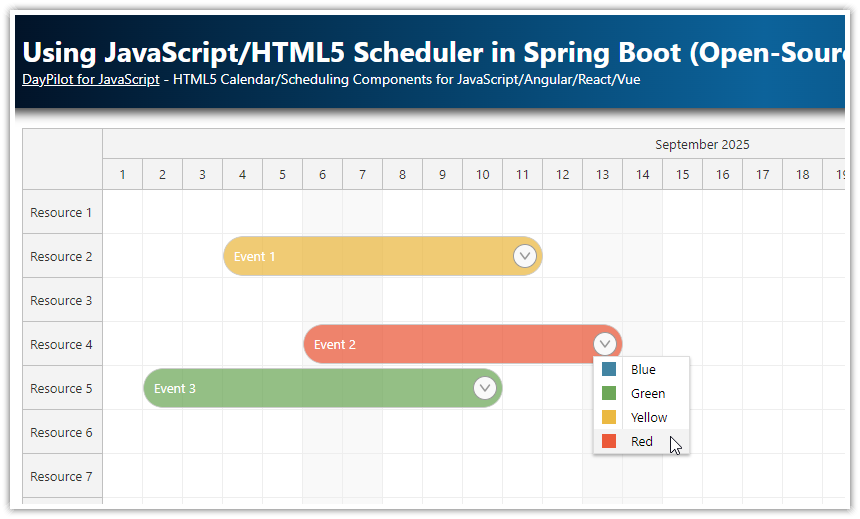
Split Scheduler events at a specified location using a context menu.
Optional snap-to-grid mode splits the event at the cell start.
This example uses the open-source DayPilot Lite for JavaScript library.
JavaScript Scheduler Config
")
This is the starting configuration of HTML5/JavaScript Scheduler component generated using Scheduler UI Builder. In the next steps, we will extend it with the splitting functionality.
import {DayPilot} from "@daypilot/daypilot-lite-javascript";

const scheduler = new DayPilot.Scheduler("scheduler", {
  timeHeaders: [{groupBy: "Month"}, {groupBy: "Day", format: "d"}],
  scale: "Day",
  days: DayPilot.Date.today().daysInMonth(),
  startDate: DayPilot.Date.today().firstDayOfMonth(),
  // ...
});
scheduler.init();

const app = {
  loadData() {
    const resources = [
      {name: "Resource 1", id: "R1"},
      {name: "Resource 2", id: "R2"},
      {name: "Resource 3", id: "R3"},
      {name: "Resource 4", id: "R4"},
      {name: "Resource 5", id: "R5"},
      {name: "Resource 6", id: "R6"},
      {name: "Resource 7", id: "R7"},
    ];
    const events = [
      {
        text: "Event 1",
        start: DayPilot.Date.today().firstDayOfMonth().addDays(1),
        end: DayPilot.Date.today().firstDayOfMonth().addDays(6),
        resource: "R2",
        color: "#57b24a",
        id: 1
      },
    ];
    scheduler.update({resources, events});
  },
  init() {
    this.loadData();
  }
};
app.init();
How to Get the Current Mouse Position in Pixels
The current mouse position in pixels (relative to the Scheduler grid) is accessible using the getCoords() method:
const position = scheduler.getCoords().x;How to Get the Current Mouse Position as Date/Time
You can use the getDate() method to convert the pixel position to date/time value:
const position = scheduler.getDate(scheduler.getCoords().x, true);The second parameter specifies whether an exact position should be calculated. If you use false value, it will return the start of the current grid cell.
const position = scheduler.getDate(scheduler.getCoords().x, false);How to Split Events using Context Menu

In this step, we will add a context menu that will let users split an event into two new events at a specified location:

The context menu only has a single item ("Split"). It calculates the current date/time position, updates the event with a new end and creates another event starting at this time point:
import {DayPilot} from "@daypilot/daypilot-lite-javascript";

const scheduler = new DayPilot.Scheduler("scheduler", {
  contextMenu: new DayPilot.Menu({
    onShow: (args) => {
      scheduler.contextMenu._x = scheduler.getCoords().x;
    },
    items: [
      {
        text: "Split",
        onClick: (args) => {
          const time = scheduler.getDate(scheduler.contextMenu._x, true);
          const originalEvent = args.source;
          const originalEnd = originalEvent.end();

          if (time <= originalEvent.start() || time >= originalEvent.end()) {
            return;
          }

          originalEvent.data.end = time;
          scheduler.events.update(originalEvent);

          const newEvent = {
            start: time,
            end: originalEnd,
            id: DayPilot.guid(),
            resource: originalEvent.resource(),
            color: originalEvent.data.color,
            text: originalEvent.text() + ", part 2"
          };

          if (newEvent.end <= newEvent.start) {
            return;
          }

          scheduler.events.add(newEvent);
        }
      }
    ]
  })
});
scheduler.init();
How to Split Events in Snap-To-Grid Mode

We will also add a "Snap-to-grid" checkbox which will activate the snap-to-grid mode of the Scheduler. When this option is checked, the event will be split at the start of the current grid cell:

To calculate the start of the current cell, we need to modify the getDate() call in the context menu item onClick handler. The second parameter (precise) must be false to get a time position aligned with the grid.
const time = scheduler.getDate(scheduler.contextMenu._x, !app.elements.snap.checked);Full Source Code
Here is the complete source code of our JavaScript Scheduler example, which includes a context menu for events with an option to split the event into two at the current location.
import {DayPilot} from "@daypilot/daypilot-lite-javascript";

const scheduler = new DayPilot.Scheduler("scheduler", {
  timeHeaders: [{groupBy: "Month"}, {groupBy: "Day", format: "d"}],
  scale: "Day",
  days: DayPilot.Date.today().daysInMonth(),
  startDate: DayPilot.Date.today().firstDayOfMonth(),
  useEventBoxes: "Never",
  snapToGrid: false,
  eventBorderRadius: 20,
  eventPadding: 5,
  durationBarVisible: false,
  onTimeRangeSelected: async (args) =>  {
    const modal = await DayPilot.Modal.prompt("Create a new event:", "Event 1");
    scheduler.clearSelection();
    if (modal.canceled) { return; }
    scheduler.events.add({
      start: args.start,
      end: args.end,
      id: DayPilot.guid(),
      resource: args.resource,
      text: modal.result
    });
  },
  onBeforeEventRender: args => {
    if (args.data.color) {
      args.data.backColor = args.data.color + "88";
      args.data.borderColor = args.data.color;
    }
  },
  contextMenu: new DayPilot.Menu({
    onShow: (args) => {
      scheduler.contextMenu._x = scheduler.getCoords().x;
    },
    items: [
      {
        text: "Split",
        onClick: (args) => {
          const time = scheduler.getDate(scheduler.contextMenu._x, !app.elements.snap.checked);
          const originalEvent = args.source;
          const originalEnd = originalEvent.end();

          if (time <= originalEvent.start() || time >= originalEvent.end()) {
            return;
          }

          originalEvent.data.end = time;
          scheduler.events.update(originalEvent);

          const newEvent = {
            start: time,
            end: originalEnd,
            id: DayPilot.guid(),
            resource: originalEvent.resource(),
            color: originalEvent.data.color,
            text: originalEvent.text() + ", part 2"
          };

          if (newEvent.end <= newEvent.start) {
            return;
          }

          scheduler.events.add(newEvent);
        }
      }
    ]
  })
});
scheduler.init();

const app = {
  elements: {
    snap: document.getElementById("snap")
  },
  loadData() {
    const resources = [
      {name: "Resource 1", id: "R1"},
      {name: "Resource 2", id: "R2"},
      {name: "Resource 3", id: "R3"},
      {name: "Resource 4", id: "R4"},
      {name: "Resource 5", id: "R5"},
      {name: "Resource 6", id: "R6"},
      {name: "Resource 7", id: "R7"},
    ];
    const events = [
      {
        text: "Event 1",
        start: DayPilot.Date.today().firstDayOfMonth().addDays(1),
        end: DayPilot.Date.today().firstDayOfMonth().addDays(6),
        resource: "R2",
        color: "#57b24a",
        id: 1
      },
      {
        text: "Event 2",
        start: DayPilot.Date.today().firstDayOfMonth().addDays(8),
        end: DayPilot.Date.today().firstDayOfMonth().addDays(12),
        resource: "R3",
        color: "#f3c612",
        id: 2
      },
      {
        text: "Event 3",
        start: DayPilot.Date.today().firstDayOfMonth().addDays(2),
        end: DayPilot.Date.today().firstDayOfMonth().addDays(7),
        resource: "R4",
        color: "#e74c3c",
        id: 3
      },
      {
        text: "Event 4",
        start: DayPilot.Date.today().firstDayOfMonth().addDays(12),
        end: DayPilot.Date.today().firstDayOfMonth().addDays(17),
        resource: "R5",
        color: "#0d8ecf",
        id: 4
      },
      {
        text: "Event 5",
        start: DayPilot.Date.today().firstDayOfMonth().addDays(5),
        end: DayPilot.Date.today().firstDayOfMonth().addDays(9),
        resource: "R6",
        color: "#34495e",
        id: 5
      }
    ];
    scheduler.update({resources, events});
  },
  addEventHandlers() {
    app.elements.snap.addEventListener("click", (ev) => {
      const enabled = app.elements.snap.checked;
      const useEventBoxes = enabled ? "Always" : "Never";
      const snapToGrid = enabled;
      scheduler.update({useEventBoxes, snapToGrid});
    });
  },
  init() {
    this.addEventHandlers();
    this.loadData();
  }
};
app.init();
You can download the complete project using the link at the top of this article.