")
Features
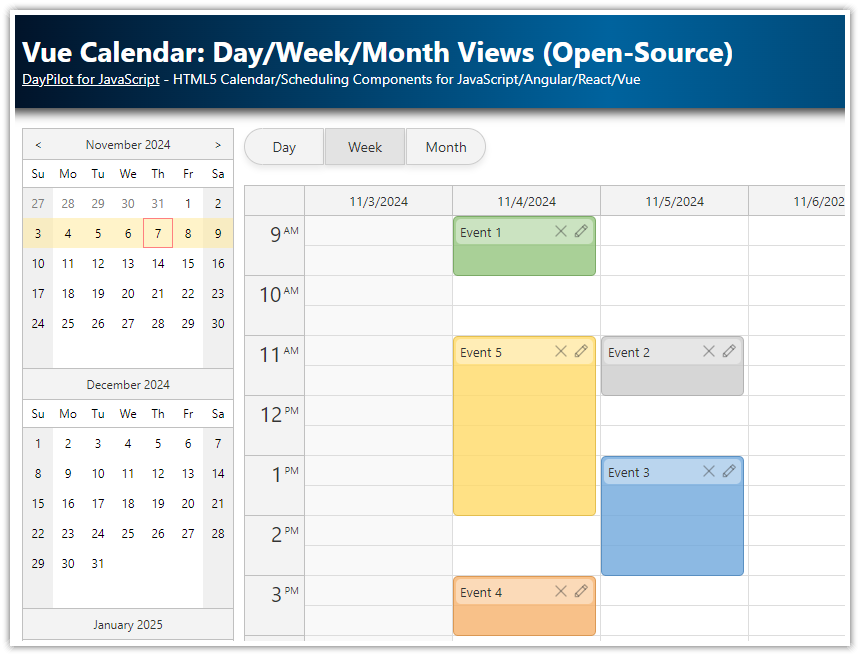
This tutorial uses the event calendar, monthly calendar, and date picker components from the open-source DayPilot Lite for javaScript package to build a simple HTML5/JavaScript calendar application with integrated day, week, and month views.
Daily, weekly and monthly event calendars that provide different views of the same data
Date navigator for changing the current date
All calendar components support drag and drop event creating, moving and resizing
Simplified calendar data loading using the built-in
events.load()methodPHP backend that provides access to the database using REST API
MySQL and SQLite database
Online Calendar Configurator
With the UI Builder app, you can configure calendar features and download a ready-to-run project for JavaScript, TypeScript, Angular, React, or Vue.
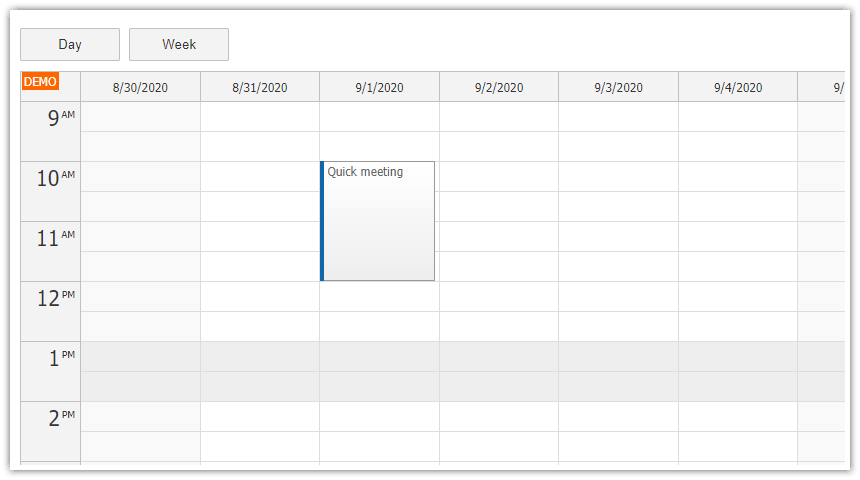
HTML5/JavaScript Daily Calendar

The daily calendar view is built using DayPilot.Calendar class with viewType set to "Day". This view displays a calendar for 24 hours of a single day. By default, the viewport is limited to business hours (predefined as 9 a.m. to 6 p.m.). Users can access the remaining hours using a vertical scrollbar.
The daily calendar will be rendered in a placeholder <div> which is marked with id="dpDay". The DayPilot.Calendar instance is stored in day JavaScript variable.
HTML5
<div id="dpDay"></div>JavaScript
<script type="text/javascript">

  const day = new DayPilot.Calendar("dpDay", {
    viewType: "Day"
  });
  day.init();

</script>
HTML5/JavaScript Weekly Calendar

The weekly calendar is built using DayPilot.Calendar class with viewType set to "Week". You can see that the weekly calendar is built using the same DayPilot.Calendar component. However, this time it uses a different placeholder div (id="dpWeek") and it creates a different instance (stored as week variable). This allows us to work with both instances at once. When switching between view, we will simply hide or show the instances as needed. This way, we will avoid the overhead of creating and destroying the calendar instances when switching views.
As you can see, the configuration is very simple - the only property we define is the viewType.
HTML5
<div id="dpWeek"></div>JavaScript
<script type="text/javascript">
const week = new DayPilot.Calendar("dpWeek", {
viewType: "Week"
});
week.init();
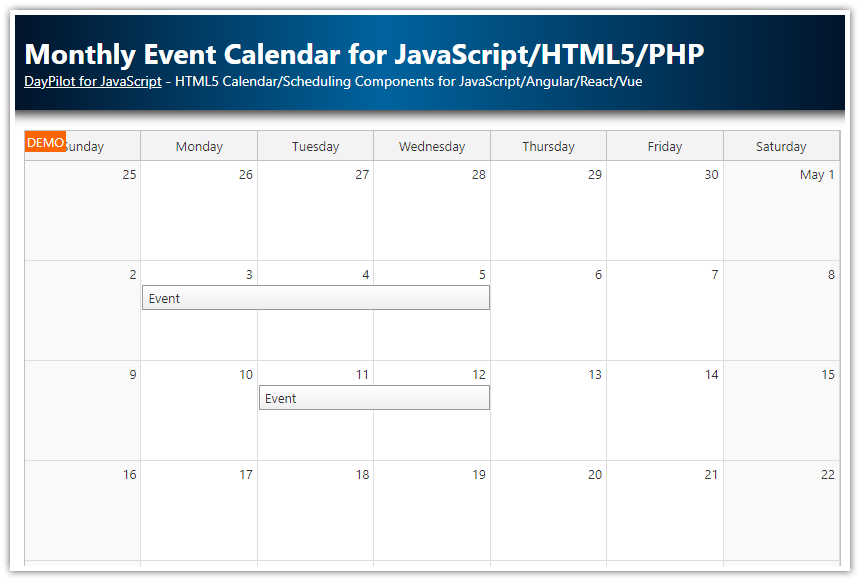
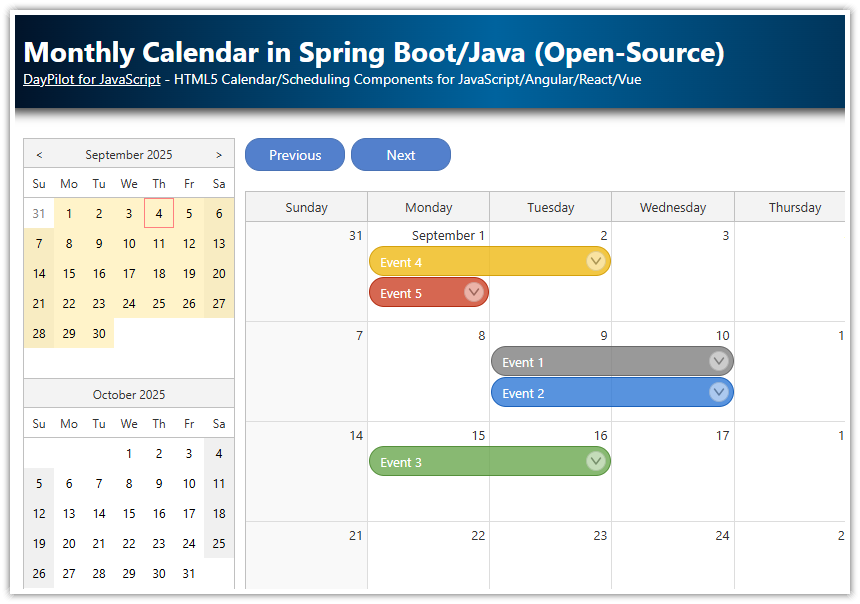
</script>HTML5/JavaScript Monthly Calendar

The monthly calendar view is built using DayPilot.Month class. This time it's a different class that represents the month view which uses a different layout. As in the previous cases, we use a special placeholder (id="dpMonth") and store the instance as month variable.
HTML5
<div id="dpMonth"></div>JavaScript
<script type="text/javascript">

  const month = new DayPilot.Month("dpMonth");
  month.init();

</script>
Loading Calendar Event Data

The day/week (DayPilot.Calendar) and month (DayPilot.Month) calendar components support events.load() shortcut method for loading events:
calendar.events.load("calendar_events.php");You can use this method to load events from a remote data source. It expects a JSON array with calendar event data as a response.
It automatically adds the start and end of the current view as query string parameters to the specified URL. You can use these parameters to limit the SQL query on the server side.
PHP (calendar_events.php)
<?php
require_once '_db.php';

// .events.load() passes start and end as query string parameters by default
$start = $_GET["start"];
$end = $_GET["end"];

$stmt = $db->prepare('SELECT * FROM events WHERE NOT ((end <= :start) OR (start >= :end))');

$stmt->bindParam(':start', $start);
$stmt->bindParam(':end', $end);

$stmt->execute();
$result = $stmt->fetchAll();

class Event {
  public $id;
  public $text;
  public $start;
  public $end;
  public $backColor;
}
$events = array();

foreach($result as $row) {
  $e = new Event();
  $e->id = $row['id'];
  $e->text = $row['name'];
  $e->start = $row['start'];
  $e->end = $row['end'];
  $e->backColor = $row['color'];
  $events[] = $e;
}

header('Content-Type: application/json');
echo json_encode($events);
The sample MySQL database uses a simple schema with just one table called events:
CREATE TABLE `events` (
	`id` INT(11) NOT NULL AUTO_INCREMENT,
	`name` TEXT NULL,
	`start` DATETIME NOT NULL,
	`end` DATETIME NOT NULL,
        `color` VARCHAR(30),
	PRIMARY KEY (`id`)
);
How Does events.load() Work
The calendar.events.load() method is a shortcut method that updates the calendar data using an HTTP call.
The calendar event data is stored in the calendar.events.list array. Example:
calendar.events.list = [
  {
    "start": "2025-09-16T10:30:00",
    "end": "2025-05-16T12:00:00",
    "id": 2,
    "text": "Meeting"
  }
];
You can load the data during the initial page load:
<div id="calendar"></div>

<script type="text/javascript">

  const calendar = new DayPilot.Calendar("calendar", {
    viewType: "Week"
  });
  calendar.events.list = [
   {
    "start": "2025-09-16T10:30:00",
    "end": "2025-09-16T12:00:00",
    "id": 2,
    "text": "Meeting"
   }
  ];
  calendar.init();

</script>
You can also load the data using a separate HTTP call:
<div id="calendar"></div>

<script type="text/javascript">

  var calendar = new DayPilot.Calendar("calendar", {
    viewType: "Week"
  });
  calendar.init();

  async function loadEvents() {
    const start = calendar.visibleStart();
    const end = calendar.visibleEnd();
    const url = `calendar_events.php?start=${start}&end=${end}`;
    const {data} = await DayPilot.Http.get(url);
    calendar.update({events: data});
  }

  loadEvents();

</script>
The DayPilot.Http.get() call can be replaced with dp.events.load():
It sends a GET HTTP request that loads the calendar data in JSON format. It sends the
visibleStart()date asstartquery string parameter andvisibleEnd()date asendquery string parameter.It assigns the data to
calendar.events.list.It updates the calendar using
calendar.update().You can configure the HTTP method ("POST" | "GET") using
eventsLoadMethodproperty
JavaScript
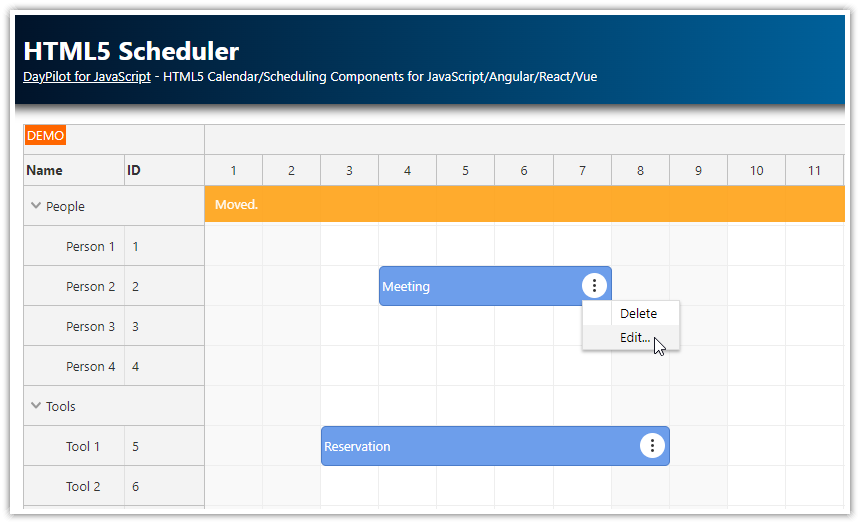
calendar.events.load("calendar_events.php");Calendar Drag and Drop Support

We will add four events handlers:
onEventMovedonEventResizedonTimeRangeSelectedonEventClick
The syntax of all event handlers is the same in the DayPilot.Calendar and DayPilot.Month. We can use a helper method that will add the event handlers to all views.
JavaScript
function configureCalendar(calendar) {

  calendar.onEventMoved = async args => {
    const params = {
      id: args.e.id(),
      newStart: args.newStart,
      newEnd: args.newEnd
    };
    await DayPilot.Http.post("calendar_move.php", params);
    console.log("Moved.");
  };

  calendar.onEventResized = async args => {
    const params = {
      id: args.e.id(),
      newStart: args.newStart,
      newEnd: args.newEnd
    };
    await DayPilot.Http.post("calendar_move.php", params);
    console.log("Resized.");
  };

  calendar.onTimeRangeSelected = async args => {

    const form = [
      {name: "Name", id: "text"},
      {name: "Start", id: "start", dateFormat: "MMMM d, yyyy h:mm tt", disabled: true},
      {name: "End", id: "end", dateFormat: "MMMM d, yyyy h:mm tt", disabled: true},
    ];

    const data = {
      start: args.start,
      end: args.end,
      text: "Event"
    };

    const active = switcher.active.control;

    const modal = await DayPilot.Modal.form(form, data);
    active.clearSelection();

    if (modal.canceled) {
      return;
    }

    const {data: result} = await DayPilot.Http.post("calendar_create.php", modal.result);

    active.events.add({
      start: modal.result.start,
      end: modal.result.end,
      id: result.id,
      text: modal.result.text
    });

  };

  calendar.onEventClick = args => {
    DayPilot.Modal.alert(args.e.data.text);
  };
}
Date Navigator

The last missing piece of the UI is a date navigator (date picker) that will let the users switch the visible date.
HTML5
<div id="nav"></div>JavaScript
<script type="text/javascript">
  const nav = new DayPilot.Navigator("nav");
  nav.showMonths = 3;
  nav.skipMonths = 3;
  nav.init();
</script>
Switching the Day/Week/Month Views

Now it's time to assemble all components and views into a complex calendar view. We have the following components:
buttons for switching the current view (simple
<a>links with"Day","Week", and"Month"text)day, week, and month views (
DayPilot.Calendar,DayPilot.Monthobjects)navigator (
DayPilot.Navigator)
We will use the DayPilot.Switcher helper to bind all calendar components together.
HTML5
<div style="display:flex">
  <div style="">
    <div id="nav"></div>
  </div>
  <div style="flex-grow: 1; margin-left: 10px;">
    <div class="toolbar buttons">
      <button id="buttonDay">Day</button>
      <button id="buttonWeek">Week</button>
      <button id="buttonMonth">Month</button>
    </div>
    <div id="dpDay"></div>
    <div id="dpWeek"></div>
    <div id="dpMonth"></div>
  </div>
</div>
JavaScript
<script type="text/javascript">

  // initialize the date navigator
  const nav = new DayPilot.Navigator("nav", {
    showMonths: 3,
    skipMonths: 3
  });
  nav.init();

  // initialize the day view
  const day = new DayPilot.Calendar("dpDay", {
    viewType: "Day"
  });
  configureCalendar(day);
  day.init();

  // initialize the week view
  const week = new DayPilot.Calendar("dpWeek", {
    viewType: "Week"
  });
  configureCalendar(week);
  week.init();

  // initialize the month view
  const month = new DayPilot.Month("dpMonth");
  configureCalendar(month);
  month.init();

  // ...

  const switcher = new DayPilot.Switcher({
      triggers: [
          {id: "buttonDay", view: day },    // link buttonDay to day view
          {id: "buttonWeek", view: week},   // link buttonWeek to week view
          {id: "buttonMonth", view: month}  // link buttonMonth to month view
      ],
      navigator: nav,
      selectedClass: "selected",  // add this class to the selected trigger
      onChanged: args => {
          switcher.events.load("calendar_events.php");   // action to be performed when the view or date changes - reload the events for the current view
      }
  });

  switcher.select("buttonWeek");

</script>
History
October 6, 2025: Event creation fixed (the new event name is applied correctly to the new event).
September 12, 2025: Upgraded to DayPilot Lite for JavaScript 2025.3.703.
October 4, 2024: Upgraded to DayPilot Lite for JavaScript 2024.4.563. Scrollbar syncing (day, week views); improved toolbar styling; rounded event corners; updated event icon (SVG); options syntax used for init code. PHP 8.3 compatibility.
April 4, 2023: Switched to the open-source DayPilot Lite for JavaScript 2023.2.452.
June 4, 2021: Upgraded to DayPilot Pro for JavaScript 2021.2.5000. Using ES6+ syntax, including async/await. DayPilot.Http.get() and DayPilot.Http.post() methods instead of DayPilot.Http.ajax().
August 6, 2020: Upgraded to DayPilot Pro for JavaScript 2020.3.4619. Context menu added (color, event deleting). jQuery dependency removed. CSS styles updated.
September 19, 2019: Upgraded to DayPilot Pro for JavaScript 2019.3.4012. Support for MySQL. Using DayPilot.Modal.prompt().
June 27, 2017: Upgraded to DayPilot Pro for JavaScript 8.4.2911
June 15, 2015: Initial release