Features of the Hotel Room Booking App
In this tutorial, we will show how to create a room booking management application for a hotel using ASP.NET Core.
The application has the following features:
Create bookings with a drag-and-drop interface.
Bookings possess different statuses such as new, confirmed, and expired.
It manages check-in and check-out events, adjusting the reservation status as needed.
Rooms have statuses (e.g., available, occupied) determined by the room booking status.
The application allows users to find an available room based on specific criteria like date and room size.
Occupation statistics for all rooms are displayed in the top row.
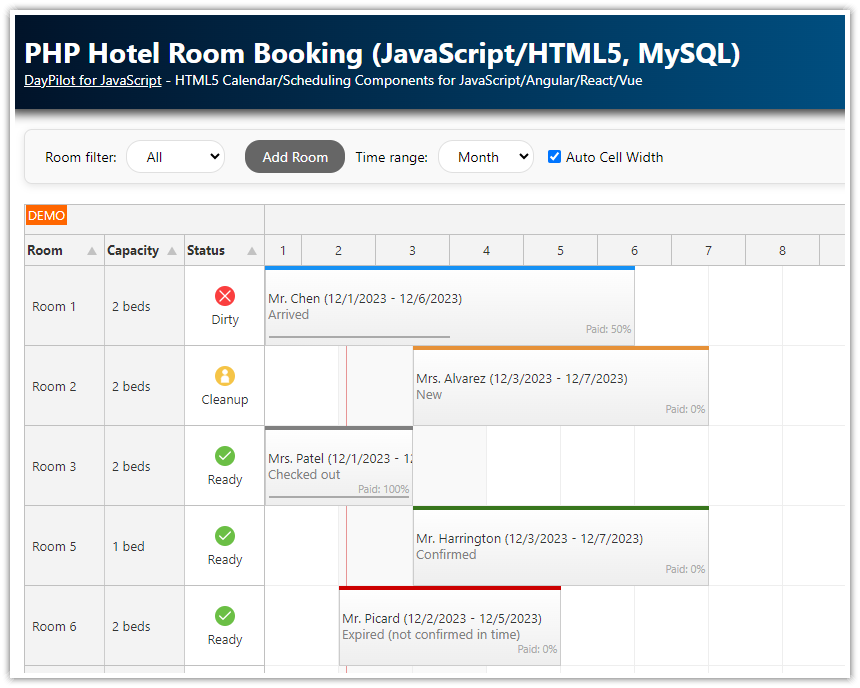
The room reservation application features a visual UI, using the JavaScript Scheduler component. This displays the hotel rooms on the vertical axis and the days on the horizontal axis.
The backend utilizes ASP.NET Core, Entity Framework, and SQL Server for data management.
Data is stored in an SQL Server database (though this can be swapped out for any database supported by Entity Framework).
Entity Framework facilitates data access.
The database is initialized automatically upon startup.
Communication between the UI and the server is executed via a JSON-based REST API.
Dependencies:
The application Includes a trial version of DayPilot Pro for JavaScript (see License below).
License
Licensed for testing and evaluation purposes. Please see the license agreement included in the sample project. You can use the source code of the tutorial if you are a licensed user of DayPilot Pro for JavaScript. Buy a license.
How to Use JavaScript Scheduler to Create a Hotel Room Management Application
This is an intermediate-level tutorial that focused on features specific to a room-booking application.
For an introduction to using the JavaScript Scheduler in ASP.NET Core application, please see the ASP.NET Core Scheduler tutorial:
How to add the JavaScript Scheduler component to your application.
How to load room data from the server using a REST API and display the rooms on the Y axis.
How to configure the timeline (scale and header time units).
How to load the reservations.
How to customize the appearance of the Scheduler grid and reservations.
How to implement the backend in ASP.NET Core, using Entity Framework.

You can extend the user interface with additional features provided by the JavaScript Scheduler component, such as:
Display links between related bookings, such as when multiple rooms are booked together.
Find the next available time slot for a room.
Block selected dates for reasons such as maintenance or remodeling.
Limit the reservation duration by enforcing a minimum and maximum duration during drag and drop.
Swap two event using drag and drop.
Use keyboard to navigate the Scheduler grid, create and edit reservations.
Lock reservations using a context menu.
Add undo/redo functionality.
Copy and paste reservations.
Highlight holidays.
Room Status Calculation

The room booking app displays rooms vertically on the JavaScript Scheduler. Each row's header provides room details, such as name and size. Additionally, the app offers a real-time view of the current room status, making it easier for users to identify and select rooms. By taking a quick look at the layout, users can determine which rooms are occupied, available, or in need of maintenance. Later in this tutorial, we'll show how to use room status for filtering based on parameters and availability.
The room status is determined on the client side, based on reservations for the current day.
For each row, the app checks for reservations in the morning (before the checkout hour) and in the afternoon (after the checkout hour).
Room status can fall into one of these categories:
Available
Occupied
Leaving today
Cleanup
The “Leaving today” and “Cleanup” statuses give a clearer picture of room availability on the departure day.
The room's status, along with a corresponding status icon, is displayed in the row header.
To customize the row header content, the Scheduler uses the onBeforeRowHeaderRender event handler.
Scheduler config:
onBeforeRowHeaderRender: (args) => {
    const beds = (count) => {
        return count + " bed" + (count > 1 ? "s" : "");
    };

    const {status, description} = app.getRoomStatus(args.row);

    args.row.columns[2].html = description;

    let symbol = "checkmark-2";
    let color = app.colors.yellow;
    switch (status) {
        case "Unavailable":
            symbol = "x-2";
            color = app.colors.red2;
            break;
        case "Later":
            symbol = "figure";
            color = app.colors.orange;
            break;
    }

    args.row.columns[2].areas = [
        {left: "50%", top: 10, width: 20, height: 20, fontColor: "#fff", symbol: "icons/daypilot.svg#" + symbol, backColor: color, style: "border-radius: 50%; margin-left: -10px; padding: 2px; box-sizing: border-box;"}
    ];

},
The app.getRoomStatus() method contains the room status calculation logic:
getRoomStatus(row) {
    let status = "Available";
    let description = "Available";
    const morning = row.events.forRange(DayPilot.Date.today(), DayPilot.Date.today().addHours(app.checkoutHour))[0];
    const afternoon = row.events.forRange(DayPilot.Date.today().addHours(app.checkoutHour), DayPilot.Date.today().addDays(1))[0];
    if (morning) {
        if (morning.data.status === "CheckedOut") {
            status = "Later";
            description = "Cleanup";
        }
        else if (morning.data.status === "Cleaned") {
            status = "Available";
            description = "Available";
        }
        else if (!afternoon) {
            status = "Later";
            description = "Leaving today";
        }
        else {
            status = "Unavailable";
            description = "Occupied";
        }
    }
    else if (afternoon) {
        status = "Unavailable";
        description = "Booked";
    }

    return {status, description};
},
Reservation Status

Our ASP.NET Core room booking app uses color coding to display the status of each reservation.
The following room statuses are available:
New
Confirmed
Arrived
CheckedOut
Cleaned
The color coding is applied using the onBeforeEventRender event handler (see also event customization).
The event handler also performs some basic checks of custom business rules. The reservations with a non-standard status are displayed in red color.
New reservations that are not confirmed one day before arrival are marked as “Expired”.
Confirmed reservations are marked as “Later arrival” after 7 PM on the arrival day.
Reservations are marked as “Late checkout” after 11 AM on the departure day.
The event handler sets custom HTML content of the reservation box with additional information:
Reservation text.
Arrival and departure date.
The calculated reservation status text.
It also uses an active area to display a bar indicating how much of the accommodation price has been paid.
onBeforeEventRender: (args) => {
    const start = new DayPilot.Date(args.data.start);
    const end = new DayPilot.Date(args.data.end);

    const today = DayPilot.Date.today();
    const now = new DayPilot.Date();

    const text = DayPilot.Util.escapeHtml(args.data.text);

    let status = "";
    let color = null;

    switch (args.data.status) {
        case "New":
            const in2days = today.addDays(1);

            if (start < in2days) {
                color = app.colors.red;
                status = 'Expired (not confirmed in time)';
            }
            else {
                color = app.colors.yellow;
                status = 'New';
            }
            break;
        case "Confirmed":
            // guests must arrive before 7 pm
            const arrivalDeadline = today.addHours(19);

            if (start < today || (start.getDatePart() === today.getDatePart() && now > arrivalDeadline)) {
                color = app.colors.red;
                status = 'Late arrival';
            }
            else {
                color = app.colors.green;
                status = "Confirmed";
            }
            break;
        case 'Arrived':
             // guests must checkout before 11 am
            const checkoutDeadline = today.addHours(11);

            if (end < today || (end.getDatePart() === today.getDatePart() && now > checkoutDeadline)) {
                color = app.colors.red;
                status = "Late checkout";
            }
            else
            {
                color = app.colors.blue;
                status = "Arrived";
            }
            break;
        case 'CheckedOut':
            color = app.colors.orange;
            status = "Checked out";
            break;
        case 'Cleaned':
            color = app.colors.gray;
            status = "Cleaned";
            break;
        default:
            status = "Unexpected state";
            break;
    }

    args.data.backColor = color;
    args.data.barColor = DayPilot.ColorUtil.darker(color, 2);
    args.data.borderColor = args.data.barColor;
    args.data.fontColor = "#ffffff";

    args.data.html = `<div>${text} (${start.toString("M/d/yyyy")} - ${end.toString("M/d/yyyy")})<br /><span style='color:#ffffff'>${args.data.toolTip}</span></div>`;

    const paid = args.data.paid;
    const paidColor = "#ffffff";

    args.data.areas = [
        { bottom: 4, right: 4, html: `<div style='color:${paidColor}; font-size: 10px;'>Paid: ${paid}%</div>`},
        { left: 4, bottom: 2, right: 4, height: 2, html: `<div style='height: 100%; width:${paid}%; background-color: ${paidColor}'></div>` }
    ];

},
Room Availability Total Displayed in a Frozen Row

Our room booking application will display the total number of available rooms for each day in the first row. The first row will be frozen and it will not scroll with the main Scheduler grid, ensuring that it is always visible:
async loadRooms() {
    const {data:resources} = await DayPilot.Http.get(`/api/rooms`);
    resources.splice(0, 0, {name: "Availability", id: "AVAILABILITY", frozen: "top", eventHeight: 30, cellsAutoUpdated: true});
    dp.update({resources});
},
When loading the room data from the server, we will prepend a new item (that will define our frozen row) to the list of resources.
The availability details (how many rooms are available) are displayed in the grid cells. To calculate and set the values, we will use the onBeforeCellRender event handler (see also cell customization):
onBeforeCellRender: args => {
if (args.cell.row.data && args.cell.row.data.frozen) {
const booked = dp.events.forRange(args.cell.start, args.cell.end).length;
const total = dp.rows.all().length;
const available = total - booked;
args.cell.html = `${available}`;
args.cell.cssClass = "availability";
if (booked < total) {
args.cell.backColor = app.colors.yellow;
}
else if (booked === total) {
args.cell.backColor = app.colors.red2;
}
args.cell.areas = [
{
left: 0,
top: 0,
right: 0,
height: 6,
backColor: args.cell.backColor,
}
];
args.cell.backColor = "#ffffff";
}
if (app.filter.range) {
if (args.cell.start < app.filter.range.start || args.cell.start >= app.filter.range.end) {
args.cell.backColor = "#d9ead3";
}
}
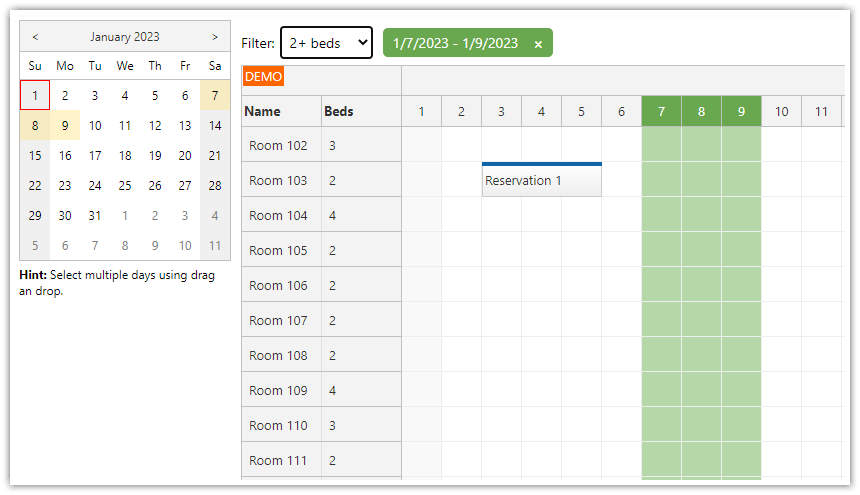
},Filter Rooms by Available Date Range

In the statistics row, you can select a date range that you want to filter.
When a date range is selected, only available rooms will be displayed.
Other rooms (fully or partially booked) will be hidden from the list.
This feature lets you check the availability for selected dates.
Filter Rooms by Capacity and Status

You can also filter rooms by capacity (and possibly other properties). This is implemented using a dropdown list that is displayed above the main scheduling grid.
You can select a minimum number of beds that the rooms needs to have. The Scheduler will display only rooms that meet this condition.
You can also combine both filters together. This will let you quickly answer complex queries.
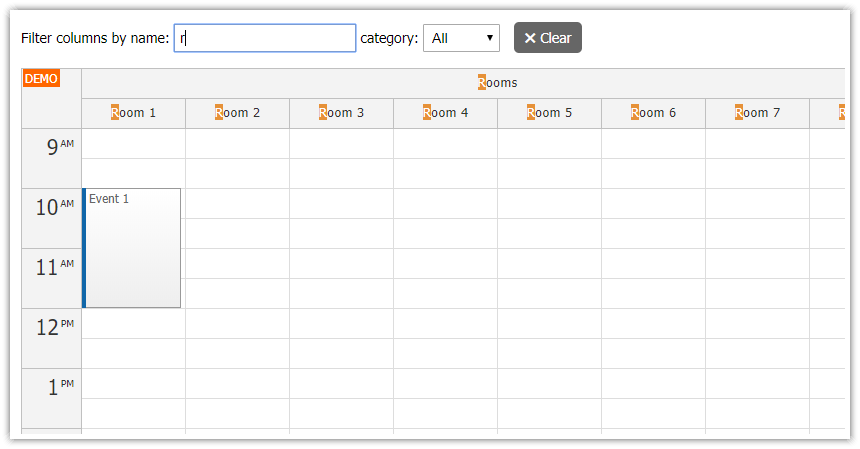
Room Filter Implementation
When looking for a room that is available, we will be able to filter the rooms by multiple criteria:
There filters will let the user display only the selected rooms. When combining multiple criteria, it will be easy to find a room of a specific size for a defined date period.
The filters will be able to use the the following criteria:
capacity
availability (now)
date
The app.filter object stores the filter parameters:
const app = {

    // ...

    filter: {
        capacity: 0,
        status: "All",
        range: null
    },

    // ...

}
The status and capacity filter dropdowns are defined in HTML:
Room filter:
<select id="filterSize">
    <option value="0">All sizes</option>
    <option value="1">Single</option>
    <option value="2">Double</option>
    <option value="4">Family</option>
</select>
<select id="filterStatus">
    <option value="All">All statuses</option>
    <option value="Later">Available later today</option>
    <option value="Unavailable">Unavailable</option>
    <option value="Available">Available</option>
</select>
The filter parameters are updated on every change of the filter dropdowns:
const app = {
    elements: {
        filterSize: document.querySelector("#filterSize"),
        filterStatus: document.querySelector("#filterStatus"),
    },
    filter: {
        capacity: 0,
        status: "All",
        range: null
    },
    init() {
        this.addEventListeners();
        // ...
    },

    // ...

    addEventListeners() {
        this.elements.filterSize.addEventListener("change", (e) => {
            app.filter.capacity = parseInt(e.target.value);
            dp.rows.filter(app.filter);
        });

        this.elements.filterStatus.addEventListener("change", (e) => {
            app.filter.status = e.target.value;
            dp.rows.filter(app.filter);
        });

        this.elements.admin.addEventListener("change", (e) => {
            const options = {
                rowCreateHandling: app.adminMode ? "Enabled" : "Disabled",
                rowCreateHtml: "New room...",
            };
            dp.update(options);
        });

        this.elements.dateFilterRemove.addEventListener("click", (e) => {
            app.filter.range = null;
            dp.rows.filter(app.filter);
            app.elements.dateFilter.style.display = "none";
        });


    }
};
The date filter is implemented using the onTimeRangeSelected event handler. Users can select a custom range in the first frozen row that displays the room availability.
onTimeRangeSelected: async (args) => {

    if (args.resource === "AVAILABILITY") {

        app.filter.range = {
          start: args.start,
          end: args.end
        };

        dp.rows.filter(app.filter);
        dp.clearSelection();
        return;
    }

    // ...

},
The rows.filter() method applies the filter to the Scheduler component. The Scheduler uses the onRowFilter event handler to determine visibility of each row:
onRowFilter: (args) => {
    const filterStatus = args.filterParam.status;
    const filterCapacity = args.filterParam.capacity;
    const filterDate = args.filterParam.range;

    const {status} = app.getRoomStatus(args.row);

    const statusAndCapacity = (() => {
        if (filterStatus === "All" && filterCapacity === 0) {
            return true;
        }

        if (filterStatus !== "All" && status !== filterStatus) {
            return false;
        }

        if (filterCapacity !== 0 && args.row.data.capacity !== filterCapacity) {
            return false;
        }

        return true;
    })();

    const date = (() => {
        if (!filterDate) {
            return true;
        }
        const eventCount = args.row.events.forRange(filterDate.start, filterDate.end).length;
        return eventCount === 0;

    })();

    args.visible = statusAndCapacity && date;
},
For a more detailed explanation of the row filtering mechanism, please see the JavaScript/HTML5 Scheduler: Filtering Rooms by Availability tutorial.
In addition to applying a filter, it is also possible sort the Scheduler rows using the column data.
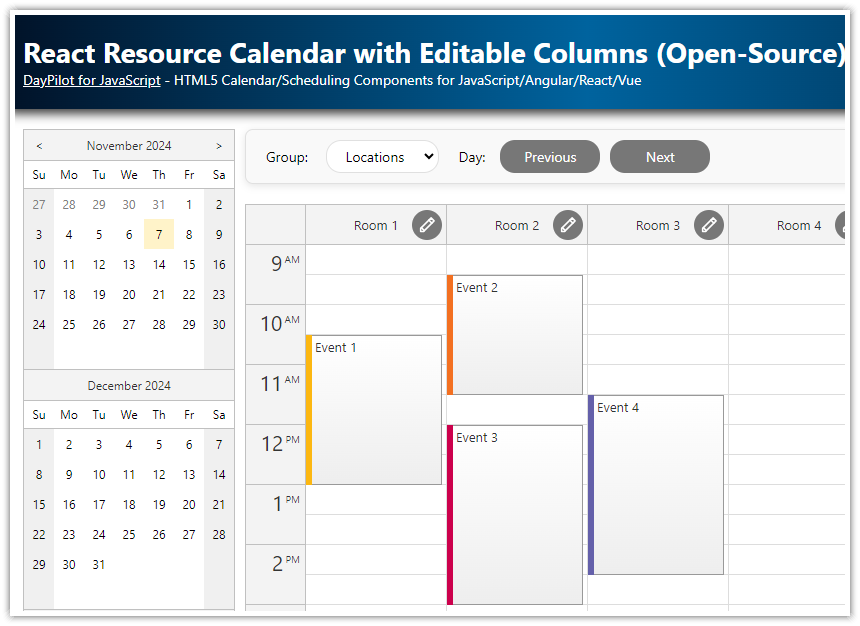
Hotel Room Admin Mode

Directly in the room booking UI, you can switch to the “Admin” mode which lets you manage the rooms:
add new room
move a room to a different position in the list
remove a room
edit a room (name, properties)
This mode is turned off by default as it is not necessary to add new rooms or edit their names on daily basis.
The admin mode can be enabled using a switch displayed in the toolbar:
<label class="switch-container">
  <span class="switch-text">Admin Mode</span>
  <div class="switch">
    <input type="checkbox" id="admin" />
    <span class="slider round"></span>
  </div>
</label>
CSS:
:root {
    --switch-width: 36px;
    --switch-height: 20px;
    --switch-background: #ccc;
    --switch-background-checked: #005D96FF;
    --switch-handle-size: 16px;
    --switch-handle-color: white;
    --switch-space-between: 10px;
}

.switch-container {
    display: inline-flex;
    align-items: center;
}

.switch-text {
    margin-right: var(--switch-space-between);
}

.switch {
    position: relative;
    display: inline-block;
    width: var(--switch-width);
    height: var(--switch-height);
}

.switch input {
    opacity: 0;
    width: 0;
    height: 0;
}

.slider {
    position: absolute;
    cursor: pointer;
    top: 0;
    left: 0;
    right: 0;
    bottom: 0;
    background-color: var(--switch-background);
    -webkit-transition: .4s;
    transition: .4s;
}

.slider:before {
    position: absolute;
    content: "";
    height: var(--switch-handle-size);
    width: var(--switch-handle-size);
    left: 2px;
    bottom: 2px;
    background-color: var(--switch-handle-color);
    -webkit-transition: .4s;
    transition: .4s;
}

input:checked + .slider {
    background-color: var(--switch-background-checked);
}

input:focus + .slider {
    box-shadow: 0 0 1px var(--switch-background-checked);
}

input:checked + .slider:before {
    -webkit-transform: translateX(calc(var(--switch-handle-size) + 0px));
    -ms-transform: translateX(calc(var(--switch-handle-size) + 0px));
    transform: translateX(calc(var(--switch-handle-size) + 0px));
}

/* Rounded sliders */
.slider.round {
    border-radius: var(--switch-height);
}

.slider.round:before {
    border-radius: 50%;
}
The change event handler updates the Scheduler configuration and refreshes the UI (to display the “New room” row at the bottom):
const app = {

    // ...
    elements: {
        admin: document.querySelector("#admin"),
    },

    addEventListeners() {
        this.elements.admin.addEventListener("change", (e) => {
            const options = {
                rowCreateHandling: app.adminMode ? "Enabled" : "Disabled",
                rowCreateHtml: "New room...",
            };
            dp.update(options);
        });
    }

    // ...

};
A dynamic getter that returns the current mode:
const app = {

    // ...

    get adminMode() {
     return this.elements.admin.checked;
    },

    // ...
}
Icons with context menu added conditionally to the row headers, depending on the admin mode:
onBeforeRowHeaderRender: (args) => {

    // ...

    if (app.adminMode) {
        args.row.columns[0].areas = [
            {right: 3, top: 3, width: 20, height: 20, symbol: "icons/daypilot.svg#minichevron-down-2", action: "ContextMenu", visibility: "Visible", cssClass: "area-icon"}
        ];
    }

},
Entity Framework Data Model
Room class:
public class Room
{
    public int Id { get; set; }
    public string Name { get; set; }

    public string? Status { get; set; }

    public int Capacity { get; set; }

}
Reservation class:
public class Reservation
{
    public int Id { get; set; }
    public DateTime Start { get; set; }
    public DateTime End { get; set; }

    [JsonPropertyName("resource")]
    public int RoomId { get; set; }

    public string? Text { get; set; }

    public string? Status { get; set; }

    public int Paid { get; set; }

}
Entity Framework DbContext
Our HotelContext class derives from the DbContext class which ensures that the data-access method will be generated automatically.
We also add some initial Room data when creating the database.
public class HotelContext : DbContext
{
    public DbSet<Room> Rooms { get; set; }
    public DbSet<Reservation> Reservations { get; set; }

    public HotelContext(DbContextOptions<HotelContext> options) : base(options) { }

    protected override void OnModelCreating(ModelBuilder modelBuilder)
    {
        modelBuilder.Entity<Room>().HasData(new Room { Id = 1, Name = "Room 101", Status = "Available", Capacity = 4 });
        modelBuilder.Entity<Room>().HasData(new Room { Id = 2, Name = "Room 102", Status = "Available", Capacity = 2 });
        modelBuilder.Entity<Room>().HasData(new Room { Id = 3, Name = "Room 103", Status = "Available", Capacity = 2 });
    }
}
Database Initialization
The database connection string is set in AppSettings.json configuration file.
It uses an SQL Server database accessed using LocalDB interface.
AppSettings.json
{

    ...

    "ConnectionStrings": {
        "HotelContext": "Server=(localdb)\\mssqllocaldb;Database=DayPilot.TutorialAspNetCoreHotel;Trusted_Connection=True"
    },

    ...
}
The SQL Server database will be created and initialized automatically during the first run of the application.
Program.cs
var builder = WebApplication.CreateBuilder(args);

// ...

builder.Services.AddDbContext<HotelContext>(options => options.UseSqlServer(builder.Configuration.GetConnectionString("HotelContext")));

// ...

// Ensure the database is created.
using (var serviceScope = app.Services.CreateScope())
{
    var services = serviceScope.ServiceProvider;
    try
    {
        var context = services.GetRequiredService<HotelContext>();
        context.Database.EnsureCreated();
    }
    catch (Exception ex)
    {
        var logger = services.GetRequiredService<ILogger<Program>>();
        logger.LogError(ex, "An error occurred creating the DB.");
    }
}