Overview
This tutorial shows how to implement disabled slots in the DayPilot Angular Scheduler component. For an introduction to using the Angular Scheduler component, please see the Angular Scheduler Tutorial which explains how to install and configure the Angular Scheduler component and how to load the schedule data from the server using HTTP calls.
License
Licensed for testing and evaluation purposes. Please see the license agreement included in the sample project. You can use the source code of the tutorial if you are a licensed user of DayPilot Pro for JavaScript.
How to disable time slots in the Angular Scheduler component?

The Angular Scheduler component prevents selecting the disabled slots (when creating new events) and moving existing events to a new location if they overlapped a disabled slot. The same rule is applied during resizing as well.
The disabled slots can be defined by extending the items of the resources array. We will use a custom property called disabled. This is an arbitrary name and you can change it but make sure it doesn’t conflict with the existing property names.
The disabled property holds an array of time ranges (defined using start and end properties). The start and end properties can be DayPilot.Date objects or strings that can be converted to DayPilot.Date (ISO 8601 format without time zone).
resources: DayPilot.ResourceData[] = [
  { name: 'Group A', id: 'GA', expanded: true, children: [
    { name: 'Resource 1', id: 'R1' },
    { name: 'Resource 2', id: 'R2', disabled: [
        {start: "2021-07-05T00:00:00", end: "2021-07-12T00:00:00"}
      ]
    }
  ]},
  { name: 'Group B', id: 'GB', expanded: true, children: [
    { name: 'Resource 3', id: 'R3', disabled: [
        {start: "2021-07-05T00:00:00", end: "2021-07-10T00:00:00"}
      ]
    },
    { name: 'Resource 4', id: 'R4'}
  ]}
];
To actually disable the time slots, it is necessary to use onBeforeCellRender event handler. This event is fired for every time slot of the Angular Scheduler and it lets you define custom slot properties, including disabled status. In addition to marking the slot as disabled, we also apply a custom background color.
config: DayPilot.SchedulerConfig = {
  timeHeaders: [{"groupBy":"Month"},{"groupBy":"Day","format":"d"}],
  scale: "Day",
  days: 31,
  startDate: "2021-07-01",
  onBeforeCellRender: (args) => {
    const dp = this.scheduler.control;

    const row = dp.rows.find(args.cell.resource);
    const disabled = row.data.disabled;
    if (!disabled) {
      return;
    }
    var disabledSlot = disabled.map(this.activateDates).find((item: Range) => DayPilot.Util.overlaps(item.start, item.end, args.cell.start, args.cell.end));

    const color = "#dd7e6b";

    if (disabledSlot) {
      args.cell.properties.backColor = color;
      args.cell.properties.disabled = true;
    }
  },

  // ...

}
The event handler uses DayPilot.Util.overlaps() method to check if any of the ranges defined in the disabled array overlap with the current slot.
How to change the time slot status to “disabled” using drag an drop?

The previous example used predefined ranges that were applied when the Angular Scheduler was rendered.
In this step, we will add an option to add disabled ranges to the row data using drag and drop.
The users will be able to select a time range using right mouse button. As soon as the selection is completed (on mouse button release) the Angular Scheduler will display a context menu with the available actions.
First, you need to define the context menu for the time range selection using contextMenuSelection property of the Angular Scheduler config:
config: DayPilot.SchedulerConfig = {

  // ...

  contextMenuSelection: new DayPilot.Menu({
    onHide: args => {
      this.scheduler.control.clearSelection();
    },
    items: [
      {
        text: "Disable",
        onClick: args => {
          const selection = args.source;
          const row = this.scheduler.control.rows.find(selection.resource);
          if (!row.data.disabled) {
            row.data.disabled = [];
          }

          const originalActivated = row.data.disabled.map(this.activateDates);
          const overlapping = originalActivated.filter((item: Range) => {
            return DayPilot.Util.overlaps(item.start, item.end, selection.start, selection.end);
          });

          if (overlapping.length === 0) {
            row.data.disabled.push({
              start: selection.start,
              end: selection.end
            });
          }
          else {
            let minStart = selection.start;
            let maxEnd = selection.end;
            overlapping.forEach((item: Range) => {
              if (item.start < minStart) {
                minStart = item.start;
              }
              if (item.end > maxEnd) {
                maxEnd = item.end;
              }
            });

            row.data.disabled = originalActivated.filter((item: Range) => {
              return !overlapping.includes(item);
            });

            row.data.disabled.push({
              start: minStart,
              end: maxEnd
            });

          }
        }
      },
      // ...
    ]
  }),
}
The onClick handler of the “Disable” menu item updates the disabled ranges defined for the given row.
It also checks for any existing disabled ranges and merge the selection with them in case there is an overlap.
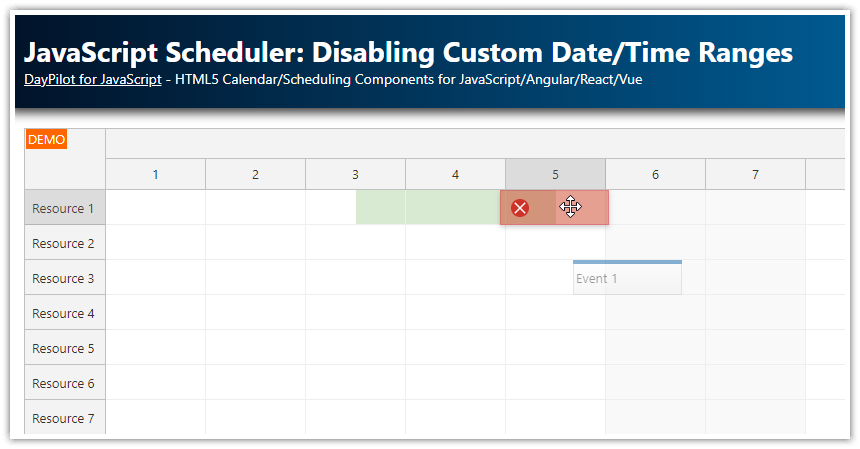
Here you can see it in action - the selection partially overlaps with the existing disabled range:

The Angular Scheduler will merge both ranges into a new one:

In order to allow selection of the cells that are already blocked, you need to ignore the disabled cells when selecting a time range using right mouse button:
onTimeRangeSelecting: args => {
  if (args.button === "right") {
    args.ignoreDisabledCells = true;
  }
},
How to enable time slots using drag and drop?

In this step, you’ll see how to add the “Enable” option to the context menu. This will let users enable the disabled slots again.
The onClick handler of the “Enabled” context menu item finds the existing time ranges for the selected row and subtracts the new range from them. Then it updates the array of disabled ranges.
The Angular Scheduler will be refreshed automatically because the resources array is part of the config object which is monitored by the change detection mechanism.
config: DayPilot.SchedulerConfig = {
contextMenuSelection: new DayPilot.Menu({
onHide: args => {
this.scheduler.control.clearSelection();
},
items: [
{
text: "Disable",
onClick: args => {
/ ...
}
},
{
text: "Enable",
onClick: args => {
const selection = args.source;
const row = this.scheduler.control.rows.find(selection.resource);
if (!row.data.disabled) {
row.data.disabled = [];
}
const originalActivated = row.data.disabled.map(this.activateDates);
originalActivated.sort((a: Range, b: Range) => {
return a.start.getTime() - b.start.getTime();
});
let keep = originalActivated.filter((item: Range) => !DayPilot.Util.overlaps(selection.start, selection.end, item.start, item.end));
const overlaps = originalActivated.filter((item: Range) => DayPilot.Util.overlaps(selection.start, selection.end, item.start, item.end));
overlaps.forEach((item: Range )=> {
const fragments = this.minus(item.start, item.end, selection.start, selection.end);
keep = keep.concat(fragments);
});
row.data.disabled = keep;
}
}
]
}),
}
minus(start1: DayPilot.Date, end1: DayPilot.Date, start2: DayPilot.Date, end2: DayPilot.Date): Range[] {
if (start2 <= start1 && end1 <= end2) {
return [];
}
if (start2 < start1) {
if (end1 < end2) {
return [];
}
return [
{start: end2, end: end1}
];
}
else {
if (end2 < end1) {
return [
{start: start1, end: start2},
{start: end2, end: end1}
];
}
return [
{start: start1, end: start2}
];
}
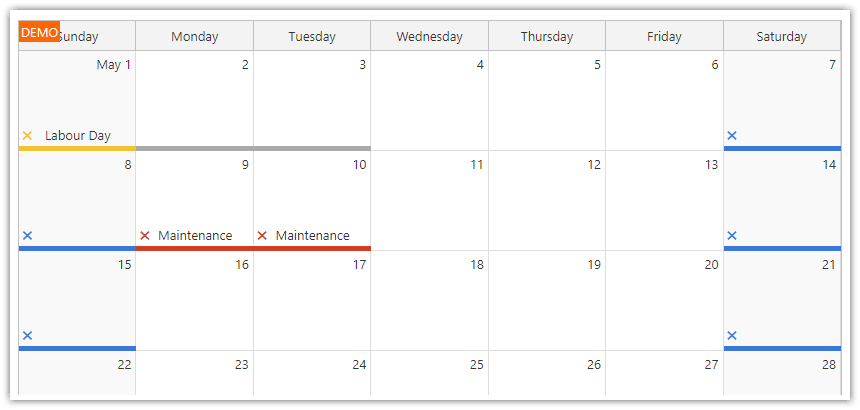
}This is how the updated row looks after applying the changes:

You can download the attached Angular project for full source code. You can run the project locally to see the how the feature works.