")
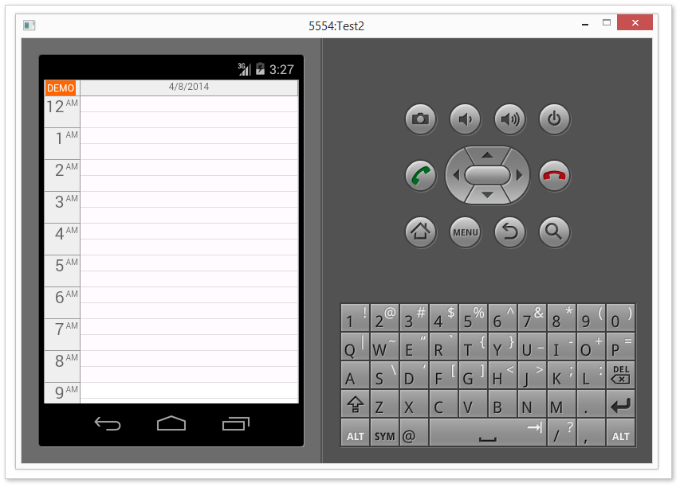
DayPilot JavaScript Scheduler supports mobile and touch devices (such as iPhone, iPad, Android phones and tablets). The support includes correct displaying of the Scheduler in mobile browsers (Safari on iOS, Chrome on Android) with viewport meta tag specified.
There is a set of touch gestures that lets the mobile users perform basic scheduling operations:
creating new events by selecting a time range (activated using tap-and-hold gesture on the grid cell; the selection can be adjusted using drag and drop)
editing events (tap gesture that is mapped to event click)
moving events (activated using tap-and-hold gesture on the event box; the event can be dragged to a new position)
Additional functionality can be activated by adding active areas with icons to the events boxes.
Features
Customizable touch gestures
Custom CSS theme adjusted for mobile screens
Set of font icons that can be used for active areas (resizing, moving, info, menu)
Support for iOS (iPad, iPhone) and Android (phones and tables)
Client-side solution - works with any server-side platform (PHP, ASP.NET, Node.js, Ruby, etc.)
Includes a trial version of DayPilot Pro for JavaScript
License
Licensed for testing and evaluation purposes. Please see the license agreement included in the sample project. You can use the source code of the tutorial if you are a licensed user of DayPilot Pro for JavaScript.
1. Viewport Meta Tag
The sample page specifies the viewport meta tag in the HTML page header:
<meta name="viewport" content="width=device-width, initial-scale=1.0">This ensures the page scale will be correctly adjusted for the mobile device screen size.
2. Event Moving on Touch Devices
Moving using Tap-and-Hold
By default, the mobile users can activate event moving using a tap-and-hold gesture. As soon as the moving is activated (after 300ms) they can move the event using drag and drop.
The default tap-and-hold timeout is set to 300ms. It can be adjusted using tapAndHoldTimeout property.
Moving using an Active Area

It is possible to add a special active area to the events that will trigger event moving on mouse down and touch start events.
dp.onBeforeEventRender = function(args) {
  args.data.areas = [
      {left:22, top:5, bottom:5, width: 20, icon: "icon icon-move", action:"Move"},
      // ...
  ];
};
If you use the active area for moving there is no timeout (no hold gesture is required). The moving will be started immediately on touch start.
The "Move" active area also supports mouse actions - the users can use it in desktop browsers and on devices that support a stylus in addition to touch events.
3. Event Resizing on Touch Devices
By default, there is no special touch gesture for event resizing. In order to let the users resize the events on touch devices you need to add an active area. There are two active area actions available, one for resizing using the event start ("ResizeStart") and one for resizing using the event end ("ResizeEnd"). In both cases the resizing will start immediately on touch.
It is possible to use the resize active areas with mouse/stylus as well.
Resizing the event start:

dp.onBeforeEventRender = function(args) {
  args.data.areas = [
      // ...
      {left:2, top:5, bottom:5, width: 20, icon: "icon icon-resize-left", action:"ResizeStart"},
      // ...
  ];
};
Resizing the event end:

dp.onBeforeEventRender = function(args) {
  args.data.areas = [
      // ...
      {right:2, top:5, bottom:5, width: 20, icon: "icon icon-resize-right", action:"ResizeEnd"},
      // ...
  ];
};
4. Event Bubble
On the desktop, the bubble is activated by event hover (eventHoverHandling is set to "Bubble" by default). The hover event is not available on touch devices. In order to display a bubble with event details you will need to use an active area. Users can tap it to display the bubble. On devices with mouse/stylus the bubble will appear when you hover the active area.

dp.onBeforeEventRender = function(args) {
  args.data.areas = [
      // ...
      {right:54, top:5, bottom:5, width: 32, icon: "icon icon-info", action:"Bubble"},
      // ...
  ];
};
The bubble appears above the event:

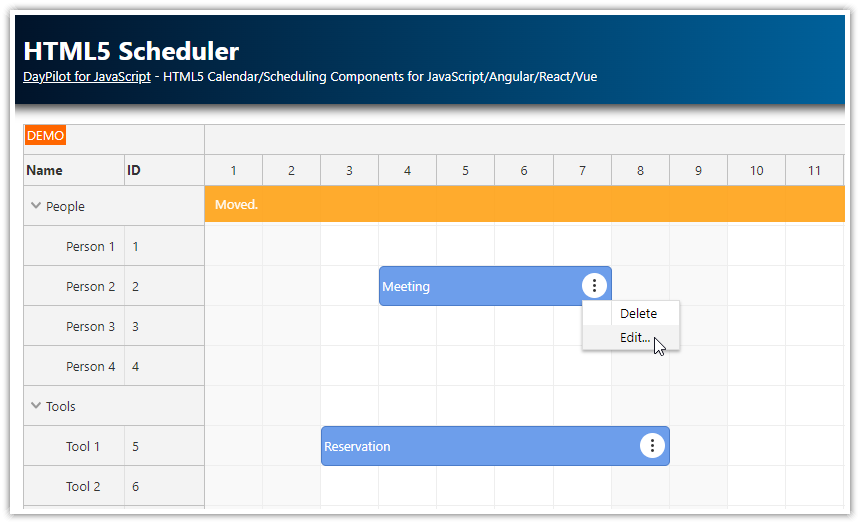
5. Context Menu
Context Menu using Tap-and-Hold
You use the tap-and-hold gesture to display a context menu instead of activating the event moving. Set the required behavior using eventTapAndHoldHandling property:
dp.eventTapAndHoldHandling = "ContextMenu";Context Menu using an Active Area
Another option is to use an active area:

dp.onBeforeEventRender = function(args) {
  args.data.areas = [
      // ...
      {right:22, top:5, bottom:5, width: 32, icon: "icon icon-menu", action:"ContextMenu"},
      // ...
  ];
};
The context menu appears next to the active area:

6. Shifting the Event Text

We have added two active areas to the left side of the event box ("ResizeStart", "Move" actions). They will cover the original event text.
We could increase the event text padding using CSS to make sure it is visible.
There is also another option - hide the original text and add yet another active area that will display the text at the specified position:
dp.onBeforeEventRender = function(args) {
  args.data.areas = [
      // ...
      {left:50, top:5, bottom:5, right: 84, style:"line-height:30px;", html: args.data.text}
  ];
  args.data.html = '';
};
6. Icons
![]()
This project includes a simple set of font icons.
<!-- Font icons -->
<link rel="stylesheet" href="icons/style.css" />
You can display an icon by adding the selected CSS class name to an element. This works for the active areas as well. The icon property adds an <i> elements inside the active area and adds the specified CSS classes:
dp.onBeforeEventRender = function(args) {
  args.data.areas = [
      {left:2, top:5, bottom:5, width: 20, icon: "icon icon-resize-left", action:"ResizeStart"},
      {right:2, top:5, bottom:5, width: 20, icon: "icon icon-resize-right", action:"ResizeEnd"},
      {left:22, top:5, bottom:5, width: 20, icon: "icon icon-move", action:"Move"},
      {right:54, top:5, bottom:5, width: 32, icon: "icon icon-info", action:"Bubble"},
      {right:22, top:5, bottom:5, width: 32, icon: "icon icon-menu", action:"ContextMenu"},
      // ...
  ];
};
We also use additional helper class ("icon") to set the icon size and color, and center the icon in the active area box:
<style>
    .icon {
      font-size: 16px;
      color: #ccc;

      line-height: 30px;
      padding: 0px 5px;
    }
</style>
7. CSS Theme

The default CSS theme that is included in the scheduler is optimized for desktop screens. You can create a special mobile CSS theme using the online theme designer.
This sample project uses a special theme called "Dark". This theme uses increased font size (14px) and padding (4px for headers).
You will find the theme in the themes folder. Include the stylesheet in the HTML page:
<link type="text/css" rel="stylesheet" href="themes/dark.css" />And set the Scheduler .theme property to activate it:
<div id="dp"></div>

<script type="text/javascript">
  var dp = new DayPilot.Scheduler("dp");
  dp.theme = "dark";

  // ...

  dp.init();

</script>