Overview
Interactive scheduler UI built with the DayPilot Pro JavaScript Scheduler component.
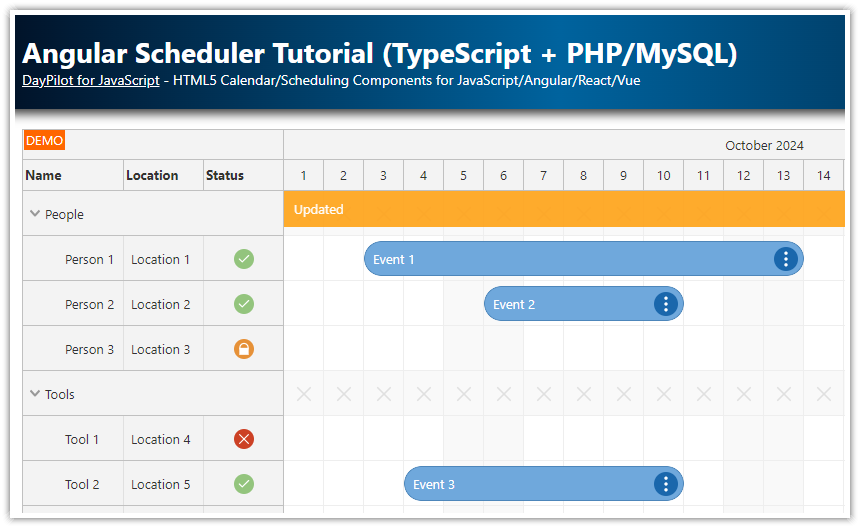
Customizable timeline with daily cells and grouped time headers (e.g., by month and day).
Resource-based scheduling with support for assigning events to people, tools, or other resources.
Hierarchical row structure, allowing resources to be grouped into sections (like "People" or "Tools").
Parent rows disabled for scheduling to prevent events from being dropped on group headers.
Dynamic row headers with support for multiple columns, including custom content like icons and resource IDs.
Event tooltips and metadata using custom fields such as
bubbleHtml.Styled events with custom background color, border, font color, and rounded corners.
Event action icons (edit, delete, context menu) directly embedded in the event display.
Real-time event editing using modals and inline controls.
Drag-and-drop support for moving and resizing events directly in the UI.
RESTful API endpoints for loading, creating, updating, and deleting events via Laravel controllers.
Resource API with tree structure output, ready for direct use in the Scheduler.
Separation of backend and frontend logic, making it easy to maintain and extend.
The Laravel project includes a trial version of DayPilot Pro for JavaScript (see License below).
License
Licensed for testing and evaluation purposes. Please see the license agreement included in the sample project. You can use the source code of the tutorial if you are a licensed user of DayPilot Pro for JavaScript. Buy a license.
Quick Start: Running the Laravel Scheduler Project
You can download the complete Laravel project using the “Download” link at the top of the tutorial and run it on your machine to see it in action.
Requirements:
PHP 8.2+ (with the following extensions enabled: curl, fileinfo, mbstring, openssl, pdo_mysql, pdo_sqlite, zip)
To run the downloaded project, follow these steps:
1. Install the PHP dependencies:
composer install2. Install the client-side (JavaScript) dependencies:
npm install3. Initialize the database:
php artisan migrate4. Seed the database with sample data:
php artisan db:seed5. Now you can run the project:
composer run devIn the tutorial below, we will explain how the Laravel app components were integrated to create a scheduling UI.
Building the Scheduler UI in Laravel

We will use the JavaScript Scheduler component from DayPilot Pro to build the UI. The trial version of DayPilot Pro can be installed using NPM:
npm install https://npm.daypilot.org/daypilot-pro-javascript/trial/2025.1.6429.tar.gzThe first step will be to add a placeholder <div> to the HTML (welcome.blade.php).
<!DOCTYPE html>
<html lang="{{ str_replace('_', '-', app()->getLocale()) }}">
    <head>

        <!-- ... -->

        @vite(['resources/css/app.css', 'resources/js/app.js'])

        <!-- ... -->

    </head>
    <body>

        <!-- ... -->

        <div id="scheduler"></div>

        <!-- ... -->

    </body>
</html>
Now we will switch to JavaScript to initialize the Scheduler.
In app.js, we need to import the DayPilot library:
import {DayPilot} from "daypilot-pro-javascript";Now we can create a new DayPilot.Scheduler object, which will render the Scheduler UI in the specified placeholder.
import './bootstrap';
import {DayPilot} from "daypilot-pro-javascript";

class App {
    scheduler = null;

    init() {
        this.scheduler = new DayPilot.Scheduler("scheduler", {
            // ... config
        });
        this.scheduler.init();
    }
}

new App().init();
In the next chapter, we will explore how to configure the Scheduler and customize its appearance.
Laravel Scheduler: Configure the Timeline

The Scheduler component displays a timeline on the horizontal axis and resources on the vertical axis.
By default, each cell has a duration of 1 hour, and the time headers display the name of each hour as well as the day groups.
We want our Scheduler to display one cell per day (scale property) and group the time headers by month. We'll configure the timeline to show the entire year 2025 (startDate and days properties), and set the initial scrollbar position to the current day (scrollTo() method).
This is how our config looks now:
import './bootstrap';
import {DayPilot} from "daypilot-pro-javascript";

class App {
    scheduler = null;

    init() {
        this.scheduler = new DayPilot.Scheduler("scheduler", {
            timeHeaders: [
                {groupBy: "Month"},
                {groupBy: "Day", format: "d"}
            ],
            scale: "Day",
            days: 365,
            startDate: "2025-01-01",
        });
        this.scheduler.init();
        this.scheduler.scrollTo(DayPilot.Date.today());
    }

}

new App().init();
Configure the Scheduler Rows and Load Resources from the Database

In this step, we'll define the rows of the Scheduler by loading resource data from the database. Each resource represents an item we want to schedule—such as a person or a tool.
To keep things organized, the resources will be structured in a tree hierarchy. This means they’ll be grouped into predefined categories ('People' and 'Tools'), making it easier to navigate and manage the schedule.
Each group is also represented by a dedicated row, which isn’t available for scheduling - that’s why we disable the parent resources using the treePreventParentUsage property.
import './bootstrap';
import {DayPilot} from "daypilot-pro-javascript";

class App {
    scheduler = null;

    init() {
        this.scheduler = new DayPilot.Scheduler("scheduler", {
            // ...
            treeEnabled: true,
            treePreventParentUsage: true,
            rowHeaderColumns: [
                {name: "Name", display: "name"},
            ],
            // ...
        });
        this.scheduler.init();
        this.loadData();
    }

    async loadData() {
        const resources = await axios.get("/api/resources");
        this.scheduler.update({resources});
    }
}

new App().init();
The loadData() method gets the resource data from the server using an API call. The /api/resources endpoint returns the resource data in JSON format:
[
    {
        "id": "group_1",
        "name": "People",
        "expanded": true,
        "children": [
            {
                "id": 1,
                "name": "Person 1",
                "icon": "avatar1.png"
            },
            {
                "id": 2,
                "name": "Person 2",
                "icon": "avatar2.png"
            },
            {
                "id": 3,
                "name": "Person 3",
                "icon": "avatar3.png"
            },
            {
                "id": 4,
                "name": "Person 4",
                "icon": "avatar4.png"
            }
        ]
    },
    {
        "id": "group_2",
        "name": "Tools",
        "expanded": true,
        "children": [
            {
                "id": 5,
                "name": "Tool 1",
                "icon": null
            },
            {
                "id": 6,
                "name": "Tool 2",
                "icon": null
            },
            {
                "id": 7,
                "name": "Tool 3",
                "icon": null
            },
            {
                "id": 8,
                "name": "Tool 4",
                "icon": null
            }
        ]
    }
]
As soon as we receive the data, we load the Scheduler rows using the update() method.
We will get back to the Laravel implementation of the API controller later.
To show additional data for the resources in the row headers (such as the icon and ID), we will define custom row header columns:
this.scheduler = new DayPilot.Scheduler("scheduler", {
    // ...
    rowHeaderColumns: [
        {name: "Name", display: "name"},
        {name: "Icon", width: 40},
        {name: "ID", display: "id"}
    ],
    // ...
});
Standard content can be loaded easily by setting the display property for the column. This property determines which member of the resource data object is used to display the text.
To show more complex content in the row header columns (an icon), we’ll use the onBeforeRowHeaderRender event handler:
onBeforeRowHeaderRender: args => {

    const icon = args.row.data.icon;
    const column = args.row.columns[1];

    if (icon && column) {
        column.areas = [
            {
                right: 0,
                top: 0,
                left: 0,
                bottom: 0,
                image: "/images/" + icon,
                fontColor: "#555555",
                style: "box-sizing: border-box; padding: 5px;",
            }
        ];
    }

},
This example uses an active area to add an icon loaded from the icon property of the resource data object.
Load Event Data in the Laravel Scheduler

Now it’s time to load the event data.
We will extend our existing loadData() method to get events from the /api/events endpoint using an HTTP call.
async loadData() {
    const start = this.scheduler.visibleStart();
    const end = this.scheduler.visibleEnd();
    const [{data: resources}, {data: events}] = await Promise.all([
        axios.get("/api/resources"),
        axios.get(`/api/events?start=${start}&end=${end}`)
    ]);
    this.scheduler.update({resources, events});
}
To limit the number of events loaded from the database and sent over the network, we use the start and end query string parameters. This way the Scheduler will only load events for the visible date range.
Both HTTP requests are executed in parallel and we wait for both of them to complete before updating the Scheduler.
To adjust the appearance of Scheduler events, we’ll use the onBeforeEventRender event handler. It allows us to make the following changes:
Set custom background, border and font color
Hide the duration bar
Add action icons to the right side of events (context menu, delete)
This is our event-loading logic:
import './bootstrap';
import {DayPilot} from "daypilot-pro-javascript";

class App {
    scheduler = null;

    init() {
        this.scheduler = new DayPilot.Scheduler("scheduler", {

            // ...

            onBeforeEventRender: args => {
                args.data.backColor = "#93c47d";
                args.data.borderColor = "darker";
                args.data.fontColor = "white";

                args.data.barHidden = true;
                args.data.padding = "5px";

                args.data.areas = [
                    {
                        right: 3,
                        top: 10,
                        width: 16,
                        height: 16,
                        symbol: "/icons/daypilot.svg#x-2",
                        fontColor: "#555555",
                        onClick: async args => {
                            await axios.delete(`/api/events/${args.e.data.id}`);
                            this.scheduler.events.remove(args.e.data.id);
                        }
                    },
                    {
                        right: 23,
                        top: 10,
                        width: 16,
                        height: 16,
                        symbol: "/icons/daypilot.svg#edit",
                        fontColor: "#444444",
                        onClick: args => {
                            this.editEvent(args.source);
                        }
                    },
                ];
            },
        });
        this.scheduler.init();
        this.loadData();
    }

    async loadData() {
        const start = this.scheduler.visibleStart();
        const end = this.scheduler.visibleEnd();
        const [{data: resources}, {data: events}] = await Promise.all([
            axios.get("/api/resources"),
            axios.get(`/api/events?start=${start}&end=${end}`)
        ]);
        this.scheduler.update({resources, events});
    }
}

new App().init();
Database Structure, Migrations and Eloquent Models
To support the Scheduler, we’ll create three database tables: events, resource_groups, and resources. These tables will store the scheduling data, group information, and individual resources (like people or tools) respectively. We'll also define corresponding Eloquent models to make it easy to interact with the data in Laravel.
Events Table and Model
The events table stores individual scheduled items. Each event has a text label, a start and end datetime, and a reference to the resource it’s assigned to (resource_id).
We start by generating a migration using:
php artisan make:migration create_events_tableIn the migration, we define the structure of the events table. The resource_id field links each event to a specific resource.
<?php

use Illuminate\Database\Migrations\Migration;
use Illuminate\Database\Schema\Blueprint;
use Illuminate\Support\Facades\Schema;

return new class extends Migration
{
    public function up()
    {
        Schema::create('events', function (Blueprint $table) {
            $table->id();

            $table->string('text')->nullable();
            $table->dateTime('event_start')->nullable();
            $table->dateTime('event_end')->nullable();
            $table->unsignedBigInteger('resource_id')->nullable();
            $table->timestamps();
        });
    }

    public function down()
    {
        Schema::dropIfExists('events');
    }
};
The corresponding Event model allows mass assignment of key attributes and automatically casts event_start and event_end fields to datetime objects for easier handling:
<?php

namespace App\Models;

use Illuminate\Database\Eloquent\Model;

class Event extends Model
{
    protected $fillable = [
        'text',
        'event_start',
        'event_end',
        'resource_id',
    ];

    protected $casts = [
        'event_start' => 'datetime',
        'event_end'   => 'datetime',
    ];
}
Resource Groups Table and Model
We’ll use a separate table to organize resources into logical groups (e.g., "People", "Tools").
Generate the migration:
php artisan make:migration create_resource_groups_tableThen update it as follows:
use Illuminate\Database\Migrations\Migration;
use Illuminate\Database\Schema\Blueprint;
use Illuminate\Support\Facades\Schema;

return new class extends Migration
{
    public function up(): void
    {
        Schema::create('resource_groups', function (Blueprint $table) {
            $table->id();
            $table->string('name', 200); // Group name
            $table->timestamps();
        });
    }

    public function down(): void
    {
        Schema::dropIfExists('resource_groups');
    }
};
Create the model (if needed):
php artisan make:model ResourceGroupUpdate app/Models/ResourceGroup.php:
namespace App\Models;

use Illuminate\Database\Eloquent\Model;

class ResourceGroup extends Model
{
    protected $fillable = ['name'];

    public function resources()
    {
        return $this->hasMany(Resource::class, 'group_id');
    }
}
This model defines a one-to-many relationship with the Resource model.
Resources Table and Model
The resources table stores the individual items you’ll be scheduling—these could be team members, rooms, machines, etc. Each resource belongs to a resource_group, has a name, and can optionally have an icon.
Generate the migration:
php artisan make:migration create_resources_tableEdit it like so:
use Illuminate\Database\Migrations\Migration;
use Illuminate\Database\Schema\Blueprint;
use Illuminate\Support\Facades\Schema;

return new class extends Migration
{
    public function up(): void
    {
        Schema::create('resources', function (Blueprint $table) {
            $table->id();
            $table->string('name', 200); // Resource name
            $table->string('icon', 200)->nullable(); // Optional icon file name
            $table->unsignedBigInteger('group_id'); // Reference to resource group
            $table->timestamps();
        });
    }

    public function down(): void
    {
        Schema::dropIfExists('resources');
    }
};
Generate the model (if needed):
php artisan make:model ResourceUpdate app/Models/Resource.php:
namespace App\Models;

use Illuminate\Database\Eloquent\Model;

class Resource extends Model
{
    protected $fillable = ['name', 'group_id', 'icon'];

    public function resourceGroup()
    {
        return $this->belongsTo(ResourceGroup::class, 'group_id');
    }
}
This sets up the inverse of the relationship defined in ResourceGroup, linking each resource back to its group.
Adding Custom Fields to Scheduler Events
Sometimes you may want to include extra information with your events—like tooltips, CSS classes, or metadata—beyond just the basic text, start, and end fields. DayPilot Scheduler supports custom fields, and we can easily include them by customizing the API response using a Laravel resource class.
Step 1: Generate the Resource
We'll create an EventResource class to define how event data is formatted when returned from the backend:
php artisan make:resource EventResourceEdit the generated EventResource.php file to include the fields expected by DayPilot Scheduler, including any custom fields you'd like to pass (like bubbleHtml for tooltips):
namespace App\Http\Resources;

use Illuminate\Http\Request;
use Illuminate\Http\Resources\Json\JsonResource;

class EventResource extends JsonResource
{
    public static $wrap = null;

    /**
     * Transform the resource into an array.
     *
     * @return array<string, mixed>
     */
    public function toArray($request)
    {
        return [
            'id'         => $this->id,
            'text'       => $this->text,
            'start'      => $this->event_start ? $this->event_start->format('Y-m-d\\TH:i:s') : null,
            'end'        => $this->event_end ? $this->event_end->format('Y-m-d\\TH:i:s') : null,
            'resource'   => $this->resource_id,

            // Custom field: Used for the event bubble (tooltip)
            'bubbleHtml' => "Event details: <br/>{$this->text}",
        ];
    }
}
The toArray() function allows us to format the output to match the structure expected by the Scheduler:
bubbleHtmlis a custom field used by DayPilot to display a tooltip when hovering over an event.resourcecorresponds to theresource_idand tells DayPilot where to place the event on the Scheduler.The
startandendfields are formatted in ISO 8601 format (Y-m-d\TH:i:s), which is required by the Scheduler.
API Controller for Handling Scheduler Events
To manage events (loading, creating, updating, and deleting), we’ll create a dedicated controller that will serve as the backend API for the Scheduler.
Run the following command to generate a new controller:
php artisan make:controller EventControllerThis will create a new file at app/Http/Controllers/EventController.php. Update the file as follows:
<?php

namespace App\Http\Controllers;

use App\Http\Resources\EventResource;
use App\Models\Event;
use Illuminate\Http\Request;

class EventController extends Controller
{
    public function index(Request $request)
    {
        $request->validate([
            'start' => 'sometimes|date',
            'end'   => 'sometimes|date',
        ]);

        $start = $request->query('start');
        $end   = $request->query('end');

        $events = Event::whereNot(function ($query) use ($start, $end) {
            $query->where('event_end', '<=', $start)
                ->orWhere('event_start', '>=', $end);
        })->get();

        return EventResource::collection($events)->collection;
    }

    public function store(Request $request)
    {
        $input = $request->validate([
            'text'     => 'required|string',
            'start'    => 'required|date',
            'end'      => 'required|date',
            'resource' => 'required|integer', // or exists:resource_groups,id if you want to ensure valid resource ID
        ]);

        // Create the new event
        $event = Event::create([
            'text'        => $input['text'],
            'event_start' => $input['start'],
            'event_end'   => $input['end'],
            'resource_id' => $input['resource'],
        ]);

        return new EventResource($event);
    }

    public function show(Event $event)
    {
        return new EventResource($event);
    }

    public function update(Request $request, Event $event)
    {
        $data = $request->validate([
            'start'    => 'sometimes|date',
            'end'      => 'sometimes|date',
            'resource' => 'sometimes|integer',
            'text'     => 'sometimes|string',
        ]);

        // Update your model columns accordingly
        $event->update([
            'event_start' => $data['start'] ?? $event->event_start,
            'event_end'   => $data['end']   ?? $event->event_end,
            'resource_id' => $data['resource'] ?? $event->resource_id,
            'text'        => $data['text'] ?? $event->text,
        ]);

        return response()->json(['result' => 'OK', 'message' => 'Event updated']);
    }

    public function destroy(Event $event)
    {
        $event->delete();

        return response()->json(['result' => 'OK', 'message' => 'Event deleted']);
    }
}
This implementation of the controller defines all necessary CRUD operations:
index(): Returns events within a given date range. It filters out events that don’t intersect with the Scheduler's visible timeline.store(): Creates a new event based on the request payload.show(): Returns a single event by ID.update(): Updates an existing event with any provided fields (start,end,resource, ortext).destroy(): Deletes the specified event.
This controller works seamlessly with the EventResource class we created earlier, ensuring the response is formatted correctly for the Scheduler component.
To make the event API accessible, we’ll define RESTful routes for the EventController. Laravel provides a convenient apiResource helper that automatically sets up all the standard routes (index, show, store, update, destroy).
To define the routes, add the following line to api.php:
Route::apiResource('events', EventController::class);This single line registers all the necessary endpoints.
API Controller for Handling Scheduler Resources
In this step, we'll create an API endpoint that returns a structured list of resources for the Scheduler. The resources will be grouped into sections (like “People” or “Tools”) using the resource_groups table.
Run the following command to generate the controller:
php artisan make:controller ResourceControllerThe index() method will load all resource groups along with their related resources, format the data, and return it in the structure expected by DayPilot Scheduler.
Update app/Http/Controllers/ResourceController.php with the following code:
<?php

namespace App\Http\Controllers;

use App\Models\ResourceGroup;
use Illuminate\Http\Request;

class ResourceController extends Controller
{
    public function index()
    {
        $groups = ResourceGroup::with(['resources' => function ($query) {
            $query->orderBy('name');
        }])
            ->orderBy('name')
            ->get();

        $transformed = $groups->map(function ($group) {
            return [
                'id'       => 'group_' . $group->id,
                'name'     => $group->name,
                'expanded' => true,
                'children' => $group->resources->map(function ($resource) {
                    return [
                        'id'   => $resource->id,
                        'name' => $resource->name,
                        'icon' => $resource->icon,
                    ];
                })->toArray(),
            ];
        });

        return response()->json($transformed);
    }
}
The index() method returns the resource tree:
The controller fetches all resource groups and their related resources using Eloquent relationships.
It then transforms the data into a tree format, which the Scheduler expects for hierarchical row display.
Each group is given a custom ID (e.g.,
group_1) to distinguish it from regular resources.Each group includes a
childrenarray containing its individual resources.The
expanded: trueflag ensures that the groups are expanded by default in the Scheduler UI.
Full Source Code
Here is the full source code of the client-side JavaScript file (resources/js/app.js), which defines the user interface and handles user actions:
import './bootstrap';
import {DayPilot} from "daypilot-pro-javascript";

class App {
    scheduler = null;

    init() {
        this.scheduler = new DayPilot.Scheduler("scheduler", {
            treeEnabled: true,
            treePreventParentUsage: true,
            timeHeaders: [
                {groupBy: "Month"},
                {groupBy: "Day", format: "d"}
            ],
            scale: "Day",
            days: 365,
            startDate: "2025-01-01",
            rowHeaderColumns: [
                {name: "Name", display: "name"},
                {name: "Icon", width: 40},
                {name: "ID", display: "id"}
            ],
            cellWidth: 60,
            eventBorderRadius: 5,
            rowMarginBottom: 2,
            rowMarginTop: 2,
            contextMenu: new DayPilot.Menu({
                items: [
                    {
                        text: "Edit...",
                        onClick: args => {
                            this.editEvent(args.source);
                        }
                    },
                    {
                        text: "Delete",
                        icon: "delete",
                        onClick: async args => {
                            await axios.delete(`/api/events/${args.source.data.id}`);
                            this.scheduler.events.remove(args.source.data.id);
                        }
                    }
                ]
            }),
            onEventClick: args => {
                this.editEvent(args.e);
            },
            onBeforeEventRender: args => {
                args.data.backColor = "#93c47d";
                args.data.borderColor = "darker";
                args.data.fontColor = "white";

                args.data.barHidden = true;
                args.data.padding = "5px";

                args.data.areas = [
                    {
                        right: 3,
                        top: 10,
                        width: 16,
                        height: 16,
                        symbol: "/icons/daypilot.svg#x-2",
                        fontColor: "#555555",
                        onClick: async args => {
                            await axios.delete(`/api/events/${args.e.data.id}`);
                            this.scheduler.events.remove(args.e.data.id);
                        }
                    },
                    {
                        right: 23,
                        top: 10,
                        width: 16,
                        height: 16,
                        symbol: "/icons/daypilot.svg#threedots-v",
                        fontColor: "#444444",
                        action: "ContextMenu"
                    },
                ];
            },
            onBeforeCellRender: args => {
                if (args.cell.isParent) {
                    args.cell.backColor = "#f8f8f8";
                }
            },
            onBeforeRowHeaderRender: args => {

                const icon = args.row.data.icon;
                const column = args.row.columns[1];

                if (icon && column) {
                    column.areas = [
                        {
                            right: 0,
                            top: 0,
                            left: 0,
                            bottom: 0,
                            image: "/images/" + icon,
                            fontColor: "#555555",
                            style: "box-sizing: border-box; padding: 5px;",
                        }
                    ];
                }

            },
            onTimeRangeSelected: async args => {
                const modal = await DayPilot.Modal.prompt("Create a new event:", "Event 1");
                this.scheduler.clearSelection();
                if (modal.canceled) {
                    return;
                }
                const params = {
                    start: args.start,
                    end: args.end,
                    resource: args.resource,
                    text: modal.result
                };
                const {data} = await axios.post("/api/events", params);
                this.scheduler.events.add(data);
            },
            onEventMove: async args => {
                const params = {
                    id: args.e.data.id,
                    start: args.newStart,
                    end: args.newEnd,
                    resource: args.newResource,
                    text: args.e.data.text
                };
                await axios.put(`/api/events/${params.id}`, params);
            },
            onEventResize: async args => {
                const params = {
                    id: args.e.id(),
                    start: args.newStart,
                    end: args.newEnd,
                    resource: args.e.data.resource,
                    text: args.e.data.text
                };
                await axios.put(`/api/events/${params.id}`, params);
            },
        });
        this.scheduler.init();
        this.scheduler.scrollTo(DayPilot.Date.today());
        this.loadData();
    }

    resourcesFlat() {
        const resources = [];
        this.scheduler.resources.forEach(group => {
            group.children.forEach(resource => {
                resources.push(resource);
            });
        })
        return resources;
    }

    async editEvent(e) {
        const form = [
            {name: "Text", id: "text"},
            {name: "Start", id: "start", type: "datetime"},
            {name: "End", id: "end", type: "datetime"},
            {name: "Resource", id: "resource", options: this.resourcesFlat()}
        ];

        const modal = await DayPilot.Modal.form(form, e.data);
        if (modal.canceled) {
            return;
        }

        await axios.put(`/api/events/${e.data.id}`, modal.result);

        this.scheduler.events.update(modal.result);
    }

    async loadData() {
        const start = this.scheduler.visibleStart();
        const end = this.scheduler.visibleEnd();
        const [{data: resources}, {data: events}] = await Promise.all([
            axios.get("/api/resources"),
            axios.get(`/api/events?start=${start}&end=${end}`)
        ]);
        this.scheduler.update({resources, events});
    }
}

new App().init();