Overview
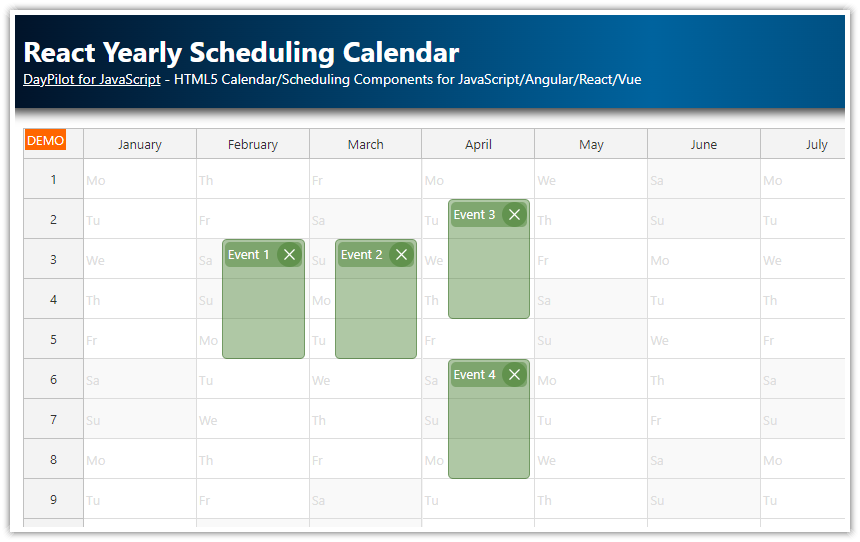
How to configure the JavaScript Calendar component to display a year view.
Each column displays one month, one day per cell.
How to customize the calendar cell content to display the day of the week and the day number in each cell.
How to shade the extra cells in short months.
This tutorial assumes that you are familiar with the JavaScript Calendar component setup and configuration.
For an introduction, please see the HTML5/JavaScript Calendar Component (Open-Source) tutorial.
This tutorial uses the Pro version of the Calendar component, which includes advanced features such as custom scale, fixed column widths, context menu, snap-to-grid disabling, column resizing, disabled cells, touch support, and more.
License
Licensed for testing and evaluation purposes. Please see the license agreement included in the sample project. You can use the source code of the tutorial if you are a licensed user of DayPilot Pro for JavaScript. Buy a license.
Setting the Calendar Scale: One Day per Cell

The Calendar uses a default cell duration of 30 minutes. In the first step, we need to change the cell duration to one day.
scale: "Day",Displaying Months as Columns

Now we will configure the Calendar component to display 12 columns, each having 31 slots.
Config:
viewType: "Resources",
days: 31,
In the yearly calendar, each column will display 31 days. Some months are shorter, so we will shade the days that don’t belong to the current month in a later step.
The resources view is normally used to display multiple resources side by side. However, if we don’t specify any IDs for the columns, the Calendar will not restrict events to a specific column, and it will display all events matching the column dates.
This is how we define the months as custom columns:
loadColumns() {
  const columns = [];
  const startDate = DayPilot.Date.today().firstDayOfYear();
  // one column per month
  for (let i = 0; i < 12; i++) {
    const start = startDate.addMonths(i);
    const name = start.toString("MMMM");
    columns.push({name, start});
  }
  dp.update({startDate, columns});
},
Note that we have used the month name in the name property. We have also specified a custom start, and we haven’t specified any column id.
Displaying Day Numbers in Row Headers

With the current configuration, the row headers display the day names starting with the specified startDate value. However, our yearly calendar displays a different day of the week in each column. We will customize the row headers to display only the day number (from 1 to 31).
The row headers can be customized using the onBeforeTimeHeaderRender event handler:
onBeforeTimeHeaderRender: args => {
  const day = args.header.date.toString("d");
  args.header.html = day;
},
Adding Day Names to Yearly Calendar Cells

As each row represents a different day of the week every month, we need to add the day names directly to the yearly calendar cells.
To customize the calendar cells, we will use the onBeforeCellRender event handler:
onBeforeCellRender: args => {
  const belongsToCurrentMonth = args.cell.y + 1 === args.cell.start.getDay();

  if (belongsToCurrentMonth) {
    args.cell.properties.areas = [
      { top: 0, left: 2, bottom: 0, width: 40, fontColor: "#666666", text: args.cell.start.toString("d ddd"), verticalAlignment: "center" }
    ];
  }

}
The day names are always displayed on the left side of each calendar cell. In the standard configuration, the day names would be covered by the events.
In order to reserve space for the day names, we will define a left margin using the columnMarginLeft property:
columnMarginLeft: 45,This affects the width of events and also the width of the target shadow during drag and drop operations (moving, resizing, time range selection).
Shading Cells That Don’t Belong to the Current Month

Some of the months have fewer days, but our yearly calendar columns always display 31 days vertically. To make it clear that the extra cells don’t belong to the current month, we will add a gray background using onBeforeCellRender:
onBeforeCellRender: args => {
  const belongsToCurrentMonth = args.cell.y + 1 === args.cell.start.getDay();

  if (!belongsToCurrentMonth) {
    args.cell.properties.backColor = "#dddddd";
  }

}
Setting Fixed Column Width
By default, the columns fill the available horizontal space. This may result in different column widths on different devices. On some screens, the columns might not be wide enough to display all the event data in a readable form.
In that case, it is possible to use a fixed column width:
columnWidthSpec: "Fixed",
columnWidth: 200,
It is also possible to set a custom width for individual columns (e.g., make the current month wider) and enable user-resizable columns.
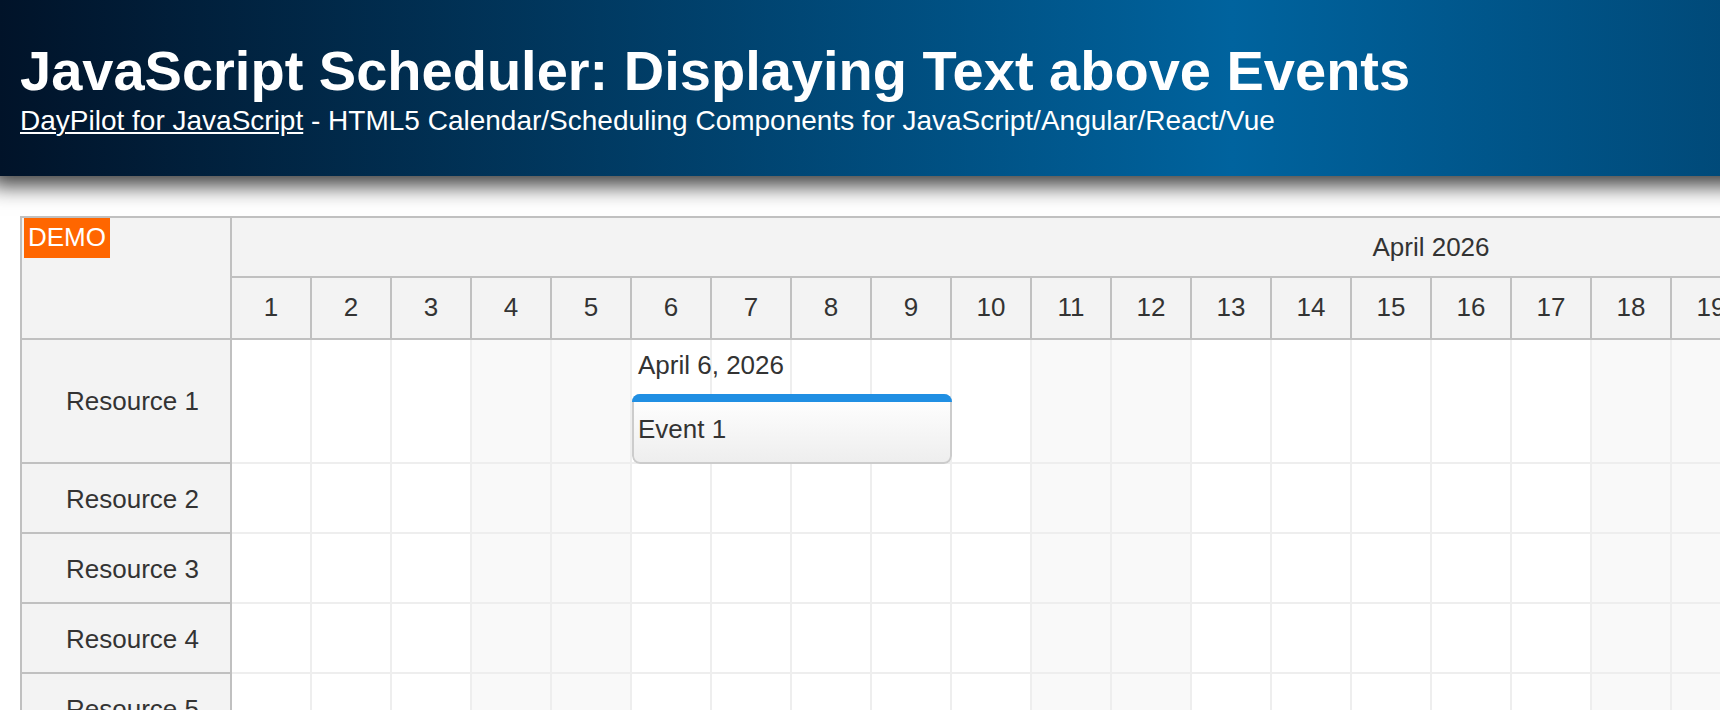
Yearly Calendar with Months as Rows

To create a scheduling calendar that displays months as rows, you can use the JavaScript Scheduler component:
Full Source Code
Here is the full source code of our yearly calendar implementation that displays months side-by-side as columns:
<!DOCTYPE html>
<html>
<head>
  <meta charset="utf-8"/>
  <meta name="viewport" content="width=device-width, initial-scale=1">
  <title>JavaScript Yearly Calendar</title>

  <style type="text/css">
    p, body, td, input, select, button { font-family: -apple-system,system-ui,BlinkMacSystemFont,'Segoe UI',Roboto,'Helvetica Neue',Arial,sans-serif; font-size: 14px; }
    body { padding: 0px; margin: 0px; background-color: #ffffff; }
    a { color: #1155a3; }
    .space { margin: 10px 0px 10px 0px; }
    .header { background: #003267; background: linear-gradient(to right, #011329 0%,#00639e 44%,#011329 100%); padding:20px 10px; color: white; box-shadow: 0px 0px 10px 5px rgba(0,0,0,0.75); }
    .header a { color: white; }
    .header h1 a { text-decoration: none; }
    .header h1 { padding: 0px; margin: 0px; }
    .main { padding: 10px; margin-top: 10px; }
    .generated { color: #999; margin-top: 10px; }
    .generated a { color: #999; }
  </style>

  <!-- DayPilot library -->
  <script src="js/daypilot/daypilot-all.min.js"></script>

  <style>
    .calendar_default_event_inner {
      background: #2e78d6;
      border: 1px solid #176cda;
      color: white;
      border-radius: 5px;
      opacity: 0.9;
    }
  </style>

</head>
<body>
<div class="header">
  <h1><a href='https://code.daypilot.org/23687/javascript-yearly-calendar'>JavaScript Yearly Calendar</a></h1>
  <div><a href="https://javascript.daypilot.org/">DayPilot for JavaScript</a> - HTML5 Calendar/Scheduling Components for JavaScript/Angular/React/Vue</div>
</div>

<div class="main">
  <div id="dp"></div>
  <div class="generated">Generated using <a href="https://builder.daypilot.org/">DayPilot UI Builder</a>.</div>
</div>

<script>
  const dp = new DayPilot.Calendar("dp", {
    viewType: "Resources",
    scale: "Day",
    days: 31,
    heightSpec: "Full",
    columnWidthSpec: "Auto",
    headerLevels: 1,
    headerHeight: 30,
    cellHeight: 30,
    columnMarginLeft: 45,
    columnWidthMin: 200,
    durationBarVisible: false,
    eventClickHandling: "Disabled",
    eventHoverHandling: "Disabled",
    eventMoveHandling: "Update",
    eventResizeHandling: "Update",
    timeRangeSelectedHandling: "Enabled",
    onTimeRangeSelected: async (args) => {
      const calendar = args.control;
      const modal = await DayPilot.Modal.prompt("Create a new event:", "Event 1");
      calendar.clearSelection();
      if (modal.canceled) {
        return;
      }
      calendar.events.add({
        start: args.start,
        end: args.end,
        id: DayPilot.guid(),
        resource: args.resource,
        text: modal.result
      });
    },
    onBeforeTimeHeaderRender: (args) => {
      const day = args.header.date.toString("d");
      args.header.html = day;
    },
    onBeforeCellRender: (args) => {
      const belongsToCurrentMonth = args.cell.y + 1 === args.cell.start.getDay();

      if (belongsToCurrentMonth) {
        args.cell.properties.areas = [
          {
            top: 0,
            left: 2,
            bottom: 0,
            width: 40,
            fontColor: "#666666",
            text: args.cell.start.toString("d ddd"),
            verticalAlignment: "center"
          }
        ];
        return;
      }

      args.cell.properties.backColor = "#dddddd";
    }
  });
  dp.init();

  const app = {
    loadColumns() {
      const columns = [];
      const startDate = DayPilot.Date.today().firstDayOfYear();

      for (let i = 0; i < 12; i++) {
        const start = startDate.addMonths(i);
        const name = start.toString("MMMM");
        columns.push({name, start});
      }

      dp.update({startDate, columns});
    },
    init() {
      this.loadColumns();
    }
  };
  app.init();
</script>

</body>
</html>
History
2026-04-21: Upgraded the bundled DayPilot Pro for JavaScript runtime from 2024.2.5922 to 2026.2.6907, refreshed the project-backed screenshots, and reviewed the article text.