Overview
The JavaScript Scheduler component displays a timeline grid for multiple resources. On a dedicated layer above the grid, the Scheduler can display events that represent reservations, tasks, milestones, or other scheduled activities.
Sometimes, it may want to to add details for specific grid cells, without adding an event that would interfere with the planned activities.
One of the options is to add an Excel-style note that will be indicated by a triangle in the corner of a cell and displayed on hover. This is what we are going to explore in this tutorial:
How to add a context menu to a Scheduler cell to allow for the addition of a new note.
How to create a visual indicator of an attached note to the cell.
How to display the note on hover.
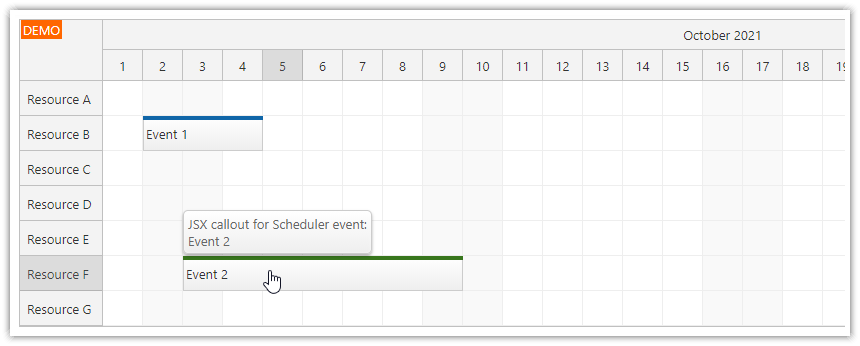
How to customize the appearance of the bubble popup that displays the note text and make it editable.
The attached project includes a source code a trial version of DayPilot Pro for JavaScript (see License below).
License
Licensed for testing and evaluation purposes. Please see the license agreement included in the sample project. You can use the source code of the tutorial if you are a licensed user of DayPilot Pro for JavaScript. Buy a license.
Add a Note to Scheduler Grid Cell using Context Menu

In this step, we will define a context menu that can be activated by right-clicking on grid cells.
The context menu (assigned to the contextMenuSelection property) has a single item (“Add Note”)
Scheduler config:
{
    contextMenuSelection: new DayPilot.Menu({
      items: [
        {
          text: "Add Note",
          onClick: async args => {

            const form = [
              {name: "Note", id: "note", type: "textarea", height: 200},
            ];
            const modal = await DayPilot.Modal.form(form);
            dp.clearSelection();
            if (modal.canceled) { return; }
            const note = modal.result.note;

            app.notes[args.source.resource + "_" + args.source.start.toString("yyyy-MM-dd")] = note;
            dp.update();
          }
        }
      ]
    }),

    // ...

}
The “Add Note” context menu item opens a modal dialog for entering the note details on click.

The new note is stored in a app.notes object. As a key, it uses a string created from the resource ID and cell start date:
const app = {
  notes: {
    "R3_2024-01-04": "Details\n\nThis is a note for 'Resource 3' on January 4, 2024",
  },

  // ...

};
Display a Red Triangle in the Cell Upper-Right Corner

Now, we have the note stored in app.notes. To highlight the corresponding grid cells, we'll use the onBeforeCellRender event handler, which allows for the customization of Scheduler cells.
In our onBeforeCellRender handler, we create a new active area that displays a SVG image in the upper-right corner.
{
    onBeforeCellRender: args => {
      const note = app.notes[args.cell.resource + "_" + args.cell.start.toString("yyyy-MM-dd")];
      if (note) {
        args.cell.areas = [
          // red triangle in the upper-right corner
          {
            top: 0,
            right: 0,
            height: 10,
            width: 10,
            image: "icons/triangle.svg"
          }
        ];
      }
    }

    // ...

}
The SVG image (triangle.svg) displays a simple red triangle:
<svg width="20" height="20" xmlns="http://www.w3.org/2000/svg">
    <symbol id="triangle-symbol" viewBox="0 0 20 20">
        <polygon points="0,0 20,0 20,20" fill="currentColor"/>
    </symbol>
    <use href="#triangle-symbol" x="0" y="0" color="red" />
</svg>
Show and Edit the Cell Note

In this step, we will define the logic that displays the note text using a bubble pop-up.
The bubble content is generated dynamically.
It uses a
<textarea>element to edit the note text.The local value (
app.notes) is updated immediately.You can save the new value to the server using the
blurevent of the text area.
{
    cellBubble: new DayPilot.Bubble({
      position: "Right",
      onBeforeDomAdd: args => {
        const note = app.notes[args.source.resource + "_" + args.source.start.toString("yyyy-MM-dd")] || "";

        if (!note) {
          return;
        }

        // create text area
        const textarea = document.createElement("textarea");
        textarea.className = "note";
        textarea.value = note;
        textarea.addEventListener("change", () => {
          app.notes[args.source.resource + "_" + args.source.start.toString("yyyy-MM-dd")] = textarea.value;
        });
        // prevent click event from bubbling up to the scheduler
        textarea.addEventListener("click", ev => {
          ev.stopPropagation();
        });
        // automatically expand the textarea height to fit the content
        textarea.addEventListener("input", ev => {
          textarea.style.height = "auto";
          textarea.style.height = textarea.scrollHeight + "px";
        });
        // update scheduler on blur
        textarea.addEventListener("blur", ev => {
          // ... notify the server
          dp.update();
        });
        // auto-fit the height on startup
        setTimeout(() => {
          textarea.dispatchEvent(new Event("input"));
        }, 0);
        args.element = textarea;
      },
    }),

    // ...

}
Full Source Code
And here is the full source code of our sample project that lets users add custom Excel-like notes to the JavaScript Scheduler cells.
It includes the JavaScript Scheduler initialization code, configuration and CSS styles.
<!DOCTYPE html>
<html>
<head>
  <meta charset="utf-8"/>
  <meta name="viewport" content="width=device-width, initial-scale=1">
  <title>How to Add Excel-Like Notes to JavaScript Scheduler Grid Cells</title>

  <style type="text/css">
    p, body, td, input, select, button, textarea { font-family: -apple-system,system-ui,BlinkMacSystemFont,'Segoe UI',Roboto,'Helvetica Neue',Arial,sans-serif; font-size: 14px; }
    body { padding: 0px; margin: 0px; background-color: #ffffff; }
    a { color: #1155a3; }
    .space { margin: 10px 0px 10px 0px; }
    .header { background: #003267; background: linear-gradient(to right, #011329 0%,#00639e 44%,#011329 100%); padding:20px 10px; color: white; box-shadow: 0px 0px 10px 5px rgba(0,0,0,0.75); }
    .header a { color: white; }
    .header h1 a { text-decoration: none; }
    .header h1 { padding: 0px; margin: 0px; }
    .main { padding: 10px; margin-top: 10px; }
    .generated { color: #999; }
    .generated a { color: #999; }
  </style>

  <style>
    textarea.note {
      width: 200px;
      height: 100px;
      border: 1px solid #ccc;
    }
    body .scheduler_default_event_bar_inner {
      background-color: #36b7ff;
    }
  </style>

  <!-- DayPilot library -->
  <script src="js/daypilot/daypilot-all.min.js"></script>
</head>
<body>
<div class="header">
  <h1><a href='https://code.daypilot.org/88861/javascript-scheduler-grid-cell-notes'>How to Add Excel-Like Notes to JavaScript Scheduler Grid Cells</a></h1>
  <div><a href="https://javascript.daypilot.org/">DayPilot for JavaScript</a> - HTML5 Calendar/Scheduling Components for JavaScript/Angular/React/Vue</div>
</div>

<div class="main">
  <div id="dp"></div>
  <div class="generated">Generated using <a href="https://builder.daypilot.org/">DayPilot UI Builder</a>.</div>
</div>

<script>
  const dp = new DayPilot.Scheduler("dp", {
    timeHeaders: [{"groupBy":"Month"},{"groupBy":"Day","format":"d"}],
    scale: "Day",
    days: 365,
    startDate: "2024-01-01",
    timeRangeSelectedHandling: "Enabled",
    onTimeRangeSelected: async (args) => {
      const dp = args.control;
      const modal = await DayPilot.Modal.prompt("Create a new event:", "Event 1");
      dp.clearSelection();
      if (modal.canceled) { return; }
      dp.events.add({
        start: args.start,
        end: args.end,
        id: DayPilot.guid(),
        resource: args.resource,
        text: modal.result
      });
    },
    cellBubble: new DayPilot.Bubble({
      position: "Right",
      onBeforeDomAdd: args => {
        const note = app.notes[args.source.resource + "_" + args.source.start.toString("yyyy-MM-dd")] || "";

        if (!note) {
          return;
        }

        // create text area
        const textarea = document.createElement("textarea");
        textarea.className = "note";
        textarea.value = note;
        textarea.addEventListener("change", () => {
          app.notes[args.source.resource + "_" + args.source.start.toString("yyyy-MM-dd")] = textarea.value;
        });
        // prevent click event from bubbling up to the scheduler
        textarea.addEventListener("click", ev => {
          ev.stopPropagation();
        });
        // automatically expand the textarea height to fit the content
        textarea.addEventListener("input", ev => {
          textarea.style.height = "auto";
          textarea.style.height = textarea.scrollHeight + "px";
        });
        // update scheduler on blur
        textarea.addEventListener("blur", ev => {
          // ... notify the server
          dp.update();
        });
        // auto-fit the height on startup
        setTimeout(() => {
          textarea.dispatchEvent(new Event("input"));
        }, 0);
        args.element = textarea;
      },
    }),
    contextMenuSelection: new DayPilot.Menu({
      items: [
        {
          text: "Add Note",
          onClick: async args => {

            const form = [
              {name: "Note", id: "note", type: "textarea", height: 200},
            ];
            const modal = await DayPilot.Modal.form(form);
            dp.clearSelection();
            if (modal.canceled) { return; }
            const note = modal.result.note;

            app.notes[args.source.resource + "_" + args.source.start.toString("yyyy-MM-dd")] = note;
            dp.update();
          }
        }
      ]
    }),
    onBeforeCellRender: args => {
      const note = app.notes[args.cell.resource + "_" + args.cell.start.toString("yyyy-MM-dd")];
      if (note) {
        args.cell.areas = [
          // red triangle in the upper-right corner
          {
            top: 0,
            right: 0,
            height: 10,
            width: 10,
            image: "icons/triangle.svg"
          }
        ];
      }
    }
  });
  dp.init();

  const app = {
    notes: {
      "R3_2024-01-04": "Details\n\nThis is a note for 'Resource 3' on January 4, 2024",
    },
    loadData() {
      const resources = [
        {name: "Resource 1", id: "R1"},
        {name: "Resource 2", id: "R2"},
        {name: "Resource 3", id: "R3"},
        {name: "Resource 4", id: "R4"},
        {name: "Resource 5", id: "R5"},
        {name: "Resource 6", id: "R6"},
        {name: "Resource 7", id: "R7"},
        {name: "Resource 8", id: "R8"},
        {name: "Resource 9", id: "R9"},
      ];
      dp.update({resources: resources});
    },
    init() {
      this.loadData();
    }
  };
  app.init();
</script>

</body>
</html>