")
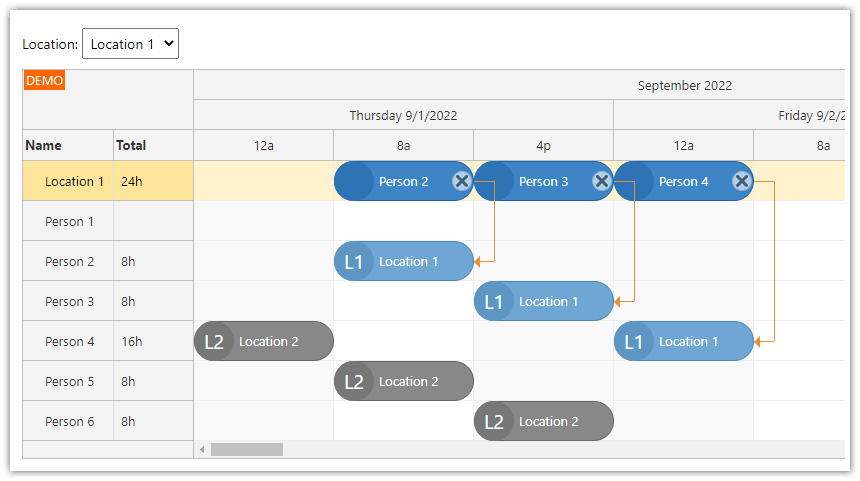
Resource-Scheduling Calendar in ASP.NET Core
In this tutorial, you will learn how to create a resource-scheduling calendar in ASP.NET Core.
Our application uses the open-source calendar component from DayPilot Lite for JavaScript. DayPilot Lite is licensed under a business-friendly Apache License 2.0 which lets you use the component in commercial applications.
The resource calendar displays resources as columns. You can use it to display resources of different types, such as:
rooms
factories
cars
tools
people
On the vertical axis, the scheduling calendar displays time.
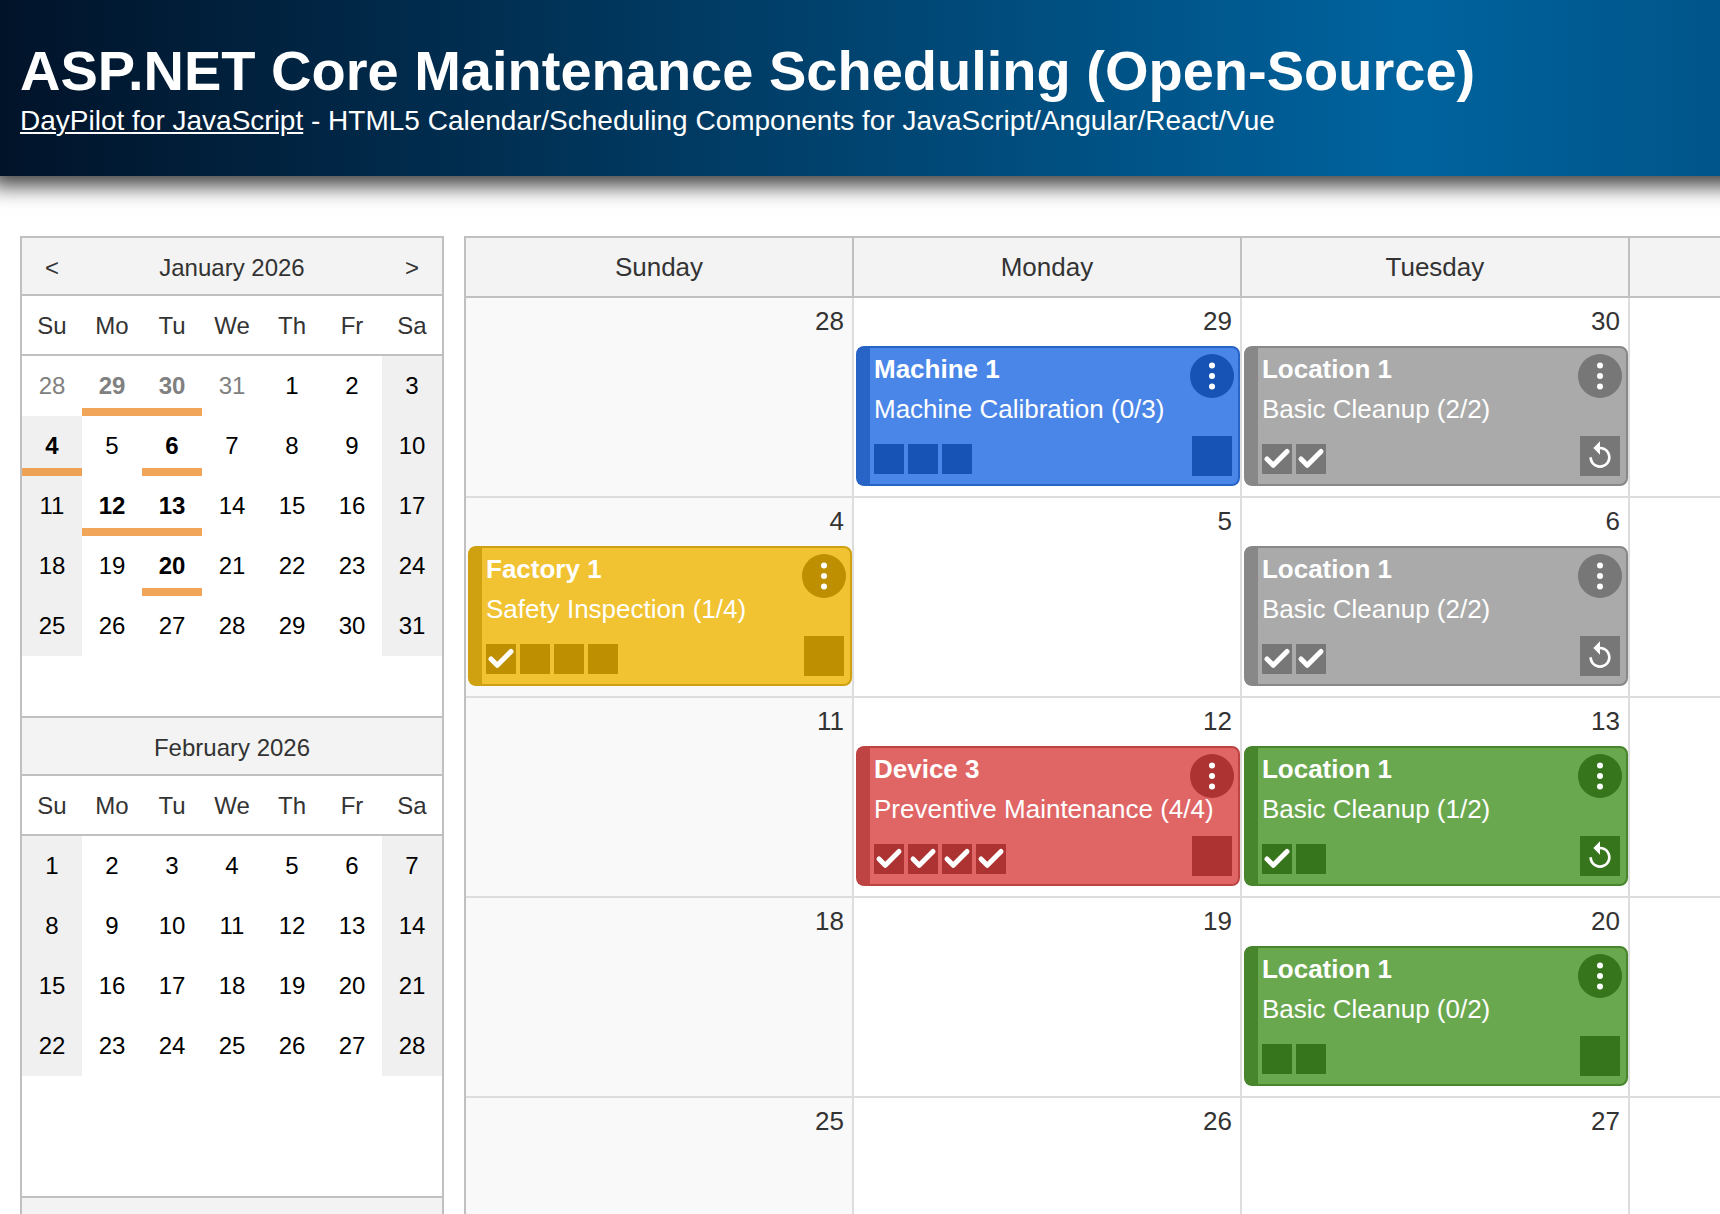
On the left side, next to the calendar, our ASP.NET Core application displays a date picker component that lets users change the current date.
Above the calendar, there are three buttons:
Next
Previous
Today
Users can use these buttons to change the current date. The buttons are synchronized with the date picker. If you change the current date using one of the buttons, the current date will also be updated in the date picker component.
Another feature of the date picker is highlighting busy days. Each day that has an event (task, reservation) scheduled for it, will be highlighted. This way, users will see which days are free/busy and have scheduled events.
The frontend of the application is created using JavaScript and HTML5. The backend is implemented using ASP.NET Core, SQL Server, and Entity Framework (in C#).
How to Initialize the Resource-Scheduling Calendar
 - Initialization")
The basic initialization code of the JavaScript Calendar in resources mode looks like this:
const calendar = new DayPilot.Calendar("calendar", {
  viewType: "Resources",
  startDate: "2026-10-01",
  columns: [
    { name: "Resource A", id: "A"},
    { name: "Resource B", id: "B"},
    { name: "Resource C", id: "C"},
    // ...
  ]
});
calendar.init();
This configuration displays a resource calendar with three columns (“Resource A”, etc.).
The current date is set using startDate property. This property accepts a date string (in ISO 8601 format). You can also set the date using a DayPilot.Date object:
startDate: DayPilot.Date.today()Loading Resource Calendar Data
 - Loading Data")
In this step, we will remove the column data from the initial config and load it from the SQL Server database using a server-side API endpoint.
const calendar = new DayPilot.Calendar("calendar", {
  viewType: "Resources",
  startDate: "2026-10-01",
});
calendar.init();

const app = {
  async loadCalendarData() {
    const {data} = await DayPilot.Http.get("/api/resources");
    calendar.update({
      columns,
    });
  }
};
app.loadCalendarData();
You can see that we are loading the column data from /api/resources endpont.
This is a Web API controller endpoint that returns the resource data which it gets from an SQL Server database using Entity Framework:
using Microsoft.AspNetCore.Mvc;
using Microsoft.EntityFrameworkCore;
using Project.Models;

namespace Project.Controllers
{
    [Produces("application/json")]
    [Route("api/resources")]
    public class ResourcesController : Controller
    {

        private readonly SchedulerDbContext _context;

        public ResourcesController(SchedulerDbContext context)
        {
            _context = context;
        }

        // GET: api/resources
        [HttpGet]
        public async Task<ActionResult<IEnumerable<SchedulerResource>>> GetResources()
        {
            return await _context.Resources.ToListAsync();
        }

    }
}
The next step will be to load the event data. We will extend our loadCalendarData() method to load the resource calendar event data from /api/events API endpoint:
async loadCalendarData() {
  const start = calendar.visibleStart();
  const end = calendar.visibleEnd();

  const promiseEvents = DayPilot.Http.get(`/api/events?start=${start}&end=${end}`);
  const promiseResources = DayPilot.Http.get("/api/resources");

  const [{data: columns}, {data: events}] = await Promise.all([promiseResources, promiseEvents]);

  calendar.update({
    columns,
    events
  });
},
You can see that we are execute two parallel HTTP requests and wait for both of them to complete.
When both results are available, we update the resource-scheduling calendar using a single call - that is much more efficient and smooth than executing two independent updates.
The event data endpoint is also a Web API controller. The standard GetSchedulerEvents() method is extended with start and end query string parameters so we can limit the query to the specified date/time range:
using System;
using System.Collections.Generic;
using System.Linq;
using System.Threading.Tasks;
using Microsoft.AspNetCore.Http;
using Microsoft.AspNetCore.Mvc;
using Microsoft.EntityFrameworkCore;
using Project.Models;

namespace Project.Controllers
{
    [Route("api/[controller]")]
    [ApiController]
    public class EventsController : ControllerBase
    {
        private readonly SchedulerDbContext _context;

        public EventsController(SchedulerDbContext context)
        {
            _context = context;
        }

        // GET: api/Events
        [HttpGet]
        public async Task<ActionResult<IEnumerable<SchedulerEvent>>> GetSchedulerEvents([FromQuery] DateTime start, [FromQuery] DateTime end)
        {
            if (_context.Events == null)
            {
                return NotFound();
            }
            return await _context.Events.Where(e => !((e.End <= start) || (e.Start >= end))).ToListAsync();
        }

    }
}
Changing the Date: Date Picker and Navigation Buttons
 - Changing Date")
The resource calendar displays event data for the date specified using the startDate property.
To change the visible date, you can update the startDate property like this:
calendar.update({
  startDate: DayPilot.Date.today().addDays(2)
});
We will use this mechanism to implement “Next”, “Previous” and “Today” buttons:
HTML:
<button id="previous">Previous</button>
<button id="today">Today</button>
<button id="next">Next</button>
JavaScript:
const app = {
  elements: {
    previous: document.getElementById("previous"),
    today: document.getElementById("today"),
    next: document.getElementById("next")
  },
  addHandlers() {
    app.elements.previous.addEventListener("click", () => {
      const current = calendar.visibleStart();
      calendar.update({startDate: current.addDays(-1)});
    });
    app.elements.next.addEventListener("click", () => {
      const current = calendar.visibleStart();
      calendar.update({startDate: current.addDays(1)});
    });
    app.elements.today.addEventListener("click", () => {
      calendar.update({startDate: DayPilot.Date.today()});
    });
  },
  // ...
};
This was a simple example that only updates the visible date. Normally, you will need to load the new event data set as well. However, we will omit the data loading at this moment because we are going to integrate a date picker in the next step and that will help us simplify the data loading.
To add a date picker, use the DayPilot.Navigator class:
const datepicker = new DayPilot.Navigator("datepicker", {
  selectMode: "Day",
  showMonths: 3,
  skipMonths: 3,
  onTimeRangeSelected: args => {
    calendar.update({
      startDate: args.start,
    });
    app.loadCalendarData();
  },
  onVisibleRangeChanged: args => {
    app.loadDatePickerData();
  }
});
datepicker.init();
The first parameter of the constructor ("datepicker") specifies the ID of the placeholder element:
<div id="datepicker"></div>The second parameter specifies an options object with configuration properties.
You can see that we set some basic properties (like the selectMode). But note the onTimeRangeSelected event handler that is fired when a user selects a new date using the date picker.
In this event handler, we update the resource calendar to display the selected date. This time, we update the calendar first using an update() call that changes the startDate and then load the calendar data using loadDatePickerData().
We could merge all these changes and call the update() just once but changing the date first lets us rely on the visibleStart() and visibleEnd() methods which automatically calculate the first and last date displayed by the resource calendar. In our application, we always display just a single day but in more complex scenarios it is more convenient to ask the resource calendar component to calculate the visible range for us.
Now we can update our buttons to change the date using the select() method of the date picker. That will ensure the date changed using buttons is displayed by the date picker. It will also invoke the data-loading event handler (onTimeRaneSelected) that updates the resource calendar automatically.
addHandlers() {
  app.elements.previous.addEventListener("click", () => {
    const current = datepicker.selectionDay;
    datepicker.select(current.addDays(-1));
  });
  app.elements.next.addEventListener("click", () => {
    const current = datepicker.selectionDay;
    datepicker.select(current.addDays(1));
  });
  app.elements.today.addEventListener("click", () => {
    datepicker.select(DayPilot.Date.today());
  });
},
Note that it is also possible to specify custom date for each of the column using the start property. If you specify the start property for a column, it will override the startDate value and the display the specified date instead:
const columns = [
    { name: "Resource 1 (October 1)", id: 1, start: "2023-10-01"},
    { name: "Resource 1 (October 2)", id: 1, start: "2023-10-02"},
];
calendar.update({
  columns
});
Resource Calendar Page Layout
This ASP.NET Core application uses a simple two-column layout that uses CSS flexbox to show the resource calendar and the date picker side-by-side.
<style>
  .main {
    display: flex;
  }
  .left {
    margin-right: 10px;
  }
  .right {
    flex-grow: 1;
  }
</style>

...

<div class="main">
  <div class="left">
    <div id="datepicker"></div>
  </div>
  <div class="right">
    <div class="toolbar">
          <button id="previous">Previous</button>
          <button id="today">Today</button>
          <button id="next">Next</button>
    </div>
    <div id="calendar"></div>
  </div>
</div>
The resource calendar height is determined by its content. By default, the height is adjusted according to show the full business hours.
If needed, you can adjust the business hours using businessBegins and businessEnds properties (in the default configuration, the resource calendar displays a range from 9 AM to 6 PM).
You can also set a different height - there are more height modes available (you can display a full range of 24 hours or set a fixed height in pixels).
Full Source Code
This is the full source code of the Index.cshtml page of our ASP.NET Core application. It defines the client-side part of the application - the resource-scheduling calendar UI, accompanied by a date picker and the quick date navigtion buttons (“Previous”, “Next”, “Today”).
@page
@model IndexModel
@{
    ViewData["Title"] = "Home page";
}

<script src="~/lib/daypilot/daypilot-all.min.js" asp-append-version="true"></script>

<div class="main">
    <div class="left">
        <div id="datepicker"></div>
    </div>
    <div class="right">
        <div class="buttons">
            <button id="previous">Previous</button>
            <button id="today">Today</button>
            <button id="next">Next</button>
        </div>
        <div id="calendar"></div>
    </div>
</div>

<script>
  const calendar = new DayPilot.Calendar("calendar", {
    viewType: "Resources",
    durationBarVisible: false,
    onTimeRangeSelected: async (args) => {
      const modal = await DayPilot.Modal.prompt("Create a new event:", "Event 1");
      calendar.clearSelection();
      if (modal.canceled) {
        return;
      }

      const event = {
        start: args.start,
        end: args.end,
        resource: args.resource,
        text: modal.result
      };
      const { data } = await DayPilot.Http.post(`/api/events`, event);

      calendar.events.add({
        start: args.start,
        end: args.end,
        id: data.id,
        text: modal.result,
        resource: args.resource
      });

    },
    onEventMoved: async (args) => {
      const params = {
        id: args.e.id(),
        start: args.newStart,
        end: args.newEnd,
        resource: args.newResource,
        text: args.e.text()
      };
      await DayPilot.Http.put(`/api/events/${params.id}`, params);
    },
    onEventResized: async (args) => {
      const params = {
        id: args.e.id(),
        start: args.newStart,
        end: args.newEnd,
        resource: args.newResource,
        text: args.e.text()
      };
      await DayPilot.Http.put(`/api/events/${params.id}`, params);
    },
    onEventClick: async (args) => {
        const colors = [
            {name: "Default", id: null},
            { name: "Blue", id: "#2e78d6cc" },
            { name: "Green", id: "#6aa84fcc" },
            { name: "Yellow", id: "#f1c232cc" },
            { name: "Red", id: "#cc4125cc" },
        ];
      const form = [
        {name: "Name", id: "text"},
        {name: "Color", id: "color", type: "select", options: colors}
      ];

      const modal = await DayPilot.Modal.form(form, args.e.data);
      if (modal.canceled) {
        return;
      }

      const data = {
        id: args.e.id(),
        start: args.e.start(),
        end: args.e.end(),
        resource: args.e.resource(),
        text: modal.result.text,
        color: modal.result.color
      };

      await DayPilot.Http.put(`/api/events/${data.id}`, data);

      calendar.events.update({
        ...args.e.data,
        text: modal.result.text,
        color: modal.result.color
      });
      console.log("Updated.");
    },
    onBeforeEventRender: args => {
      args.data.backColor = args.data.color;
      args.data.borderColor = "darker";
      args.data.fontColor = "#ffffff";

      args.data.areas = [
          {
              right: 5,
              top: 5,
              width: 22,
              height: 22,
              symbol: "icons/daypilot.svg#x-2",
              cssClass: "area_action",
              padding: 2,
              onClick: async args => {
                  const e = args.source;
                  const modal = await DayPilot.Modal.confirm("Do you want to delete this event?");
                  if (modal.canceled) {
                      return true;
                  }
                  await DayPilot.Http.delete(`/api/events/${e.id()}`);
                  calendar.events.remove(e);
                  console.log("Deleted.");
              }
          }
      ];
    },
    onBeforeHeaderRender: args => {
        args.header.verticalAlignment = "top";
        args.header.areas = [
            {
                left: "calc(50% - 15px)",
                bottom: 5,
                width: 30,
                height: 30,
                symbol: "icons/daypilot.svg#edit",
                cssClass: "area_action",
                onClick: async args => {
                    const column = args.source;
                    console.log("column", column);
                    const modal = await DayPilot.Modal.prompt("Resource name:", column.name);
                    if (modal.canceled) {
                        return true;
                    }
                    const columns = calendar.columns.list.map(c => c.id === column.id ? {...c, name: modal.result} : c);
                    calendar.update({columns});
                }
            }
        ];
    },
    headerHeight: 60,
  });
  calendar.init();

  const datepicker = new DayPilot.Navigator("datepicker", {
    selectMode: "Day",
    showMonths: 3,
    skipMonths: 3,
    onTimeRangeSelected: args => {
      calendar.update({
        startDate: args.start,
      });
      app.loadCalendarData();
    },
    onVisibleRangeChanged: args => {
      app.loadDatePickerData();
    }
  });
  datepicker.init();


  const app = {
    elements: {
      previous: document.getElementById("previous"),
      today: document.getElementById("today"),
      next: document.getElementById("next")
    },
    async loadCalendarData() {
      const start = calendar.visibleStart();
      const end = calendar.visibleEnd();

      const promiseEvents = DayPilot.Http.get(`/api/events?start=${start}&end=${end}`);
      const promiseResources = DayPilot.Http.get("/api/resources");

      const [{data: columns}, {data: events}] = await Promise.all([promiseResources, promiseEvents]);

      calendar.update({
        columns,
        events
      });
    },
    async loadDatePickerData() {
      const start = datepicker.visibleStart();
      const end = datepicker.visibleEnd();

      const {data} = await DayPilot.Http.get(`/api/events?start=${start}&end=${end}`);
      datepicker.update({events: data});
    },
    addHandlers() {
      app.elements.previous.addEventListener("click", () => {
        const current = datepicker.selectionDay;
        datepicker.select(current.addDays(-1));
      });
      app.elements.next.addEventListener("click", () => {
        const current = datepicker.selectionDay;
        datepicker.select(current.addDays(1));
      });
      app.elements.today.addEventListener("click", () => {
        datepicker.select(DayPilot.Date.today());
      });
    },
    init() {
      app.addHandlers();
      app.loadCalendarData();
      app.loadDatePickerData();
    }
  };

  app.init();

</script>
History
November 13, 2025: Upgraded to .NET 10, DayPilot Lite 2025.4. Automatic DB initialization.
September 4, 2025: Upgraded to .NET 9, DayPilot Lite 2025.3.
August 16, 2024: Upgraded to .NET 8, DayPilot Lite 2024.3.
June 13, 2023: Initial release, .NET 7