Features
AngularJS Scheduler
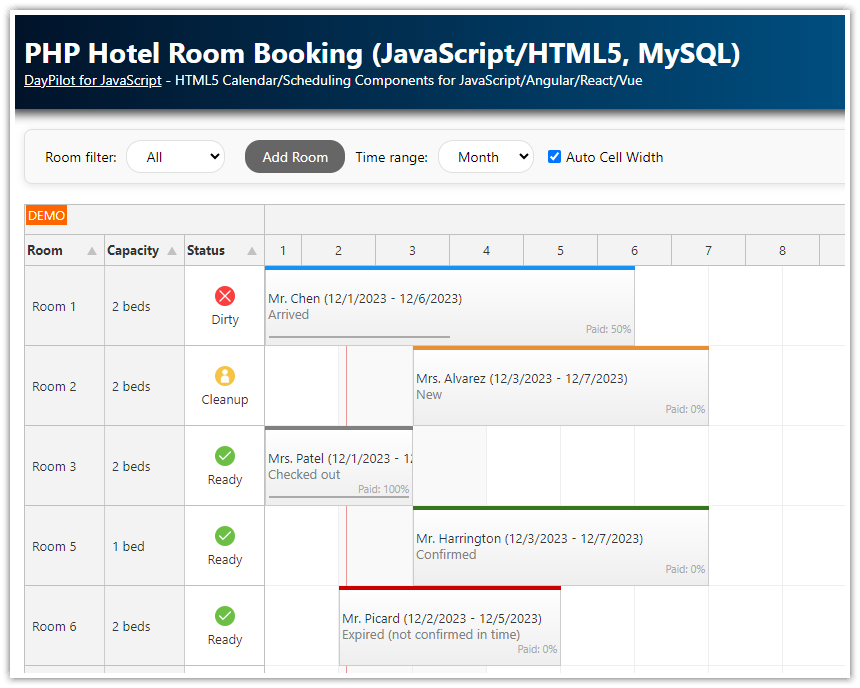
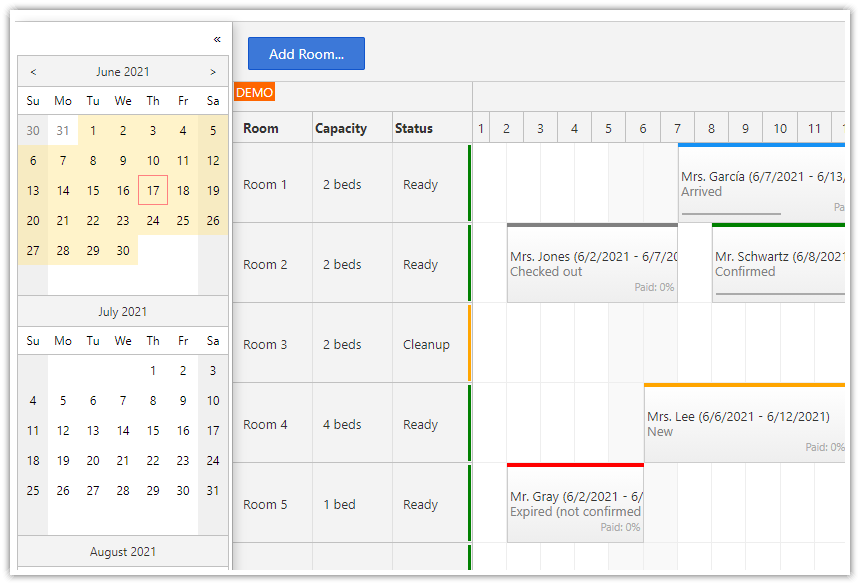
Displaying one month
Switching the month using date navigator control
Support for check-in and check-out times (displays overnight hotel reservations)
Creating new reservations using drag and drop
Status of the reservation is marked using a custom color
Status of the room is marked using a custom color ("free", "cleanup", "dirty")
PHP backend (based on simple JSON endpoints)
License
Licensed for testing and evaluation purposes. Please see the license agreement included in the sample project. You can use the source code of the tutorial if you are a licensed user of DayPilot Pro for JavaScript.
AngularJS EOL
As of December 31, 2021, AngularJS is no longer supported by Google.
See other versions of this tutorial:
JavaScript/HTML5 Hotel Room Booking (vanilla JavaScript, PHP)
Using the AngularJS Scheduler

We will use the DayPilot AngularJS Scheduler plugin to create the main reservation grid.
The scheduler can be added using <daypilot-scheduler> element. It supports the following three attributes:
id (required) - the id that will be used for the main scheduler div; it will be also used for the property name that will store the DayPilot.Scheduler objects in $scope
daypilot-config - the configuration object
daypilot-events - array with the events (reservations)
<div ng-app="main" ng-controller="DemoCtrl" >
  <!-- ... -->
  <daypilot-scheduler id="scheduler" daypilot-config="schedulerConfig" daypilot-events="events" ></daypilot-scheduler>
</div>

<script>
    var app = angular.module('main', ['daypilot']).controller('DemoCtrl', function($scope, $timeout, $http) {

        $scope.events = [];

        $scope.schedulerConfig = {
            scale: "Manual",
            timeline: getTimeline(),
            timeHeaders: [ { groupBy: "Month", format: "MMMM yyyy" }, { groupBy: "Day", format: "d" } ],
            eventDeleteHandling: "Update",
            allowEventOverlap: false,
            cellWidthSpec: "Auto",
            eventHeight: 50,
            rowHeaderColumns: [
                {title: "Room", width: 80},
                {title: "Capacity", width: 80},
                {title: "Status", width: 80}
            ],
            // ...
        };

        // the DayPilot.Scheduler object will be reachable as $scope.scheduler (see the id attribute)

    });
</script>
Angular will watch all changes in $scope.schedulerConfig and $scope.events objects. If a change is detected it will update the UI.
For introduction to using the Scheduler with AngularJS see also the AngularJS Scheduler Tutorial.
Check-In and Check-Out Time

The AngularJS Scheduler supports predefined timeline scale units, such as "Hour", "Day", "Week", "Month", "Year". The timeline unit can be set using .scale property.
However, we will use a manually-adjusted timeline that will display time cells from 12:00 to 12:00 (noon-noon) instead of 00:00 to 24:00 (midnight-midnight). That corresponds to the usual Hotel check-in and check-out time. You can adjust the check-in and check-out time in the getTimeline() function.
<script>
  var app = angular.module('main', ['daypilot']).controller('DemoCtrl', function($scope, $timeout, $http) {

      // ...

      $scope.schedulerConfig = {
          scale: "Manual",
          timeline: getTimeline(),
          timeHeaders: [ { groupBy: "Month", format: "MMMM yyyy" }, { groupBy: "Day", format: "d" } ],
          // ...
      };

      // ...

      function getTimeline(date) {
          var date = date || DayPilot.Date.today();
          var start = new DayPilot.Date(date).firstDayOfMonth();
          var days = start.daysInMonth();

          var timeline = [];

          var checkin = 12;
          var checkout = 12;

          for (var i = 0; i < days; i++) {
              var day = start.addDays(i);
              timeline.push({start: day.addHours(checkin), end: day.addDays(1).addHours(checkout) });
          }

          return timeline;
      }
  });
</script>
Room Details and Status

The Scheduler displays one room per row. By default the row header shows just one column with the resource (room) name.
We will define three columns and display additional room details there:
Name/Room Number
Capacity
Status
The row header columns are defined using rowHeaderColumns property of the scheduler config object:
<div ng-app="main" ng-controller="DemoCtrl" >
  <!-- ... -->
  <daypilot-scheduler id="scheduler" daypilot-config="schedulerConfig" daypilot-events="events" ></daypilot-scheduler>
</div>

<script>
    var app = angular.module('main', ['daypilot']).controller('DemoCtrl', function($scope, $timeout, $http) {

        $scope.schedulerConfig = {
            // ...
            rowHeaderColumns: [
                {title: "Room", width: 80},
                {title: "Capacity", width: 80},
                {title: "Status", width: 80}
            ],
            // ...
        };
    });
</script>
We will load the rooms from the server using Angular HTTP call to "backend_rooms.php" PHP script. The Angular $http.post method automatically wraps the callback method in an $apply() block so we don't have to notify the framework about a property change.
function loadResources() {
    $http.post("backend_rooms.php", params).then(function(response) {
        $scope.schedulerConfig.resources = response.data;
    });
}
backend_rooms.php - sample JSON response
[
  {"id":"1","name":"Room 1","capacity":"2","status":"Dirty"},
  {"id":"2","name":"Room 2","capacity":"2","status":"Cleanup"},
  {"id":"3","name":"Room 3","capacity":"2","status":"Ready"},
  {"id":"4","name":"Room 4","capacity":"4","status":"Ready"},
  {"id":"5","name":"Room 5","capacity":"1","status":"Ready"}
]
backend_rooms.php
<?php
require_once '_db.php';

$json = file_get_contents('php://input');
$params = json_decode($json);

$stmt = $db->prepare("SELECT * FROM rooms WHERE capacity = :capacity OR :capacity = '0' ORDER BY name");
$stmt->bindParam(':capacity', $params->capacity);
$stmt->execute();
$rooms = $stmt->fetchAll();

class Room {}

$result = array();

foreach($rooms as $room) {
  $r = new Room();
  $r->id = $room['id'];
  $r->name = $room['name'];
  $r->capacity = $room['capacity'];
  $r->status = $room['status'];
  $result[] = $r;

}

header('Content-Type: application/json');
echo json_encode($result);

?>
We will use onBeforeResHeaderRender event to set the content of the additional columns and customize the row header CSS (depending on the room status). It is also possible to load the column data directly from the JSON source (.resources property) but we will use the client-side approach.
onBeforeResHeaderRender: function(args) {
  var beds = function(count) {
      return count + " bed" + (count > 1 ? "s" : "");
  };

  args.resource.columns[0].html = beds(args.resource.capacity);
  args.resource.columns[1].html = args.resource.status;
  switch (args.resource.status) {
      case "Dirty":
          args.resource.cssClass = "status_dirty";
          break;
      case "Cleanup":
          args.resource.cssClass = "status_cleanup";
          break;
  }
},
CSS
.scheduler_default_rowheadercol2
{
    background: #ffffff;
}
.scheduler_default_rowheadercol2 .scheduler_default_rowheader_inner
{
    top: 2px;
    bottom: 2px;
    left: 2px;
    background-color: transparent;
    border-left: 5px solid #1a9d13; /* status: "free" (default), green color */
    border-right: 0px none;
}
.status_dirty.scheduler_default_rowheadercol2 .scheduler_default_rowheader_inner
{
    border-left: 5px solid #ea3624; /* status: "dirty", red color */
}
.status_cleanup.scheduler_default_rowheadercol2 .scheduler_default_rowheader_inner
{
    border-left: 5px solid #f9ba25; /* status: "cleanup", orange color */
}
Loading Reservations for the Selected Month

The Navigator will let users switch the current month. Whenever the user clicks a certain date, onTimeRangeSelected event is fired.
If the selected date is within the current month, the Scheduler will scroll to the selected date (we update the scrollbar position using scrollTo property).
If the selected date is in another month we will load the events for the new month and update the view.
HTML
<div ng-app="main" ng-controller="DemoCtrl" >

  <div style="float:left; width:160px">
      <daypilot-navigator id="navigator" daypilot-config="navigatorConfig"></daypilot-navigator>
  </div>
  <div style="margin-left: 160px">
      <!-- ...  -->
      <daypilot-scheduler id="scheduler" daypilot-config="schedulerConfig" daypilot-events="events" ></daypilot-scheduler>
  </div>

</div>
AngularJS Controller
<script>
  var app = angular.module('main', ['daypilot']).controller('DemoCtrl', function($scope, $timeout, $http) {

      $scope.navigatorConfig = {
          selectMode: "month",
          showMonths: 3,
          skipMonths: 3,
          onTimeRangeSelected: function(args) {
              if ($scope.scheduler.visibleStart().getDatePart() <= args.day && args.day < $scope.scheduler.visibleEnd()) {
                  $scope.scheduler.scrollTo(args.day, "fast");  // just scroll
              }
              else {
                  loadEvents(args.day);  // reload and scroll
              }
          }
      };

      $scope.schedulerConfig = {
        // ...
      };

      // loads events; switches the Scheduler visible range if "day" supplied
      function loadEvents(day) {
          var from = $scope.scheduler.visibleStart();
          var to = $scope.scheduler.visibleEnd();
          if (day) {
              from = new DayPilot.Date(day).firstDayOfMonth();
              to = from.addMonths(1);
          }

          var params = {
              start: from.toString(),
              end: to.toString()
          };

          $http.post("backend_events.php", params).success(function(data) {
              if (day) {
                $scope.schedulerConfig.timeline = getTimeline(day);
                $scope.schedulerConfig.scrollTo = day;
                $scope.schedulerConfig.scrollToAnimated = "fast";
                $scope.schedulerConfig.scrollToPosition = "left";
              }
              $scope.events = data;
          });
      }
  });
</script>
backend_events.php - sample JSON response
[
  {"id":"1","text":"Mrs. Jones","start":"2015-11-03T12:00:00","end":"2015-11-10T12:00:00","resource":"1","bubbleHtml":"Reservation details: <br\/>Mrs. Jones","status":"New","paid":"0"},
  {"id":"2","text":"Mr. Lee","start":"2015-11-05T12:00:00","end":"2015-11-12T12:00:00","resource":"2","bubbleHtml":"Reservation details: <br\/>Mr. Lee","status":"Confirmed","paid":"0"},
  {"id":"3","text":"Mr. Garc\u00eda","start":"2015-11-02T12:00:00","end":"2015-11-07T12:00:00","resource":"3","bubbleHtml":"Reservation details: <br\/>Mr. Garc\u00eda","status":"Arrived","paid":"50"}
]
backend_events.php
<?php
require_once '_db.php';

$json = file_get_contents('php://input');
$params = json_decode($json);

$stmt = $db->prepare("SELECT * FROM reservations WHERE NOT ((end <= :start) OR (start >= :end))");
$stmt->bindParam(':start', $params->start);
$stmt->bindParam(':end', $params->end);
$stmt->execute();
$result = $stmt->fetchAll();

class Event {}
$events = array();

$now = new DateTime("now");
$today = $now->setTime(0, 0, 0);

foreach($result as $row) {
    $e = new Event();
    $e->id = $row['id'];
    $e->text = $row['name'];
    $e->start = $row['start'];
    $e->end = $row['end'];
    $e->resource = $row['room_id'];
    $e->bubbleHtml = "Reservation details: <br/>".$e->text;

    // additional properties
    $e->status = $row['status'];
    $e->paid = $row['paid'];
    $events[] = $e;
}

header('Content-Type: application/json');
echo json_encode($events);

?>
Reservation Status

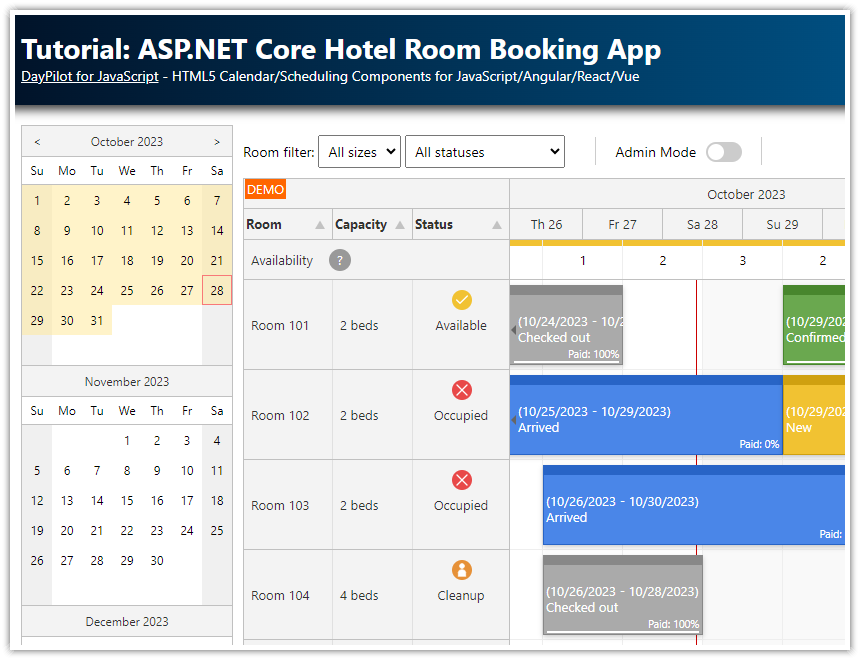
The AngularJS Scheduler can customize the reservations depending on custom reservation properties. We will use this feature to display reservation details:
Reservation status text ("New", "Confirmed", "Arrived").
Custom bar color highlighting the reservation status (yellow, green, blue)
Guest name, check-in a check-out day: "Mr. García (11/2/2015 - 11/7/2015)"
How much of the price has been paid already (text + special bar)
AngularJS Controller
<div ng-app="main" ng-controller="DemoCtrl" >
  <daypilot-scheduler id="scheduler" daypilot-config="schedulerConfig" daypilot-events="events" ></daypilot-scheduler>
</div>

<script>
    var app = angular.module('main', ['daypilot']).controller('DemoCtrl', function($scope, $timeout, $http) {

        $scope.schedulerConfig = {

          // ...

          onBeforeEventRender: function(args) {
              var start = new DayPilot.Date(args.data.start);
              var end = new DayPilot.Date(args.data.end);

              var now = new DayPilot.Date();
              var today = new DayPilot.Date().getDatePart();
              var status = "";

              // customize the reservation bar color and tooltip depending on status
              switch (args.e.status) {
                  case "New":
                      var in2days = today.addDays(1);

                      if (start < in2days) {
                          args.data.barColor = 'red';
                          status = 'Expired (not confirmed in time)';
                      }
                      else {
                          args.data.barColor = 'orange';
                          status = 'New';
                      }
                      break;
                  case "Confirmed":
                      var arrivalDeadline = today.addHours(18);

                      if (start < today || (start === today && now > arrivalDeadline)) { // must arrive before 6 pm
                          args.data.barColor = "#f41616";  // red
                          status = 'Late arrival';
                      }
                      else {
                          args.data.barColor = "green";
                          status = "Confirmed";
                      }
                      break;
                  case 'Arrived': // arrived
                      var checkoutDeadline = today.addHours(10);

                      if (end < today || (end === today && now > checkoutDeadline)) { // must checkout before 10 am
                          args.data.barColor = "#f41616";  // red
                          status = "Late checkout";
                      }
                      else
                      {
                          args.data.barColor = "#1691f4";  // blue
                          status = "Arrived";
                      }
                      break;
                  case 'CheckedOut': // checked out
                      args.data.barColor = "gray";
                      status = "Checked out";
                      break;
                  default:
                      status = "Unexpected state";
                      break;
              }

              // customize the reservation HTML: text, start and end dates
              args.data.html = args.data.text + " (" + start.toString("M/d/yyyy") + " - " + end.toString("M/d/yyyy") + ")" + "<br /><span style='color:gray'>" + status + "</span>";

              // reservation tooltip that appears on hover - displays the status text
              args.e.toolTip = status;

              // add a bar highlighting how much has been paid already (using an "active area")
              var paid = args.e.paid;
              var paidColor = "#aaaaaa";
              args.data.areas = [
                  { bottom: 10, right: 4, html: "<div style='color:" + paidColor + "; font-size: 8pt;'>Paid: " + paid + "%</div>", v: "Visible"},
                  { left: 4, bottom: 8, right: 4, height: 2, html: "<div style='background-color:" + paidColor + "; height: 100%; width:" + paid + "%'></div>" }
              ];

          },

          // ...

        };
    });
</script>
Room Filter Using Angular

The users can filter rooms using a drop down list with room types (single rooms, double rooms, etc.).
The dropdown is a simple <select> control bound to "roomType" variable using ng-model attribute:
HTML
<div>
  Room Filter:
  <select ng-model="roomType">
      <option value="0">All</option>
      <option value="1">Single</option>
      <option value="2">Double</option>
      <option value="4">Family</option>
  </select>
</div>
We will watch changes of the roomType using Angular $watch mechanism. Changing the room type will reload the resources using the specified filter.
AngularJS Controller
<script>
  var app = angular.module('main', ['daypilot']).controller('DemoCtrl', function($scope, $timeout, $http) {

      $scope.roomType = 0;
      $scope.$watch("roomType", function() {
          loadResources();
      });

      // ...

      function loadResources() {
          var params = {
              capacity: $scope.roomType
          };
          $http.post("backend_rooms.php", params).success(function(data) {
              $scope.schedulerConfig.resources = data;
              $scope.schedulerConfig.visible = true;
          });
      }
  });
</script>
AngularJS Date Formatting

The demo uses a special AngularJS directive to format and parse the date value between model and view.
Format used to store the date value in the model:
"2015-11-25T00:00:00" (ISO 8601 format)Format used in the view:
"25/11/2015" (specified in the date-format attribute as "d/M/yyyy")If the value specified by the user in the view can't be parsed (DayPilot.Date.parse() method returns null) an error message is displayed ("Invalid date").
HTML
<div ng-app="main" ng-controller="NewReservationController" style="padding:10px">
  <!-- ... -->

  <div>Start:</div>
  <div><input type="text" id="start" name="start" ng-model="reservation.start" date-format="d/M/yyyy" /> <span ng-show="!reservation.start">Invalid date</span></div>
  <div>End:</div>
  <div><input type="text" id="end" name="end" ng-model="reservation.end" date-format="d/M/yyyy" /> <span ng-show="!reservation.end">Invalid date</span></div>
  <!-- ... -->

</div>
AngularJS Model
var app = angular.module('main', ['daypilot']).controller('NewReservationController', function($scope, $timeout, $http) {
  $scope.reservation = {
      start: '2015-10-15T12:00:00',    // use ISO 8601 format for the model
      end: '2015-10-15T12:00:00',      // use ISO 8601 format for the model
  };
  // ...
AngularJS "date-format" Directive
app.directive('dateFormat', function() {
    return { restrict: 'A',
      require: 'ngModel',
      link: function(scope, element, attrs, ngModel) {
        if(ngModel) {

            // parse the input value using the format string, pass the normalized ISO8601 value to the model
            // (unparseable value returns null)

            ngModel.$parsers.push(function (value) {
                var d = DayPilot.Date.parse(value, attrs.dateFormat);
                return d && d.toString();
            });


            // display the date in the specified format
            // (null value will be returned as null)

            ngModel.$formatters.push(function (value) {
                return value && new DayPilot.Date(value).toString(attrs.dateFormat);
            });
        }
      }
    };
});
Room Editing

In order to allow room editing, we will modify onBeforeResHeaderRender event handler to add a row header active area that will open an edit dialog:
$scope.schedulerConfig = {

    // ...

    onBeforeResHeaderRender: function(args) {

        // ...

        args.resource.areas = [{
            top:3,
            right:4,
            height:14,
            width:14,
            action:"JavaScript",
            js: function(r) {
                var modal = new DayPilot.Modal();
                modal.onClosed = function(args) {
                    loadResources();
                };
                modal.showUrl("room_edit.php?id=" + r.id);
            },
            v:"Hover",
            css:"icon icon-edit",
        }];
    },

    // ...
};
It uses an "edit" icon from the DayPilot icon font which is included in "icons" directory. The icon font is imported using CSS:
<link type="text/css" rel="stylesheet" href="icons/style.css" />The icon opens a modal dialog with room details (room_edit.php):

room_edit.php
<!DOCTYPE html>
<html>
    <head>
        <meta charset="UTF-8">
        <title>Edit Room</title>
    	<link type="text/css" rel="stylesheet" href="media/layout.css" />
        <script src="js/jquery-1.11.2.min.js" type="text/javascript"></script>
        <script src="js/angular.min.js" type="text/javascript"></script>
        <script src="js/daypilot/daypilot-all.min.js" type="text/javascript"></script>
    </head>
    <body>
        <?php
            // check the input
            is_numeric($_GET['id']) or die("invalid URL");

            require_once '_db.php';

            $stmt = $db->prepare('SELECT * FROM rooms WHERE id = :id');
            $stmt->bindParam(':id', $_GET['id']);
            $stmt->execute();
            $room = $stmt->fetch();
        ?>
        <div ng-app="main" ng-controller="EditRoomController" style="padding:10px">
            <input type="hidden" name="id" value="<?php print $_GET['id'] ?>" />
            <h1>Edit Room</h1>
            <div>Name: </div>
            <div><input type="text" id="name" name="name" ng-model="room.name" /></div>
            <div>Capacity:</div>
            <div>
                <select id="capacity" name="capacity" ng-model="room.capacity" >
                    <?php
                        $options = array(1, 2, 4);
                        foreach ($options as $option) {
                            $selected = $option == $room['capacity'] ? ' selected="selected"' : '';
                            $id = $option;
                            $name = $option;
                            print "<option value='$id' $selected>$name</option>";
                        }
                    ?>
                </select>
            </div>
            <div>Status:</div>
            <div>
                <select id="status" name="status" ng-model="room.status" >
                    <?php
                        $options = array("Ready", "Cleanup", "Dirty");
                        foreach ($options as $option) {
                            $selected = $option == $room['status'] ? ' selected="selected"' : '';
                            $id = $option;
                            $name = $option;
                            print "<option value='$id' $selected>$name</option>";
                        }
                    ?>
                </select>
            </div>


            <div class="space"><input type="submit" value="Save" ng-click="save()" /> <a href="" ng-click="cancel()">Cancel</a></div>
        </div>

        <script type="text/javascript">
        var app = angular.module('main', ['daypilot']).controller('EditRoomController', function($scope, $timeout, $http) {
            $scope.room = {
                id: <?php print $room['id'] ?>,
                name: '<?php print $room['name'] ?>',
                capacity: <?php print $room['capacity'] ?>,
                status: '<?php print $room['status'] ?>'
            };
            $scope.save = function() {
                $http.post("backend_room_update.php", $scope.room).success(function(data) {
                    DayPilot.Modal.close(data);
                });
            };
            $scope.cancel = function() {
                DayPilot.Modal.close();
            };

            $("#name").focus();
        });

        </script>
    </body>
</html>
Database Schema (SQLite, MySQL)
1. The sample projects uses SQLite backend by default. The database file (daypilot.sqlite) will be created automatically in the root directory if id doesn't exist.
CREATE TABLE reservations (
    id      INTEGER      PRIMARY KEY,
    name    TEXT,
    start   DATETIME,
    [end]   DATETIME,
    room_id INTEGER,
    status  VARCHAR (30),
    paid    INTEGER
);

CREATE TABLE rooms (
    id       INTEGER      PRIMARY KEY,
    name     TEXT,
    capacity INTEGER,
    status   VARCHAR (30)
);
2. You can also use the MySQL backend by replacing _db.php with _db_mysql.php file. You need to modify the settings at the beginning of _db_mysql.php according to your configuration.
<?php
$host = "127.0.0.1";
$port = 3306;
$username = "username";
$password = "password";
$database = "hotel";   // the database will be created and initialized if it doesn't exist