Features
Use event versions feature to display custom text above events in the JavaScript Scheduler
Requires DayPilot Pro for JavaScript 2020.1.4183 or later
Includes a trial version of DayPilot Pro for JavaScript (see License below)
License
Licensed for testing and evaluation purposes. Please see the license agreement included in the sample project. You can use the source code of the tutorial if you are a licensed user of DayPilot Pro for JavaScript.
Live Demo
JavaScript Scheduler Setup

The easiest way to start a new project with JavaScript Scheduler component is to use the online UI Builder tools. It will let you customize the properties with a live preview and generate a new project with all the required boilerplate.
Enable Event Versions in the Scheduler
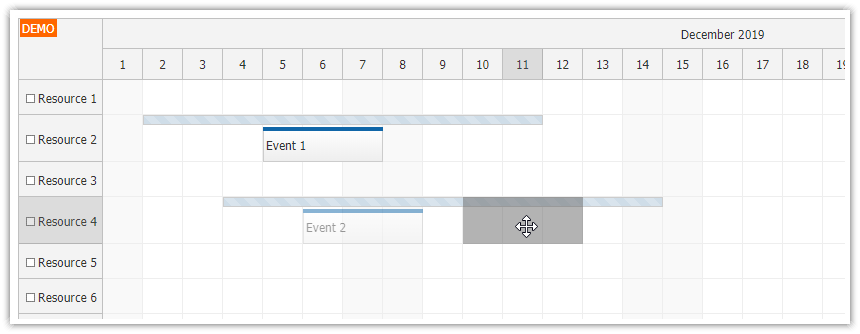
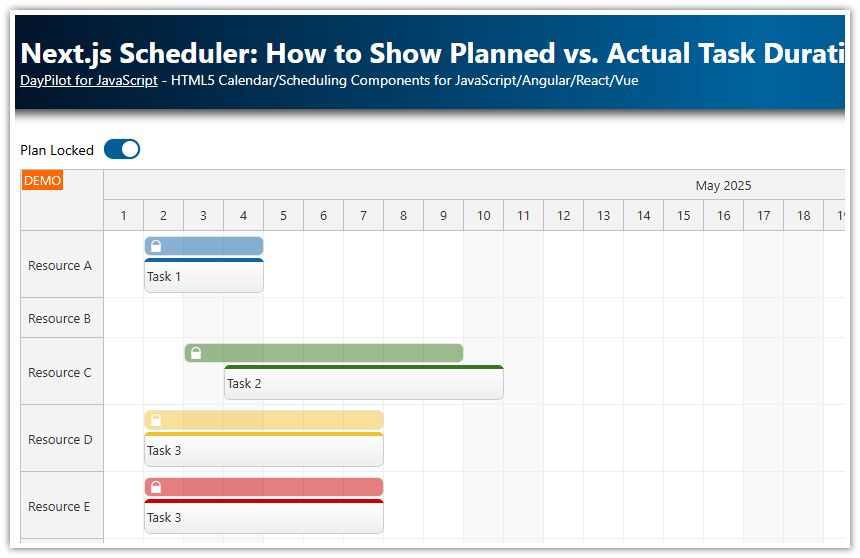
The next step is to add eventVersionsEnabled: true to the Scheduler configuration in order to enable event versions. Event versions are normally used to display a previous version (or versions) of the event so the users can see the difference between the original plan and the current project status.
The versions are displayed in a reserved space above (or below) events. That allows us to use them to display additional information related to the event, without affecting other events or the drag and drop functionality.
var dp = new DayPilot.Scheduler("dp", {
  // ...
  eventVersionsEnabled: true,
});
Add a Sample Event to the Scheduler

Let's add a sample event to the Scheduler:
dp.events.list = [
  {
    id: 1,
    start: "2020-01-06T00:00:00",
    end: "2020-01-10T00:00:00",
    text: "Event 1",
    resource: "R1"
  }
];
This event will be displayed in the "Resource 1" row in a standard way.
Define an Event Version

In order to display an event version, we need to add a versions property to the event data object. You can add it directly to the source data (event.list) but the data is usually loaded from the server and it's much easier to add the version on the client side using onBeforeEventRender event handler.
onBeforeEventRender: function(args) {
  args.data.versions = [
    {
      start: args.data.start,
      end: args.data.end
    }
  ]
}
We define just two properties, start and end. They have the same values as the original event to ensure that the version will be displayed at the same horizontal position.
Add Text to the Version Box

Now we can add the text property to display an actual content. The following example uses a formatted start date.
onBeforeEventRender: function(args) {
  args.data.versions = [
    {
      start: args.data.start,
      end: args.data.end,
      text: args.data.start.toString("MMMM d, yyyy")
    }
  ]
}
Version Box Styling

The previous examples displayed the event version using the default theme which uses a striped background. We want to use a simple transparent background to hide the actual box and leave just the plain text.
Overriding the default style:
onBeforeEventRender: function(args) {
  args.data.versions = [
    {
      start: args.data.start,
      end: args.data.end,
      text: args.data.start.toString("MMMM d, yyyy"),
      backColor: "transparent",
      borderColor: "transparent",
      barHidden: true
    }
  ]
}
We have changed the appearance using the built-in properties (barColor, borderColor, barHidden). This makes the Scheduler aware of the styling and it will be respected during image export.
It's also possible to adjust the appearance by overriding the CSS theme:
<style>
  .scheduler_default_event_version.scheduler_default_event .scheduler_default_event_inner {
    background: transparent;
    border: 0px none;
  }
  .scheduler_default_event_version.scheduler_default_event .scheduler_default_event_bar {
    display: none;
  }
</style>
Full Source Code
<!DOCTYPE html>
<html>
<head>
  <meta charset="utf-8"/>
  <meta name="viewport" content="width=device-width, initial-scale=1">
  <title>JavaScript Scheduler: Displaying Text above Events</title>

  <!-- ... -->

  <!-- DayPilot library -->
  <script src="js/daypilot/daypilot-all.min.js"></script>
</head>
<body>
<div class="header">
  <h1><a href='https://code.daypilot.org/21607/javascript-scheduler-displaying-text-above-events'>JavaScript Scheduler: Displaying Text above Events</a></h1>
  <div><a href="https://javascript.daypilot.org/">DayPilot for JavaScript</a> - HTML5 Calendar/Scheduling Components for JavaScript/Angular/React</div>
</div>

<div class="main">
  <div id="dp"></div>
  <div class="generated">Generated using <a href="https://builder.daypilot.org/">DayPilot UI Builder</a>.</div>
</div>

<script>
  var dp = new DayPilot.Scheduler("dp", {
    timeHeaders: [{"groupBy":"Month"},{"groupBy":"Day","format":"d"}],
    scale: "Day",
    days: 31,
    startDate: "2020-01-01",
    timeRangeSelectedHandling: "Enabled",
    onTimeRangeSelected: function (args) {
      var dp = this;
      DayPilot.Modal.prompt("Create a new event:", "Event 1").then(function(modal) {
        dp.clearSelection();
        if (!modal.result) { return; }
        dp.events.add(new DayPilot.Event({
          start: args.start,
          end: args.end,
          id: DayPilot.guid(),
          resource: args.resource,
          text: modal.result
        }));
      });
    },
    treeEnabled: true,
    eventVersionsEnabled: true,
    onBeforeEventRender: function(args) {
      args.data.versions = [
        {
          start: args.data.start,
          end: args.data.end,
          text: args.data.start.toString("MMMM d, yyyy"),
          backColor: "transparent",
          borderColor: "transparent",
          barHidden: true
        }
      ]
    }
  });
  dp.resources = [
    {name: "Resource 1", id: "R1"},
    {name: "Resource 2", id: "R2"},
    {name: "Resource 3", id: "R3"},
    {name: "Resource 4", id: "R4"},
    {name: "Resource 5", id: "R5"},
    {name: "Resource 6", id: "R6"},
    {name: "Resource 7", id: "R7"},
    {name: "Resource 8", id: "R8"},
    {name: "Resource 9", id: "R9"},
  ];
  dp.events.list = [
    {
      id: 1,
      start: "2020-01-06T00:00:00",
      end: "2020-01-10T00:00:00",
      text: "Event 1",
      resource: "R1"
    }
  ];
  dp.init();
</script>

</body>
</html>
 DayPilot


