Features
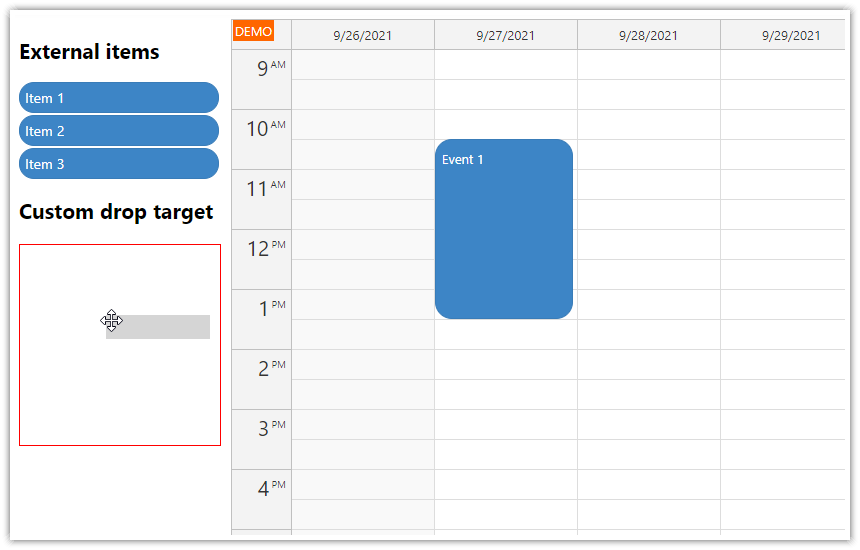
Drag custom items from an external list to JavaScript Scheduler events (each event is an active HTML5 drop target)
Built using standard HTML5 drag and drop API
Each event can hold multiple external items
Items are removed from the source list after drop
License
Licensed for testing and evaluation purposes. Please see the license agreement included in the sample project. You can use the source code of the tutorial if you are a licensed user of DayPilot Pro for JavaScript.
Live Demo
Dragging Items to Scheduler Events
The JavaScript Scheduler includes built-in support for dragging external items to the Scheduler. These items will be transformed into events and you can use this feature to schedule tasks from a list using drag and drop.
It is also possible to drag items from an external list to existing Scheduler events. This tutorial will show how to implement it using standard HTML5 drag and drop API.
Making External Items Draggable

Let's have a list of items that we want to drag to the Scheduler events. We will use simple <div> elements with some additional data saved using data attributes (data-id, data-name):
HTML:
<div class="draggable item" data-id="1" data-name="Item 1">Item 1</div>
<div class="draggable item" data-id="2" data-name="Item 2">Item 2</div>
We will add some CSS to style the draggable items:
.draggable {
  cursor: move;
}

.item {
  display: inline-block;
  padding: 10px 20px;
  margin-right: 5px;
  text-align: center;

  border-radius: 30px;
  background-color: #38761d;
  color: #ffffff;
}
Now we need to activate the items to make them draggable. This requires the draggable HTML attribute to be added:
item.setAttribute("draggable", "true");We will also handle the dragstart event and use it to specify the object type (we are using a custom data type to prevent other targets on the page from accepting the items) and pass the source object data to the target using event.dataTransfer property:
item.addEventListener("dragstart", (ev) => {
  const data = {
    id: item.dataset.id,
    name: item.dataset.name
  };
  ev.dataTransfer.setData("daypilot/external-item", JSON.stringify(data));
});
We will use the dragend event to remove the item from the source list if it was dropped successfully:
item.addEventListener("dragend", (ev) => {
  if (ev.dataTransfer.dropEffect === "move") {
    item.parentElement.removeChild(item);
  }
});
This is how the full source item initialization code looks like now:
function activateItems() {
  const src = document.getElementsByClassName("draggable");

  for (let item of src) {
    item.setAttribute("draggable", "true");

    item.addEventListener("dragstart", (ev) => {
      const data = {
        id: item.dataset.id,
        name: item.dataset.name
      };
      ev.dataTransfer.setData("daypilot/external-item", JSON.stringify(data));
    });

    item.addEventListener("dragend", (ev) => {
      if (ev.dataTransfer.dropEffect === "move") {
        item.parentElement.removeChild(item);
      }
    });

  }

}
Scheduler Events as Drop Target

In this step, we will activate the Scheduler events as drop targets.
That can be done using dragover and drop HTML5 events. We will set the event handlers using onAfterEventRender event which provides access to the event <div> element:
onAfterEventRender: (args) => {

  args.div.addEventListener("dragover", (ev) => {
    const hasMyType = ev.dataTransfer.types.some(function(type) { return type === "daypilot/external-item"; });
    if (hasMyType) {
      ev.preventDefault();
      ev.dataTransfer.dropEffect = "move";
    }
    args.div.classList.add("dragging-over");
  });

  args.div.addEventListener("dragleave", (ev) => {
    args.div.classList.remove("dragging-over");
  });

  args.div.addEventListener("drop", (ev) => {

    if (!args.e.data.items) {
      args.e.data.items = [];
    }

    const data = JSON.parse(ev.dataTransfer.getData("daypilot/external-item"));
    args.e.data.items.push(data);

    dp.events.update(args.e);
  });
};
To display items inside events, we check whether the source data object (args.data) has items property. If so, we insert a <div> element for each of the items.
If the items property is not specified, we display an “(empty)” string.
onBeforeEventRender: args => {
  args.data.backColor = "#93c47d";
  args.data.borderColor = "darker";
  args.data.fontColor = "#ffffff";

  if (args.data.items) {
    args.data.html = args.data.items.map(item => {
      const text = DayPilot.Util.escapeHtml(item.name);
      return `<div class="item">${text}</div> `
    }).join("");
  } else {
    args.data.html = "(empty)";
  }
},
To highlight the target event during dragging, we specify dragging-over CSS class:
.dragging-over {
  outline: 2px solid #38761d;
}