")
Overview
ASP.NET Core application (.NET 8)
JavaScript/HTML5 fronted built using DayPilot visual scheduling components (DayPilot Pro for JavaScript). The UI is based on drag and drop.
The frontend communicates with a REST API backend created using Web API.
The scheduling logic is divided into three UI screens, one for each role (manager, doctor, patient).
The data access layer uses Entity Framework 8 (“code first” model) and SQL Server Express (LocalDB). The database is initialized automatically on the first start of the application.
License
Licensed for testing and evaluation purposes. Please see the license agreement included in the sample project. You can use the source code of the tutorial if you are a licensed user of DayPilot Pro for JavaScript. Buy a license.
1. Manager Defines Appointment Slots in Advance

Under the “Manager” tab, you can see a shift planning dashboard with all available doctors and their appointment slots.
Here you can define new appointment slots using drag and drop.
Use mouse to select a time range - the application will automatically create appointment slots for the selected area.
It uses a predefined slot size (60 minutes) and working hours (morning shift from 9am to 1pm and afternoon shift from 2pm to 6pm).
You can switch between hour and shift view - this zooms the Scheduler so you can get a better picture of the assigned appointment slots.
You can hide non-business hours using a checkbox.
Delete unwanted appointment slots using a delete [x] icon.
Editing of appointment details is not accessible here.
This is how you can create slots using drag and drop - select a time range:

The application will automatically fill the selected range with appointment slots:

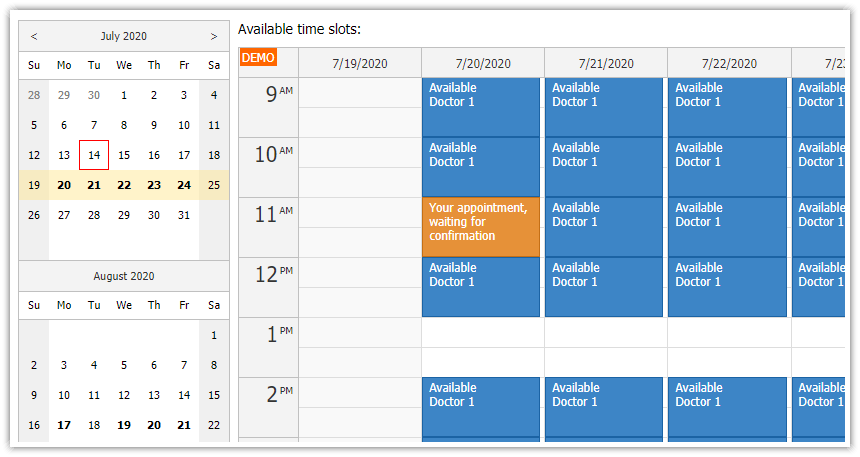
2. Patients Can Select a Slot and Request an Appointment

The patients can access a calendar view which displays all available appointments slots:
It shows slots for all doctors (there can be multiple slots displayed at the same date and time).
Only free slots are visible.
Appointment slots in the past are hidden.
Once a patient selects a slot the slot status is changed to “waiting” while it is waiting for doctor confirmation. Pending requests use orange color.
As soon as the doctor confirms the appointment request the status changes to “confirmed” and the color changes to green.
This is a pending appointment request:

Confirmed appointment:

3. Doctors Can Confirm Appointment Request and Edit Appointments

Doctors see all appointment slots with full details (status, patient name).
Doctors can edit and delete appointment details.
It is possible to move an appointment slot to a different date and time using drag and drop (it can be outside of standard working hours).
To confirm a pending request, change the appointment status from “waiting” to “confirmed”.
ASP.NET Core Implementation of the Doctor Appointment Scheduling Application
This tutorial covers the specifics of doctor appointment scheduling. For an introduction to using the scheduling components in ASP.NET Core, please see the following tutorials:
These tutorials explain the basics - how to install and configure the components, how to load the data from the server and save process the UI action (e.g. event drag an drop) using a REST API.
How to Implement Appointment Slot Generation (Manager.cshtml)
The slot creation logic is implemented in the manager’s view (Manager.cshtml).
This view displays a timeline for all doctors using the JavaScript Scheduler component. Each doctor is displayed in a separate row and the time is displayed on the horizontal axis.

The MVC view includes JavaScript code that initializes the Scheduler component:
<div id="scheduler"></div>

<script src="~/lib/daypilot/daypilot-all.min.js"></script>

<script>

const scheduler = new DayPilot.Scheduler("scheduler", {
    scale: "Manual",
    timeline: app.getTimeline(),        // the timeline is generated dynamically, depending on the selected scale
    timeHeaders: app.getTimeHeaders(),  // headers are generated dynamically, depending on the selected scale
    allowEventOverlap: false,
    eventDeleteHandling: "Update",
    eventClickHandling: "Disabled",
    eventMoveHandling: "Disabled",
    eventResizeHandling: "Disabled",
    // ...
    onTimeRangeSelected: async (args) => {
        const dp = scheduler;
        const scale = app.elements.scaleChecked.value;

        const params = {
            start: args.start.toString(),
            end: args.end.toString(),
            resource: args.resource,
            scale: scale
        };

        dp.clearSelection();

        const {data} = await DayPilot.Http.post("/api/appointments/create", params);
        app.loadEvents();
        //dp.message(data.message);
    }
});
scheduler.init();

</script>
Most of the configuration is omitted for brevity. We will take a look a the key functionality, which is generation of the appointment slots.
It is implemented using the onTimeRangeSelected event which is fired when users select a time range using drag and drop.

Our event handler calls the /api/appointments/create API endpoint which generates the slots for the provided range.
You can find the backend implementation in the AppointmentController.cs file:
using System;
using System.Collections.Generic;
using System.Linq;
using System.Threading.Tasks;
using Microsoft.AspNetCore.Http;
using Microsoft.AspNetCore.Mvc;
using Microsoft.EntityFrameworkCore;
using Project.Models;
using Project.Service;

namespace Project.Controllers
{
    [Route("api/[controller]")]
    [ApiController]
    public class AppointmentsController : ControllerBase
    {
        private readonly DoctorDbContext _context;

        public AppointmentsController(DoctorDbContext context)
        {
            _context = context;
        }

        // ...

        [HttpPost("create")]
        public async Task<ActionResult<AppointmentSlot>> PostAppointmentSlots(AppointmentSlotRange range)
        {

            var doctor = await _context.Doctors.FindAsync(range.Resource);

            if (doctor == null)
            {
                return BadRequest();
            }

            var slots = Timeline.GenerateSlots(range.Start, range.End, range.Scale);
            slots.ForEach(slot => {
                slot.Doctor = doctor;
                _context.Appointments.Add(slot);
            });

            await _context.SaveChangesAsync();

            return NoContent();
        }

        public class AppointmentSlotRange
        {
            public DateTime Start { get; set; }
            public DateTime End { get; set; }
            public int Resource { get; set; }

            public string Scale { get; set; }
        }

    }
}
The Timeline.GenerateSlots() takes two steps:
1. First, it generates the shifts for the provided range using GenerateTimeline() method.
There are two shifts per day - the morning shift from 9am to 1pm and the afternoon shift from 2pm to 6pm. In this tutorial, the shift start and end times are hardcoded (MorningShiftStarts, MorningShiftEnds, AfternoonShiftStarts, AfternoonShiftEnds properties). The shifts are the same for each doctor. In your application, you may need to change this and allow modification of the times, as well as providing a custom schedule for each of the doctors.
2. In the next step, it fills the shifts with appointment slots.
The appointment slot is defined using SlotDurationMinutes and in our application it is set to 1 hour (60 minutes).
The GenerateSlots() method saves the slots in a List<AppointmentSlot> object and returns it.
using Project.Models;

namespace Project.Service
{
    public class Timeline
    {

        public static int SlotDurationMinutes = 60;

        public static int MorningShiftStarts = 9;
        public static int MorningShiftEnds = 13;

        public static int AfternoonShiftStarts = 14;
        public static int AfternoonShiftEnds = 18;


        public static List<AppointmentSlot> GenerateSlots(DateTime start, DateTime end, string scale)
        {
            var result = new List<AppointmentSlot>();
            var timeline = GenerateTimeline(start, end, scale);

            foreach (var cell in timeline)
            {
                if (start <= cell.Start && cell.End <= end)
                {
                    for (var slotStart = cell.Start; slotStart < cell.End; slotStart = slotStart.AddMinutes(SlotDurationMinutes))
                    {
                        var slotEnd = slotStart.AddMinutes(SlotDurationMinutes);

                        var slot = new AppointmentSlot();
                        slot.Start = slotStart;
                        slot.End = slotEnd;
                        slot.Status = "free";

                        result.Add(slot);

                    }
                }
            }

            return result;
        }


        private static List<TimeCell> GenerateTimeline(DateTime start, DateTime end, string scale)
        {
            var result = new List<TimeCell>();


            var incrementMorning = 1;
            var incrementAfternoon = 1;

            var days = (end.Date - start.Date).TotalDays;

            if (end > end.Date)
            {
                days += 1;
            }

            if (scale == "shifts")
            {
                incrementMorning = MorningShiftEnds - MorningShiftStarts;
                incrementAfternoon = AfternoonShiftEnds - AfternoonShiftStarts;
            }

            for (var i = 0; i < days; i++)
            {
                var day = start.Date.AddDays(i);
                for (var x = MorningShiftStarts; x < MorningShiftEnds; x += incrementMorning)
                {
                    var cell = new TimeCell();
                    cell.Start = day.AddHours(x);
                    cell.End = day.AddHours(x + incrementMorning);

                    result.Add(cell);
                }
                for (var x = AfternoonShiftStarts; x < AfternoonShiftEnds; x += incrementAfternoon)
                {
                    var cell = new TimeCell();
                    cell.Start = day.AddHours(x);
                    cell.End = day.AddHours(x + incrementAfternoon);

                    result.Add(cell);
                }
            }


            return result;
        }


    }

    public class TimeCell
    {
        public DateTime Start;
        public DateTime End;
    }

}
As soon as the PostAppointmentSlots() method of the AppointmentController class receives the list of slots, it simply creates a new record for each of them.
var slots = Timeline.GenerateSlots(range.Start, range.End, range.Scale);
slots.ForEach(slot => {
    slot.Doctor = doctor;
    _context.Appointments.Add(slot);
});
Now we are back at the client side (Manager.cshtml) where we reload the events using app.loadEvents() method to show the new slots:
const {data} = await DayPilot.Http.post("/api/appointments/create", params);
app.loadEvents();
Note that the scheduler configuration disables all other user actions (such as drag and drop moving or resizing) except deleting.
eventDeleteHandling: "Update",
eventClickHandling: "Disabled",
eventMoveHandling: "Disabled",
eventResizeHandling: "Disabled",
In this example, the manager’s view is simplified and it only handles the slot generation. All other management actions (reservation moving, editing, etc.) are handled in the doctor’s view. In your implementation, these two roles can be merged and implemented in the same view.
How to Implement Public Patient User Interface (Index.cshtml)
In our application, patients can access a public view which lists all available slots. Slots in the past and slots that were already requested by some other patient are not visible.
The patients can browse through the available slots and choose one that they would like to book.
The user interface displays a weekly calendar that displays.

Next to the calendar, there is also a date picker that they can use to switch to a different week. Days with available slots are displayed in bold.

The weekly calendar is implemented using the JavaScript Calendar component (Index.cshtml):
<script>

const calendar = new DayPilot.Calendar("calendar", {
    viewType: "Week",
    timeRangeSelectedHandling: "Disabled",
    eventMoveHandling: "Disabled",
    eventResizeHandling: "Disabled",
    eventArrangement: "SideBySide",
    onBeforeEventRender: (args) => {
        switch (args.data.status) {
          case "free":
            args.data.backColor = "#3d85c6";  // blue
            args.data.barHidden = true;
            args.data.borderColor = "darker";
            args.data.fontColor = "white";
            args.data.html = `Available<br/>${args.data.doctorName}`;
            args.data.toolTip = "Click to request this time slot";
            break;
          case "waiting":
            args.data.backColor = "#e69138";  // orange
            args.data.barHidden = true;
            args.data.borderColor = "darker";
            args.data.fontColor = "white";
            args.data.html = "Your appointment, waiting for confirmation";
            break;
          case "confirmed":
            args.data.backColor = "#6aa84f";  // green
            args.data.barHidden = true;
            args.data.borderColor = "darker";
            args.data.fontColor = "white";
            args.data.html = "Your appointment, confirmed";
            break;
        }
    },
    onEventClick: async (args) => {
        if (args.e.data.status !== "free") {
          calendar.message("Please use a free slot to request an appointment.");
          return;
        }

        const form = [
          {name: "Request an Appointment"},
          {name: "From", id: "start", dateFormat: "MMMM d, yyyy h:mm tt", disabled: true},
          {name: "To", id: "end", dateFormat: "MMMM d, yyyy h:mm tt", disabled: true},
          {name: "Name", id: "name"},
        ];

        const data = {
          id: args.e.id(),
          start: args.e.start(),
          end: args.e.end(),
          patient: app.patientId
        };

        const options = {
          focus: "name"
        };

        const modal = await DayPilot.Modal.form(form, data, options);
        if (modal.canceled) {
          return;
        }

        await DayPilot.Http.put(`/api/appointments/${data.id}/request`, modal.result);

        args.e.data.status = "waiting";
        calendar.events.update(args.e.data);

    }
});
calendar.init();

</script>
As you can see the calendar is read-only - it disables the drag and drop operations. We don’t want patients to be able to move the appointments to a different date or time, or create appointment requests at arbitrary positions.
timeRangeSelectedHandling: "Disabled",
eventMoveHandling: "Disabled",
eventResizeHandling: "Disabled",
The main logic is implemented using onEventClick event handler which is fired (as the name suggests) when patients click an existing available slot.
The calendar displays a modal dialog with appointment slots details where the patients can enter their details. In our application, we only require the patient name.

After confirmation, we submit the request to /api/appointments/${data.id}/request. This is an API endpoint that updates the slot details in the SQL Server database:
[HttpPut("{id}/request")]
public async Task<IActionResult> PutAppointmentSlotRequest(int id, AppointmentSlotRequest slotRequest)
{
    var appointmentSlot = await _context.Appointments.FindAsync(id);
    if (appointmentSlot == null)
    {
        return NotFound();
    }

    appointmentSlot.PatientName = slotRequest.Name;
    appointmentSlot.PatientId = slotRequest.Patient;
    appointmentSlot.Status = "waiting";

    _context.Appointments.Update(appointmentSlot);
    await _context.SaveChangesAsync();

    return NoContent();
}
In the PutAppoitnmentSlotRequest() method, we change the status to waiting, save the provided patient name and link the appointment slot to the patient ID.
In your application, you’d use the patient ID from the database of users. Here, we use a client-side generated random ID that is stored in the localStorage object. This will let us identify the patient after reloading the page and highlight their requests. In a real application this needs to be replaced with a proper login.
You can see that we send the user ID with the request that loads free appointments:
const app = {
    get patientId() {
        if (!localStorage["patientId"]) {
            localStorage["patientId"] = DayPilot.guid();
        }
        return localStorage["patientId"];
    },
    async loadEvents(day) {
        const start = nav.visibleStart() > DayPilot.Date.now() ? nav.visibleStart() : DayPilot.Date.now();
        const end = nav.visibleEnd();
        const patient = app.patientId;

        const {data} = await DayPilot.Http.get(`/api/appointments/free?start=${start}&end=${end}&patient=${patient}`);

        if (day) {
            calendar.startDate = day;
        }
        calendar.events.list = data;
        calendar.update();

        nav.events.list = data;
        nav.update();
    },
    init() {
        app.loadEvents();
    }
};
On the server side, we use the patient ID to filter out slots that belong to someone else:
[HttpGet("free")]
public async Task<ActionResult<IEnumerable<AppointmentSlot>>> GetAppointments([FromQuery] DateTime start, [FromQuery] DateTime end, [FromQuery] string patient)
{
    return await _context.Appointments.Where(e => (e.Status == "free" || (e.Status != "free" && e.PatientId == patient )) && !((e.End <= start) || (e.Start >= end))).Include(e => e.Doctor).ToListAsync();
}
Entity Framework Model Classes
In this application, we use the Entity Framework model first approach. We define the model classes and generate the SQL Server schema using migrations. This is useful for running the tutorial project on your own machine - you can create the database for you specific SQL Server version and you don’t need to worry about the database file format versions.
The Entity Framework also makes it easier to create the Web API controller. We started with the generated versions of the controller and only added the application-specific endpoints.
You can find the model classes in the Models/Data.cs file:
Doctor class:
public class Doctor
{
    public int Id { get; set; }
    public string Name { get; set; }
}
AppointmentSlot class:
public class AppointmentSlot
{
    public int Id { get; set; }
    public DateTime Start { get; set; }
    public DateTime End { get; set; }

    [JsonIgnore()]
    public Doctor Doctor { get; set; }

    [JsonPropertyName("text")]
    public string? PatientName {  set; get; }

    [JsonPropertyName("patient")]
    public string? PatientId { set; get; }

    public string Status { get; set; } = "free";

    [NotMapped]
    public int Resource { get { return Doctor.Id; } }

    [NotMapped]
    public string DoctorName { get { return Doctor.Name; } }

}
Entity Framework Installation and Configuration
Install the required Entity Framework Core packages using Package Manager Console:
PM > Install-Package Microsoft.EntityFrameworkCore
PM > Install-Package Microsoft.EntityFrameworkCore.SqlServer
PM > Install-Package Microsoft.EntityFrameworkCore.Tools
Connection string in appsettings.json:
{
  // ...
  "ConnectionStrings": {
      "DoctorDbContext": "Server=(localdb)\\mssqllocaldb;Database=DayPilot.TutorialDoctor;Trusted_Connection=True"
  },
  // ...
}
Configure the DoctorDbContext - add the following line to Program.cs:
builder.Services.AddDbContext<DoctorDbContext>(options => options.UseSqlServer(builder.Configuration.GetConnectionString("DoctorDbContext")));The ASP.NET Core project does not include database migration classes. The database will be automatically created and initialized when you run the application for the first time.
Program.cs:
using (var serviceScope = app.Services.CreateScope())
{
    var services = serviceScope.ServiceProvider;
    try
    {
        var context = services.GetRequiredService<DoctorDbContext>();
        context.Database.EnsureCreated();
    }
    catch (Exception ex)
    {
        var logger = services.GetRequiredService<ILogger<Program>>();
        logger.LogError(ex, "An error occurred creating the DB.");
    }
}
History
November 26, 2023: Upgraded to .NET 8, upgraded to DayPilot Pro for JavaScript 2023.4.5808; automatic database initialization
December 3, 2021: Initial release (.NET 6)