.png "Spring Boot Resource-Scheduling Calendar (Open Source)")
Overview
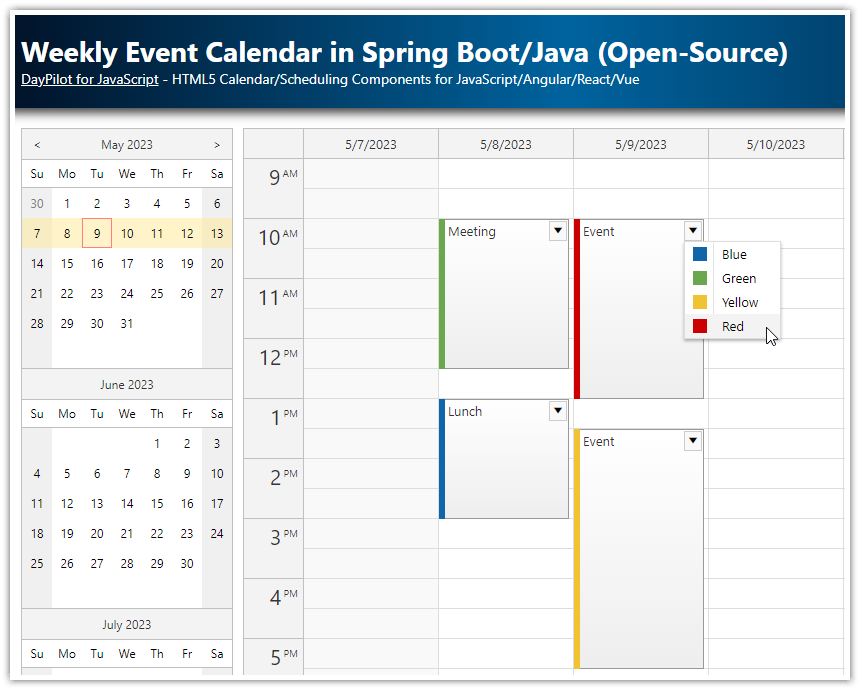
This tutorial demonstrates how to implement a resource-scheduling calendar in Spring Boot, where resources such as people, rooms, tools, and cars are displayed as columns.
Users can schedule tasks using drag and drop. To create a new task, simply select the desired time range in the corresponding column using drag and drop. A dialog with task details will pop up and you can enter the task text.
The schedule lets you quickly see all planned tasks for multiple resources side by side, making project management easier and helping to optimize resource allocation.
The attached Spring Boot application uses DayPilot Lite for JavaScript - a powerful open-source scheduling UI library. It is licensed under Apache License 2.0 which is business-friendly. You can use it in commercial applications as well.
License
Apache License 2.0
Creating a Scheduling Calendar for Multiple Resources
The main page content of our application is defined in a static index.html file, which you can find in the src/main/resources/static directory.
This HTML page outlines the user interface of our application, comprising the resource-scheduling calendar and a date picker that allows users to change the current date.
The basic setup consists of three steps:
1. Include daypilot-all.min.js script.
<script src="daypilot-all.min.js"></script>2. Add a placeholder for the Calendar component:
<div id="dp"></div>3. Now configure and initialize the calendar:
const dp = new DayPilot.Calendar("dp", {
  viewType: "Resources",
  // ...
});
dp.init();
In the following steps, you will learn how to add more functionality and customize the appearance of the calendar.
Displaying People in Columns

To show the resources in the scheduling calendar component, we need to load the column data from the database.
We will use an HTTP request:
const app = {
  async loadResources() {
    const {data:columns} = await DayPilot.Http.get("/api/resources");
    dp.update({columns});
  },
  // ...
};
The update() method re-renders the Calendar component after updating it with the properties specified using the options parameter.
The server-side endpoint (/api/resources) is implemented using Spring MVC. The following controller implements a service that returns the list of resources in JSON format:
package org.daypilot.demo.resourcescheduling.controller;

import org.daypilot.demo.resourcescheduling.domain.Resource;
import org.daypilot.demo.resourcescheduling.repository.ResourceRepository;
import org.springframework.beans.factory.annotation.Autowired;

import org.springframework.web.bind.annotation.*;

@RestController
public class MainController {

    @Autowired
    ResourceRepository rr;

    @RequestMapping("/api/resources")
    Iterable<Resource> resources() {
        return rr.findAll();
    }

}
Now, we will usethe onBeforeHeaderRender event handler to render custom content in the column headers.
onBeforeHeaderRender: args => {
  args.header.html = "";
  const icon = args.column.data.icon;
  args.header.areas = [
    {
      left: "calc(50% - 40px)",
      top: 10,
      width: 80,
      height: 80,
      image: "/images/" + icon,
      cssClass: "avatar"
    },
    {
      left: 5,
      right: 5,
      top: 95,
      height: 20,
      text: args.column.name,
      style: "display:flex;justify-content:center;align-items:center;"
    }
  ]
}
By default, the scheduling calendar displays only the resource name in the column header. In the onBeforeHeaderRender event handler, we will hide the default text and add two elements using active areas:
The resource avatar will be displayed in a circle at the top, horizontally centered (the image name is sent from the server in the
iconproperty of the resource data object).The resource name at the bottom, horizontally centered.
You can also use the active areas to add interactive elements, such as edit buttons.
We have specified a custom CSS class (avatar) for the resource icon. We can use it to customize the appearance (make the icon round, add a white border and a semi-transparent shadow):
.avatar img {
  width: 80px;
  height: 80px;
  border: 4px solid #fff;
  box-sizing: border-box;
  border-radius: 50%;
  box-shadow: 0px 0px 10px 5px rgba(0, 0, 0, 0.25);
}
Displaying Tasks in the Resource-Scheduler Calendar

To display tasks, we will load them from the server and update our resource-scheduling calendar:
const app = {
  async loadTasks() {
    const start = dp.visibleStart();
    const end = dp.visibleEnd();

    const {data: events} = DayPilot.Http.get(`/api/tasks?start=${start}&end=${end}`);
    dp.update({events});
  },
  // ...
};
The /api/tasks endpoint returns tasks for the date range specified using start and end query string parameters.
package org.daypilot.demo.resourcescheduling.controller;

import com.fasterxml.jackson.databind.annotation.JsonSerialize;
import com.fasterxml.jackson.datatype.jsr310.ser.LocalDateTimeSerializer;
import org.daypilot.demo.resourcescheduling.domain.Task;
import org.daypilot.demo.resourcescheduling.repository.TaskRepository;
import org.springframework.beans.factory.annotation.Autowired;
import org.springframework.format.annotation.DateTimeFormat;
import org.springframework.format.annotation.DateTimeFormat.ISO;
import java.time.LocalDateTime;

import org.springframework.web.bind.annotation.*;

@RestController
public class MainController {

    @Autowired
    EventRepository tr;

    @GetMapping("/api/tasks")
    @JsonSerialize(using = LocalDateTimeSerializer.class)
    Iterable<Task> tasks(@RequestParam("start") @DateTimeFormat(iso = ISO.DATE_TIME) LocalDateTime start, @RequestParam("end") @DateTimeFormat(iso = ISO.DATE_TIME) LocalDateTime end) {
        return tr.findBetween(start, end);
    }

}
In order to customize the task appearance in the calendar, we will add the following CSS to our Spring Boot application.
It will override selected styles of the built-in CSS theme:
Specify white background and gray borders.
Add a drop shadow.
Make the corners of the event box rounded.
Set a custom width of the duration bar.
body .calendar_default_event_inner {
  border-radius: 5px;
  background: #ffffff;
  border: 1px solid #666666;
  color: #333333;
  padding-left: 16px;
}

body .calendar_default_event {
  border-radius: 5px;
  box-shadow: 0px 0px 10px 1px rgba(0, 0, 0, 0.5);
}

body .calendar_default_shadow_inner {
  border-radius: 10px;
}

body .calendar_default_event_bar {
  border-radius: 5px;
  width: 10px;
}

body .calendar_default_event_bar_inner {
  width: 10px;
  border-radius: 5px;
}
The color of the duration bar is set on the client side using the onBeforeEventRender event handler:
onBeforeEventRender: args => {
  args.data.barColor = "#36b7ff";
  args.data.barBackColor = "#8cd3ff";

  // ...
},
This option lets you specify custom color for each task (depending on the task type, status or other parameters). In our example, we use the same color for all tasks.
Task Context Menu

Now, we'll add a menu icon in the upper-right corner of the tasks, providing access to a context menu.
These icons will display on hover, and clicking them will activate a context menu with additional actions.
The icon will be added as an active area that includes built-in support for showing a context menu (
action: 'ContextMenu').It uses an SVG symbol icon from the included icon library (
daypilog.svg).
We will add the active area using the onBeforeEventRender event handler:
onBeforeEventRender: args => {

  // ...

  args.data.areas = [
    {
      top: 3,
      right: 3,
      width: 24,
      height: 24,
      fontColor: "#333333",
      symbol: "/icons/daypilot.svg#threedots-v",
      action: "ContextMenu",
      visibility: "Hover",
      style: "cursor:pointer; border-radius: 50%; background: #ffffff; border: 2px solid #666666; padding: 2px; box-sizing: border-box;"
    }
  ];
},
The task context menu is defined using the contextMenu property of the config:
contextMenu: new DayPilot.Menu({
  items: [
    {
      text: "Edit...",
      onClick: async args => {
        app.editEvent(args.source);
      }
    },
    {
      text: "Delete",
      onClick: async args => {
        const {data} = await DayPilot.Http.post("/api/tasks/delete", {
          id: args.source.data.id
        });
        dp.events.remove(args.source);
      }
    }
  ]
}),
Preventing Image Flicker during Calendar Updates
Our resource scheduling calendar configuration displays images in the column headers. However, during updates, these headers may be re-rendered, causing the images to reload. Occasionally, reloading images from the server can result in a flicker.
To prevent this flicker during Calendar component updates, we'll configure the application to add a cache-control header to the images served from the /images/ directory.
This strategy ensures that the images are cached on the client side, making updates much faster and flicker-free.
WebConfig.java
package org.daypilot.demo.resourcescheduling;

import org.springframework.context.annotation.Configuration;
import org.springframework.http.CacheControl;
import org.springframework.web.servlet.config.annotation.ResourceHandlerRegistry;
import org.springframework.web.servlet.config.annotation.WebMvcConfigurer;

import java.util.concurrent.TimeUnit;

@Configuration
public class WebConfig implements WebMvcConfigurer {

    @Override
    public void addResourceHandlers(ResourceHandlerRegistry registry) {

        // make sure that images are cached and not reloaded every time
        registry.addResourceHandler("/images/**")
                .addResourceLocations("classpath:/static/images/")
                .setCacheControl(CacheControl.maxAge(2, TimeUnit.HOURS).cachePublic());
    }
}
Spring Data JPA Model Classes
Our application employs JPA for object-relational mapping and defines two classes:
The
Taskclass, which stores event or task data, including start and end times, text, and resource ID.The
Resourceclass, which holds the details of resources, such as ID, name, and icon.
This is the definition of the Task class (Task.java):
package org.daypilot.demo.resourcescheduling.domain;

import com.fasterxml.jackson.annotation.JsonIgnore;
import com.fasterxml.jackson.annotation.JsonProperty;

import jakarta.persistence.*;
import java.time.LocalDateTime;

@Entity
public class Task {

    @Id
    @GeneratedValue(strategy = GenerationType.IDENTITY)
    Long id;

    String text;

    @Column(name="task_start")
    LocalDateTime start;

    @Column(name="task_end")
    LocalDateTime end;

    @ManyToOne
    @JsonIgnore
    Resource resource;

    String color;

    @JsonProperty("resource")
    public Long getResourceId() {
        return resource.getId();
    }

    public Long getId() {
        return id;
    }

    public void setId(Long id) {
        this.id = id;
    }

    public String getText() {
        return text;
    }

    public void setText(String text) {
        this.text = text;
    }

    public LocalDateTime getStart() {
        return start;
    }

    public void setStart(LocalDateTime start) {
        this.start = start;
    }

    public LocalDateTime getEnd() {
        return end;
    }

    public void setEnd(LocalDateTime end) {
        this.end = end;
    }

    public Resource getResource() {
        return resource;
    }

    public void setResource(Resource resource) {
        this.resource = resource;
    }

    public String getColor() {
        return color;
    }

    public void setColor(String color) {
        this.color = color;
    }

}
The Resource class is defined in the Resource.java file.
package org.daypilot.demo.resourcescheduling.domain;

import com.fasterxml.jackson.annotation.JsonIgnore;

import jakarta.persistence.*;

@Entity
public class Resource {

    @Id
    @GeneratedValue(strategy = GenerationType.IDENTITY)
    Long id;

    String name;

    String icon;


    public Long getId() {
        return id;
    }

    public void setId(Long id) {
        this.id = id;
    }

    public String getName() {
        return name;
    }

    public void setName(String name) {
        this.name = name;
    }

    public String getIcon() {
        return icon;
    }

    public void setIcon(String icon) {
        this.icon = icon;
    }
}
The application uses an in-memory instance of a H2 database. The data source is configured in application.properties:
spring.datasource.url=jdbc:h2:mem:mydb
spring.h2.console.enabled=true
spring.jpa.hibernate.ddl-auto=create
spring.jpa.defer-datasource-initialization=true
The database is initialized automatically on startup with the following data (data.sql). It creates a couple of resources and defines the respective icons.
insert into resource (name, icon) values ('Person 1', 'avatar1.png');
insert into resource (name, icon) values ('Person 2', 'avatar2.png');
insert into resource (name, icon) values ('Person 3', 'avatar3.png');
insert into resource (name, icon) values ('Person 4', 'avatar4.png');
insert into resource (name, icon) values ('Person 5', 'avatar5.png');
History
October 17, 2023: Initial release.