Features
AngularJS scheduler control
Resources on the vertical axis (Y)
Time (days) on the horizontal axis (X)
Resources grouped by category (Tools, People)
Drag and drop event moving and resizing
Creating events using drag and drop (modal dialog)
Editing events using a modal dialog
Switching the visible month (Navigator)
PHP backend for JSON communication
Includes the trial version of DayPilot Pro for JavaScript
Please note that AngularJS 1.x is no longer supported by Google. See the Angular version of the Scheduler tutorial instead:
License
Licensed for testing and evaluation purposes. Please see the license agreement included in the sample project. You can use the source code of the tutorial if you are a licensed user of DayPilot Pro for JavaScript.
AngularJS Scheduler Initialization

The DayPilot Pro for JavaScript library includes an AngularJS Scheduler plugin. It defines a special element using an AngularJS directive:
<daypilot-scheduler></daypilot-scheduler>Initial Configuration
The HTML contains a definition of the AngularJS application and a simple controller:
<script src="js/angular.min.js"></script>
<script src="js/daypilot/daypilot-all.min.js"></script>

<div ng-app="main" ng-controller="DemoCtrl" >
  <daypilot-scheduler id="scheduler" daypilot-config="schedulerConfig" daypilot-events="events" ></daypilot-scheduler>
</div>

<script type="text/javascript">
  var app = angular.module('main', ['daypilot']).controller('DemoCtrl', function($scope, $timeout, $http) {
    $scope.schedulerConfig = {
      scale: "Day",
      days: new DayPilot.Date().daysInMonth(),
      startDate: new DayPilot.Date().firstDayOfMonth(),
      timeHeaders: [
          { groupBy: "Month" },
          { groupBy: "Day", format: "d" }
      ]
    };
  });
</script>
The scheduler element lets us define the control properties using the following attributes:
1. id attribute
id="dp" The value will be used for id attribute of the main scheduler control element: <div id="dp">
It will also store the DayPilot.Scheduler object in the $scope under a property with this name: $scope.dp
2. daypilot-config attribute
daypilot-config="schedulerConfig"This attribute lets us specify the Scheduler configuration object. The configuration object defines properties and event handlers of the scheduler control.
We will specify the following properties:
scale: "Day" The duration of each scheduler grid cell will be one day.
startDate: new DayPilot.Date().firstDayOfMonth() The first day will be set to the first day of the current month).
days: new DayPilot.Date().daysInMonth()The scheduler will display this month.
3. daypilot-events attribute
daypilot-events="events"
This attribute lets us specify the array of events that will be displayed in the scheduler.
timeHeaders: [
  { groupBy: "Month" },
  { groupBy: "Day", format: "d" }
]
The scheduler time header will display two rows. The first row will display months, the second row will display days.
Auto Cell Width

We want the scheduler to display the full month without having to scroll vertically. This can be done using cellWidthSpec property. See also Auto cell width:
$scope.schedulerConfig = {
  scale: "Day",
  days: new DayPilot.Date().daysInMonth(),
  startDate: new DayPilot.Date().firstDayOfMonth(),
  timeHeaders: [
      { groupBy: "Month" },
      { groupBy: "Day", format: "d" }
  ],
  cellWidthSpec: "Auto"
};
Loading Resources

In order to display the resources (people and tools) on the vertical axis of the Scheduler we have to use the following scheduler properties:
treeEnabled (it will enable the resource tree [doc.daypilot.org])
resource (the array of resources [api.daypilot.org])
You can also disable the parent resources [doc.daypilot.org] so they can't be used for placing events.
AngularJS Controller
$scope.schedulerConfig = {
  // ...
  treeEnabled: true
};


$timeout(function() {
  loadResources();
});

function loadResources() {
  $http.post("backend_resources.php").success(function(data) {
      $scope.schedulerConfig.resources = data;
  });
}
backend_resources.php
This script returns a JSON array with the resources.
<?php
require_once '_db.php';

$scheduler_groups = $db->query('SELECT * FROM [groups] ORDER BY [name]');

class Group {}
class Resource {}

$groups = array();

foreach($scheduler_groups as $group) {
  $g = new Group();
  $g->id = "group_".$group['id'];
  $g->name = $group['name'];
  $g->expanded = true;
  $g->children = array();
  $groups[] = $g;

  $stmt = $db->prepare('SELECT * FROM [resources] WHERE [group_id] = :group ORDER BY [name]');
  $stmt->bindParam(':group', $group['id']);
  $stmt->execute();
  $scheduler_resources = $stmt->fetchAll();

  foreach($scheduler_resources as $resource) {
    $r = new Resource();
    $r->id = $resource['id'];
    $r->name = $resource['name'];
    $g->children[] = $r;
  }
}

header('Content-Type: application/json');
echo json_encode($groups);

?>
Sample JSON response:
[
  {
    "id":"group_1",
    "name":"People",
    "expanded":true,
    "children":[
      {"id":"1","name":"Person 1"},
      {"id":"2","name":"Person 2"},
      {"id":"3","name":"Person 3"},
      {"id":"4","name":"Person 4"},
      {"id":"5","name":"Person 5"},
      {"id":"6","name":"Person 6"},
      {"id":"7","name":"Person 7"},
      {"id":"8","name":"Person 8"},
      {"id":"9","name":"Person 9"}
    ]
  },
  {
    "id":"group_2",
    "name":"Tools",
    "expanded":true,
    "children":[
      {"id":"11","name":"Tool 1"},
      {"id":"12","name":"Tool 2"},
      {"id":"13","name":"Tool 3"},
      {"id":"14","name":"Tool 4"},
      {"id":"15","name":"Tool 5"},
      {"id":"16","name":"Tool 6"},
      {"id":"17","name":"Tool 7"},
      {"id":"18","name":"Tool 8"},
      {"id":"19","name":"Tool 9"}
    ]
  }
]
Loading Scheduler Events

The actual events/reservations will be load using loadEvents function. It save the event data in $scope.events - the scheduler will detect the changes and reload the events.
AngularJS Controller
$timeout(function() {
  loadResources();
  loadEvents($scope.scheduler.visibleStart(), $scope.scheduler.visibleEnd());
});


function loadEvents(from, to) {
  var params = {
      start: from.toString(),
      end: to.toString()
  };

  $http.post("backend_events.php", params).success(function(data) {
      $scope.schedulerConfig.startDate = from;
      $scope.schedulerConfig.days = Math.floor(new DayPilot.Duration(from, to).totalDays());
      $scope.events = data;
  });
}
The backend_events.php script returns the event data in a JSON array.
backend_events.php
<?php
require_once '_db.php';

$json = file_get_contents('php://input');
$params = json_decode($json);

$stmt = $db->prepare('SELECT * FROM [events] WHERE NOT ((end <= :start) OR (start >= :end))');
$stmt->bindParam(':start', $params->start);
$stmt->bindParam(':end', $params->end);
$stmt->execute();
$result = $stmt->fetchAll();

class Event {}
$events = array();

foreach($result as $row) {
  $e = new Event();
  $e->id = $row['id'];
  $e->text = $row['name'];
  $e->start = $row['start'];
  $e->end = $row['end'];
  $e->resource = $row['resource_id'];
  $e->bubbleHtml = "Event details: <br/>".$e->text;
  $e->utilization = 10;
  $events[] = $e;
}

header('Content-Type: application/json');
echo json_encode($events);

?>
Sample JSON response:
[
{
"id":"12",
"text":"Event",
"start":"2015-03-02T00:00:00",
"end":"2015-03-10T00:00:00",
"resource":"3"
}
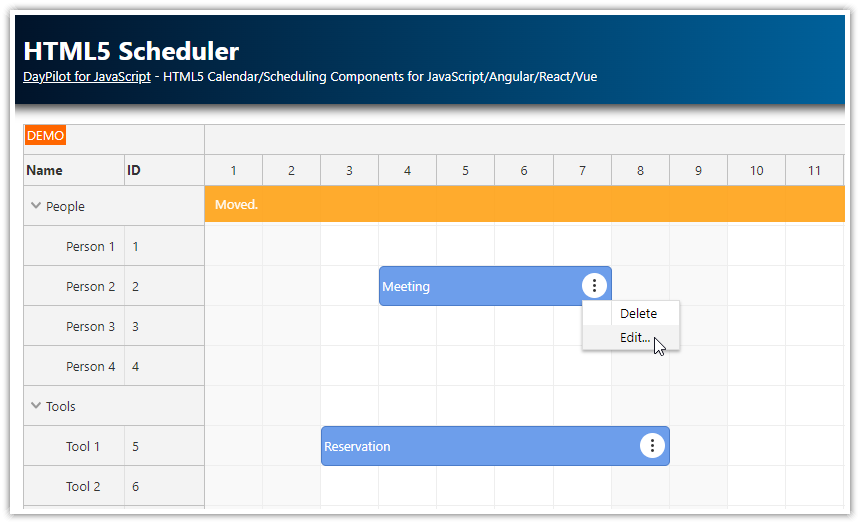
]Drag and Drop Event Moving

The AngularJS scheduler allows moving events using drag and drop. This feature is enabled by default. Whenever the user moves an event, the scheduler fires onEventMove and onEventMoved events and updates the position.
We will use onEventMoved event handler to notify the server about the change.
AngularJS Controller
<script>
  var app = angular.module('main', ['daypilot']).controller('DemoCtrl', function($scope, $timeout, $http) {

  $scope.schedulerConfig = {

      // ...

      onEventMoved: function(args) {
          var params = {
              id: args.e.id(),
              newStart: args.newStart.toString(),
              newEnd: args.newEnd.toString(),
              newResource: args.newResource
          };
          $http.post("backend_move.php", params).success(function() {
              $scope.scheduler.message("Moved.");
          });
      },
  };
});

</script>
The backend_move.php script updates the database on the server side.
backend_move.php
<?php
require_once '_db.php';

$json = file_get_contents('php://input');
$params = json_decode($json);

$stmt = $db->prepare("UPDATE events SET start = :start, end = :end, resource_id = :resource WHERE id = :id");
$stmt->bindParam(':id', $params->id);
$stmt->bindParam(':start', $params->newStart);
$stmt->bindParam(':end', $params->newEnd);
$stmt->bindParam(':resource', $params->newResource);
$stmt->execute();

class Result {}

$response = new Result();
$response->result = 'OK';
$response->message = 'Update successful';

header('Content-Type: application/json');
echo json_encode($response);

?>
Creating Events using Drag and Drop

The scheduler lets users select a time range in the grid. It fires onTimeRangeSelected event when the selection is complete. We will handle this event and open a modal dialog where the user can enter the new event details. The event will be saved in the database and the scheduler will be refreshed.
<script type="text/javascript">
  var app = angular.module('main', ['daypilot']).controller('DemoCtrl', function($scope, $timeout, $http) {

  $scope.schedulerConfig = {

    // ...

    onTimeRangeSelected: function(args) {
        var dp = $scope.scheduler;

        var modal = new DayPilot.Modal({
            onClosed: function(args) {
                if (args.result) {  // args.result is empty when modal is closed without submitting
                    loadEvents();
                }
                dp.clearSelection();
            }
        });

        modal.showUrl("event_create.php?start=" + args.start + "&end=" + args.end + "&resource=" + args.resource);
    }
  };
});

</script>
The event_create.php script displays a dialog box with event details pre-filled using the selected area (the parameters are passed to the modal dialog using the query string).
event_create.php
<!DOCTYPE html>
<html>
    <head>
        <meta charset="UTF-8">
        <title>Create Event</title>
    	<link type="text/css" rel="stylesheet" href="media/layout.css" />
        <script src="js/jquery-1.11.2.min.js" type="text/javascript"></script>
        <script src="js/daypilot/daypilot-all.min.js" type="text/javascript"></script>
    </head>
    <body>
        <?php
            require_once '_db.php';

            $start = $_GET["start"];
            $end = $_GET["end"];
            $resource = $_GET["resource"];

            // basic sanity check
            new DateTime($start) or die("invalid date");
            new DateTime($end) or die("invalid date");

        ?>
        <form id="f" action="backend_create.php" style="padding:20px;">
            <h1>Create Event</h1>

            <div>Name: </div>
            <div><input type="text" id="name" name="name" value="" /></div>

            <div class="space">
                <div>Resource:</div>
                <div>
                    <select id="resource" name="resource">
                    <?php
                        foreach($db->query('SELECT * FROM [resources] ORDER BY [id]') as $item) {
                            $selected = "";
                            if ($resource == $item["id"]) {
                                $selected = " selected";
                            }
                            echo "<option value='".$item["id"]."'".$selected.">".$item["name"]."</option>";
                        }
                    ?>
                    </select>
                </div>
            </div>

            <div class="space">
                <div>Start:</div>
                <div>
                    <input id="start" name="start"/> <a href="#" onclick="startPicker.show(); return false;">Change</a>
                </div>
            </div>

            <div class="space">
                <div>End:</div>
                <div>
                    <input id="end" name="end"/> <a href="#" onclick="endPicker.show(); return false;">Change</a>
                </div>
            </div>


            <div class="space"><input type="submit" value="Save" /> <a href="#" id="cancel">Cancel</a></div>
        </form>

        <script type="text/javascript">

        $("#f").submit(function () {
            var f = $("#f");
            $("#start").val(startPicker.date.toString());
            $("#end").val(endPicker.date.toString());
            $.post(f.attr("action"), f.serialize(), function (result) {
                DayPilot.Modal.close(result);
            });
            return false;
        });

        $("#delete").click(function() {
            $.post("backend_delete.php", { id: $("#id").val()}, function(result) {
                DayPilot.Modal.close(result);
            });
            return false;
        });

        $("#cancel").click(function() {
            DayPilot.Modal.close();
            return false;
        });

        $(document).ready(function () {
            $("#name").focus();
        });

        var startPicker =  new DayPilot.DatePicker({
            target: 'start',
            pattern: 'M/d/yyyy',
            date: "<?php echo $start ?>",
            onShow: function() {
                parent.DayPilot.ModalStatic.stretch();
            }
        });

        var endPicker =  new DayPilot.DatePicker({
            target: 'end',
            pattern: 'M/d/yyyy',
            date: "<?php echo $end ?>",
            onShow: function() {
                parent.DayPilot.ModalStatic.stretch();
            }
        });

        </script>
    </body>
</html>
Switching the Visible Month

Now we will add the Navigator control that will let the users switch the visible month.
The HTML page will display two columns
<div ng-app="main" ng-controller="DemoCtrl" >

  <div style="float:left; width:160px">
      <daypilot-navigator id="navigator" daypilot-config="navigatorConfig"></daypilot-navigator>
  </div>
  <div style="margin-left: 160px">
      <daypilot-scheduler id="scheduler" daypilot-config="schedulerConfig" daypilot-events="events" ></daypilot-scheduler>
  </div>

</div>
The AngularJS Controller defines the navigator properties using $scope.navigatorConfig:
<script>
  var app = angular.module('main', ['daypilot']).controller('DemoCtrl', function($scope, $timeout, $http) {

  $scope.navigatorConfig = {
      selectMode: "month",
      showMonths: 3,
      skipMonths: 3,
      onTimeRangeSelected: function(args) {
          loadEvents(args.start.firstDayOfMonth(), args.start.addMonths(1).firstDayOfMonth());
      }
  };

  // ...

});

</script>
Whenever the user selects a different month the Navigator fires onTimeRangeSelected event. The event handler loads the events from the server for the new months and updates startDate and days properties of the Scheduler:
function loadEvents(from, to) {
  var from = from || $scope.scheduler.visibleStart();
  var to = to || $scope.scheduler.visibleEnd();
  var params = {
      start: from.toString(),
      end: to.toString()
  };

  $http.post("backend_events.php", params).success(function(data) {
      $scope.schedulerConfig.startDate = from;
      $scope.schedulerConfig.days = Math.floor(new DayPilot.Duration(from, to).totalDays());
      $scope.events = data;
  });
}