")
Features
Built using DayPilot Angular Scheduler component
Frontend written using Angular (TypeScript)
REST/JSON backend written in PHP (PHP 8+)
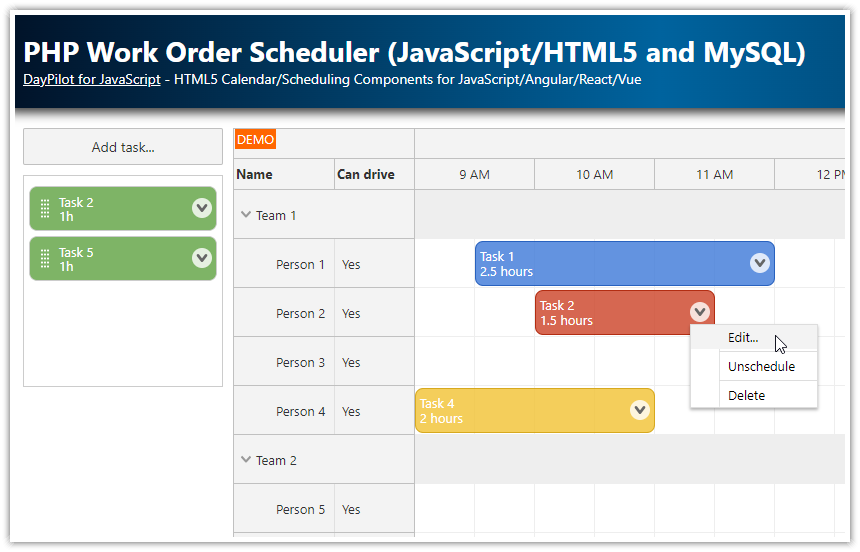
Ordered queue of unscheduled tasks with bi-directional drag and drop support
Scheduling a task using drag and drop (assign a person and time)
Context menu for additional work order actions (edit, delete, unschedule)
Includes a trial version of DayPilot Pro for JavaScript (see License below)
License
Licensed for testing and evaluation purposes. Please see the license agreement included in the sample project. You can use the source code of the tutorial if you are a licensed user of DayPilot Pro for JavaScript.
Scheduler UI Builder
This project was generated using Scheduler UI Builder. You can use this visual tool to configure the Scheduler appearance and properties and generate a downloadable project.
Running the Project
The project is split into two parts:
The frontend with the user interface is an Angular project written in TypeScript.
The backend that provides the REST API (to access the MySQL database) is written in PHP.
Since the two projects are separate you can replace the PHP backend with a custom backend running on a different platform if needed.
1. PHP backend (angular-work-order-php-backend directory)
In order to run the PHP backend that handles the database access simply start the built-in PHP web server. The web server is running on port 8090.
Linux
php -S 127.0.0.1:8090 -t /home/daypilot/tutorials/angular-work-order-php/angular-work-order-php-backendWindows
C:\php\php.exe -S 127.0.0.1:8090 -t C:\Users\DayPilot\tutorials\angular-work-order-php\angular-work-order-php-backend2. Angular frontend (angular-work-order-php-frontend directory)
The Angular project in the package doesn't include the dependencies (node_modules). It's necessary to download the dependencies first using npm install:
npm installThen you can start the Angular frontend application:
npm run startNote: The Angular project uses a reverse proxy to pass all local requests to /api/* URLs to the PHP backend running at http://localhost:8090. The start script from package.json is modified to include the proxy configuration:
{
  "scripts": {
    "start": "ng serve --proxy-config proxy.conf.json",
    // ...
  },
  / ...
}
proxy.conf.json
{
  "/api": {
    "target": "http://localhost:8090",
    "secure": false
  }
}
Angular Scheduler Configuration

This Angular application uses DayPilot Angular Scheduler component to build the work order scheduling application UI.
The Angular project boilerplate was generated using DayPilot UI Builder. This is an online application that will let you configure the Scheduler component properties and immediately preview the changes.
The source code of the Scheduler configuration can be found in src/app/scheduler/scheduler.component.ts TypeScript file.
To add the Scheduler component to the view, you need to add the <daypilot-scheduler> tag:
<daypilot-scheduler [config]="config" [events]="events" #scheduler></daypilot-scheduler>The scheduler tag uses [config] attribute to specify the object with configuration properties:
export class SchedulerComponent implements AfterViewInit {

  // ...

  config: DayPilot.SchedulerConfig = {
    eventHeight: 40,
    cellWidthSpec: "Fixed",
    cellWidth: 60,
    timeHeaders: [{groupBy: "Day"},{groupBy: "Hour"}],
    scale: "CellDuration",
    cellDuration: 30,
    showNonBusiness: false,
    treePreventParentUsage: true,
    days: DayPilot.Date.today().daysInMonth(),
    startDate: DayPilot.Date.today().firstDayOfMonth(),
    timeRangeSelectedHandling: "Enabled",
    treeEnabled: true,
    resources: [],

    // ...

  }
}
The Scheduler grid cell size (in pixels) is specified using eventHeight and cellWidth properties.

The time scale, timeline and time header rows (X axis) are configured using scale, timeHeaders, and cellDuration properties. We will display two time header rows (to display days and hours).
The Scheduler grid cell size is set to 30 minutes. Note that the cell grid size doesn't need to match the time header groups - the time headers will be calculated automatically.
timeHeaders: [{groupBy: "Day"},{groupBy: "Hour"}],
scale: "CellDuration",
cellDuration: 30,
The visible range is defined using startDate and days properties. We will display the current month (see also the date navigation options).
days: DayPilot.Date.today().daysInMonth(),
startDate: DayPilot.Date.today().firstDayOfMonth(),
We will also hide non-business hours from the Scheduler timeline using showNonBusiness property.
These hidden parts of the timeline will be highlighted using a black vertical line. This provides a hint to the user that there is a break in the timeline.

The resources are displayed on the Y axis. In order to display groups (Team 1, Team 2), we have enabled the tree hierarchy using treeEnabled property.

The config sets the resources property to an empty array:
resources: [],We need to load the rows from the server so we call the DataService.getResources() method during the component initialization:
  ngAfterViewInit(): void {

    this.ds.getResources().subscribe(result => this.config.resources = result);

    // ...

  }
The DataService.getResource() method uses a GET request to load the data in JSON format from our PHP backend:
  getResources(): Observable<any[]> {
    return this.http.get<any[]>("/api/backend_resources.php");
  }
This is a sample JSON response:
[
  {"id":"group_1","name":"Team 1","expanded":true,"children":
    [
      {"id":"1","name":"John"},
      {"id":"2","name":"Mary"}
    ]
  },
  {"id":"group_2","name":"Team 2","expanded":true,"children":
    [
      {"id":"3","name":"Cindy"},
      {"id":"4","name":"Robert"}
    ]
  }
]
The array that holds work order data (events) is specified using [events] attribute of the <daypilot-scheduler> tag:
<daypilot-scheduler [config]="config" [events]="events" #scheduler></daypilot-scheduler>It's a property specified in the SchedulerComponent class:
export class SchedulerComponent implements AfterViewInit {

  events: DayPilot.EventData[] = [];

  // ...

}
Again, we load the data in during component initialization using DataService:
  ngAfterViewInit(): void {

    // ...

    const from = this.scheduler.control.visibleStart();
    const to = this.scheduler.control.visibleEnd();
    this.ds.getEvents(from, to).subscribe(result => {
      this.events = result;
    });

    // ...
  }
The getEvents() method of DataService class is very simple. It makes a GET request to load the work order data from the server in JSON format:
  getEvents(from: DayPilot.Date, to: DayPilot.Date): Observable<any[]> {
    return this.http.get<any[]>("/api/backend_events.php?from=" + from.toString() + "&to=" + to.toString());
  }
Sample JSON response:
[
  {"id":6,"text":"Task 1","start":"2025-01-01T10:00:00","end":"2025-01-01T12:00:00","resource":1,"duration":7200},
  {"id":7,"text":"Task 2","start":"2025-01-01T09:30:00","end":"2025-01-01T12:30:00","resource":3,"duration":10800}
]
Adding a New Unscheduled Task

The “Add Task” button opens a modal dialog which lets users enter task details, such as text description and duration.
After confirmation, the new tasks will be added to the queue and displayed on the left side, next to the Scheduler.
HTML:
<button (click)="addToQueue()">Add Task</button>Angular/TypeScript:
export class SchedulerComponent implements AfterViewInit {

  // ...

  async addToQueue(): Promise<void> {

    const form = [
      {id: "text", name: "Task", type: "text"},
      {id: "duration", name: "Duration", options: this.ds.durations, type: "select"},
    ];

    const data = {
      duration: 60*60
    };

    const modal = await DayPilot.Modal.form(form, data);

    if (modal.canceled) {
      return;
    }

    let params = modal.result;

    this.ds.createTaskInQueue(params).subscribe((result: any) => {
      this.queue.control.events.add(result);
    });

  }

  // ...

}
Queue of Unscheduled Work Orders

The queue is created using the DayPilot Queue component. This component provides a UI for an ordered queue of tasks.
It uses API compatible with the Angular Scheduler component.
The queue supports direct drag-and-drop operations between the Scheduler and the Queue (in both directions).
You can easily reorder the tasks in the queue using drag and drop.
The queue items are styled the same way as the scheduler events.
HTML:
<daypilot-queue [config]="queueConfig" #queue></daypilot-queue>Angular/TypeScript:
export class SchedulerComponent implements AfterViewInit {

  @ViewChild("queue") queue!: DayPilotQueueComponent;

  events: DayPilot.EventData[] = [];

  queueConfig: DayPilot.QueueConfig = {
    eventHeight: 45,
    eventBarVisible: false,
    onEventClick: args => {
      this.queueEdit(args.e);
    },
    onEventMove: args => {
      this.ds.moveToQueue({id: args.e.id(), position: args.position}).subscribe(result => {
        this.scheduler.control.events.remove(args.e);
      });
    },

    // ...

  };

}
Work Order Queue Context Menu

In this step, we will add an active area to the elements in the work order queue.
The active area will display a menu icon in the upper-left corner of the task. Upon click, the active area opens a context menu with “Edit…” and “Delete” actions.
export class SchedulerComponent implements AfterViewInit {

  // ...

  queueMenu: DayPilot.Menu = new DayPilot.Menu({
    items: [
      {
        text: "Edit...",
        onClick: args => {
          this.queueEdit(args.source);
        }
      },
      {
        text: "-",
      },
      {
        text: "Delete",
        onClick: args => {
          this.deleteTaskFromQueue(args.source);
        }
      },
    ]
  });

  queueConfig: DayPilot.QueueConfig = {
    contextMenu: this.queueMenu,
    onBeforeEventRender: args => {

      let duration = DayPilot.Duration.ofSeconds(args.data.duration);
      const encodedText = DayPilot.Util.escapeHtml(args.data.text);

      args.data.fontColor = "#ffffff";
      args.data.html = `<div>${encodedText}<br><span class='task-duration'>${duration.totalHours()} hours</span></div>`;
      args.data.areas = [
        {
          top: 13,
          right: 5,
          height: 20,
          width: 20,
          padding: 3,
          symbol: "/icons/daypilot.svg#threedots-v",
          action: "ContextMenu",
          backColor: "#fff",
          fontColor: "#333",
          style: "cursor: pointer; border-radius: 50%; "
        }
      ];
    },

    // ...
  };


  // ...

}
Scheduling a Work Order using Drag and Drop

The queue component supports dragging items to the Scheduler.
When the user drops the task to the Scheduler, the Scheduler fires the onEventMove event handler, with args.external set to true.
export class SchedulerComponent implements AfterViewInit {

  // ...

  schedulerConfig: DayPilot.SchedulerConfig = {
    onEventMove: args => {

      const queue = this.queue.control;

      let params = {
          id: args.e.id(),
          start: args.newStart,
          end: args.newEnd,
          resource: args.newResource,
          external: args.external
      };
      this.ds.moveEvent(params).subscribe(result => {
        if (args.external) {
          queue.events.remove(args.e);
        }
      });
    },

    // ...

  }

  // ...

}
The DataService.moveEvent() method calls the server-side API:
@Injectable()
export class DataService {

  // ...

  moveEvent(params: any) {
    return this.http.post("/api/backend_move.php", params);
  }

  // ...

}
Unscheduling a Work Order

To unschedule an event (and move it back to the queue), you can use drag and drop or the context menu.
Angular/TypeScript
export class SchedulerComponent implements AfterViewInit {

  // ...

  schedulerConfig: DayPilot.SchedulerConfig = {
    onBeforeEventRender: args => {
      args.data.fontColor = "#ffffff";
      args.data.html = "<div>" + args.data.text + "<br><span class='task-duration'>" + new DayPilot.Duration(args.data.start, args.data.end).totalHours() + " hours</span></div>";
      args.data.areas = [
        {
          top: 13,
          right: 5,
          height: 20,
          width: 20,
          padding: 3,
          symbol: "/icons/daypilot.svg#threedots-v",
          action: "ContextMenu",
          backColor: "#fff",
          fontColor: "#333",
          style: "cursor: pointer; border-radius: 50%; "
        }
      ];
    },

    // ...

    contextMenu: new DayPilot.Menu({
      items: [
        {
          text: "Edit...",
          onClick: args => {
            this.editEvent(args.source);
          }
        },
        {
          text: "-",
        },
        {
          text: "Unschedule",
          onClick: args => {
            const e = args.source;
            this.unscheduleTask(e);
          }
        },
        {
          text: "-",
        },
        {
          text: "Delete",
          onClick: args => {
            var e = args.source;
            this.deleteTask(e);
          }
        },
      ],
    })
  };

  // ...

}
The “Unschedule” menu item calls the unscheduleTask() method which moves the task back to the queue.
unscheduleTask(e: DayPilot.Event): void {
  const dp = this.scheduler.control;
  const params = {
    id: e.id(),
  };
  this.ds.moveToQueue(params).subscribe(result => {
    this.queue.control.events.add(e);
    dp.events.remove(e);
  });
}
Switching from SQLite to MySQL
By default, the PHP backend uses SQLite embedded database to make the testing easier. It will automatically create a new disk-based database (you don't need to set up MySQL) - just make sure that the PHP server has write permissions.
_db.php
<?php

// use sqlite
require_once '_db_sqlite.php';

// use MySQL
//require_once '_db_mysql.php';
For a standard application, you'll want to switch to MySQL instead. The MySQL database ("workorder") will be created automatically as well (don't forget the permissions). In order to switch to MySQL, you need to update _db.php file:
<?php

// use sqlite
// require_once '_db_sqlite.php';

// use MySQL
require_once '_db_mysql.php';
Don't forget to update the MySQL server hostname, username and password in _db_mysql.php:
<?php
$host = "127.0.0.1";
$port = 3306;
$username = "username";
$password = "password";
$database = "workorder";
MySQL Database Schema
Here is the MySQL database schema used by the work order scheduling application.
This is the definition of the groups table.
CREATE TABLE `groups` (
	`id` INT(11) NOT NULL,
	`name` VARCHAR(200) NULL DEFAULT NULL,
	PRIMARY KEY (`id`)
);
This is the definition of the resources table. Resources are the people available for work order assignments.
CREATE TABLE `resources` (
	`id` INT(11) NOT NULL AUTO_INCREMENT,
	`name` VARCHAR(200) NULL DEFAULT NULL,
	`group_id` INT(11) NULL DEFAULT NULL,
	PRIMARY KEY (`id`)
);
This is the definition of the events table. This table stores the work order items.
CREATE TABLE `events` (
	`id` INT(11) NOT NULL AUTO_INCREMENT,
	`name` TEXT NULL,
	`start` DATETIME NULL DEFAULT NULL,
	`end` DATETIME NULL DEFAULT NULL,
	`resource_id` VARCHAR(30) NULL DEFAULT NULL,
	`duration` INT(11) NULL DEFAULT NULL,
	`ordinal` INT(11) NULL DEFAULT NULL,
        `ordinal_priority` DATETIME NULL DEFAULT NULL,
	PRIMARY KEY (`id`)
);
History
June 23, 2024: Upgraded to Angular 18, PHP 8, DayPilot Pro for JavaScript 2024.2.5961. Using the Queue component for unscheduled work orders; styling updates.
December 16, 2020: Upgraded to Angular 11, DayPilot Pro for JavaScript 2020.4.4807; typed config
June 22, 2020: Upgraded to Angular 9, DayPilot Pro for JavaScript 2020.2.4514
Sep 3, 2019: Upgraded to Angular 8, DayPilot Pro for JavaScript 2019.2.3871
Jun 4, 2018: Upgraded to Angular 6, DayPilot Pro for JavaScript 2018.2.3297
Jan 11, 2018: Initial release