Features
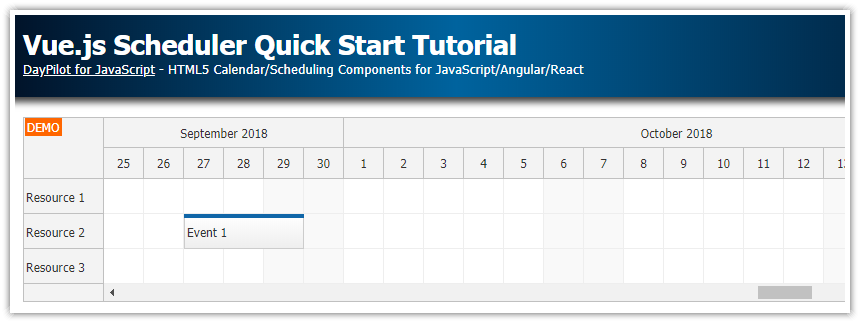
Vue scheduler component created using DayPilot JavaScript Scheduler
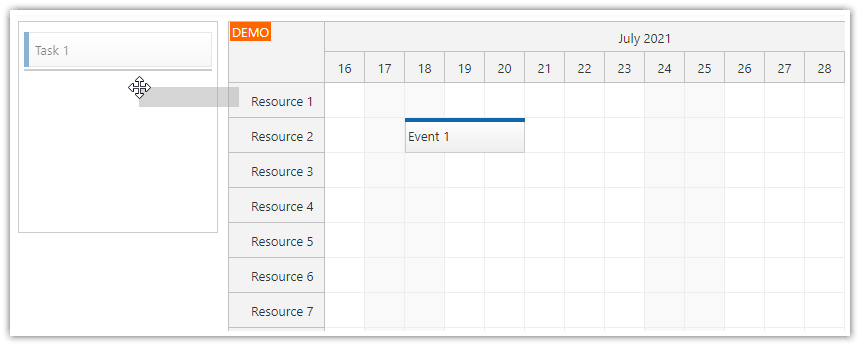
The scheduler component displays a hierarchy of resources on the vertical axis
The timeline is displayed on the horizontal axis
The appearance and behavior can be customized easily
Full drag and drop support
The Vue.js project was generated using Scheduler UI Builder
Complete Vue.js application is available for download
License
Licensed for testing and evaluation purposes. Please see the license agreement included in the sample project. You can use the source code of the tutorial if you are a licensed user of DayPilot Pro for JavaScript.
TLDR: Skip This Tutorial and Generate a Customized Vue.js Project

You can use the online Scheduler UI Builder application to create a customized Scheduler configuration using a visual configurator tool with live preview. Generate and download a complete Vue 2 or Vue 3 project with all dependencies.
NPM Dependencies
First, add daypilot-pro-vue package from npm.daypilot.org to your Vue application:
npm install https://npm.daypilot.org/daypilot-pro-vue/trial/2023.4.5801.tar.gzVue Application
The first version of our Vue scheduler application is very simple. We display the Scheduler Vue component that we will create in the next step:
App.vue
<template>
  <Scheduler />
</template>

<script setup>
import Scheduler from './components/Scheduler.vue'
</script>
Vue Scheduler Component
In this step, we will create a new Vue Scheduler component. Our component will use DayPilotScheduler from daypilot-pro-vue package to render the scheduler UI in the browser.
Template:
<template>
  <DayPilotScheduler :config="config" ref="schedulerRef" />
</template>
JavaScript:
<script setup>
import {DayPilot, DayPilotScheduler} from 'daypilot-pro-vue'

const config = reactive({});
const schedulerRef = ref(null);

</script>
The component template contains a <DayPilotScheduler> tag with two attributes:
The
configattribute specifies a JavaScript object with the initial Scheduler configuration.The
refattribute lets us access the direct API using theDayPilot.Schedulerobject.
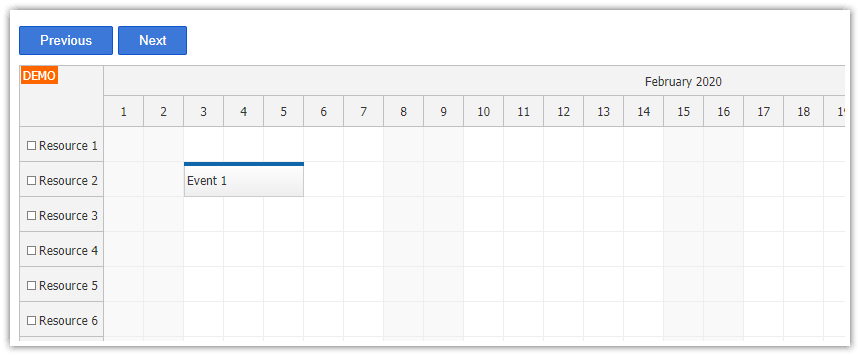
Initial Vue.js Scheduler Configuration

We have added an empty Scheduler to our Vue.js application. It uses the default configuration and the view doesn’t display much. In this step, we will use the config property to customize the Scheduler appearance.
You can use the config object to set the Scheduler properties and event handlers. This first version specifies only basic properties that define the Scheduler timeline (timeHeader, scale, days, startDate).
JavaScript
<script setup>
import {DayPilot, DayPilotScheduler} from 'daypilot-pro-vue'

const config = reactive({
  timeHeaders: [{groupBy: "Month"}, {groupBy: "Day", format: "d"}],
  scale: "Day",
  days: DayPilot.Date.today().daysInYear(),
  startDate: DayPilot.Date.today().firstDayOfYear(),
});

const schedulerRef = ref(null);

</script>
Accessing the Scheduler Object in Vue
The Scheduler component uses DayPilot.Scheduler internally to create the component. We need a reference to the DayPilot.Scheduler object in order to call its methods using the JavaScript API.
First, we need a reference to the Vue.js scheduler object. We can get it using the ref attribute of the <DayPilotScheduler> element:
<DayPilotScheduler :config="config" ref="schedulerRef" />Now we can reach the Vue.js component using schedulerRef:
const component = schedulerRef.value;The DayPilotScheduler Vue.js component stores the internal DayPilot.Scheduler instance in the control property.
const dp = schedulerRef.value?.control;Now we can use the dp constant to reach the DayPilot.Scheduler object:
onMounted(() => {
  const dp = schedulerRef.value?.control;
  dp.message("Welcome!");
  dp.scrollTo(DayPilot.Date.today().firstDayOfMonth());
});
Loading Vue.js Scheduler Resources

In this step, we will create a loadResources() function that loads the resource data and updates the Scheduler:
const loadResources = () => {
  const resources = [
    {
      name: "Group A", id: "GA", expanded: true, children: [
        {name: "Resource 1", id: "R1"},
        {name: "Resource 2", id: "R2"},
        {name: "Resource 3", id: "R3"},
        {name: "Resource 4", id: "R4"},
      ]
    },
    {
      name: "Group B", id: "GB", expanded: true, children: [
        {name: "Resource 5", id: "R5"},
        {name: "Resource 6", id: "R6"},
        {name: "Resource 7", id: "R7"},
        {name: "Resource 8", id: "R8"},
      ]
    }
  ];
  config.resources = resources;
};
Loading Vue.js Scheduler Reservations

Now we will create loadReservations() function that loads the event data to the Scheduler. Normally, this method should load the data from the server side using an HTTP call but we will return a static array in this example:
const loadReservations = () => {
  const events = [
    {
      id: 1,
      resource: "R1",
      start: DayPilot.Date.today().firstDayOfMonth().addDays(3),
      end: DayPilot.Date.today().firstDayOfMonth().addDays(7),
      text: "Event 1",
      color: "#1155cc"
    },
    {
      id: 2,
      resource: "R1",
      start: DayPilot.Date.today().firstDayOfMonth().addDays(9),
      end: DayPilot.Date.today().firstDayOfMonth().addDays(12),
      text: "Event 2",
      color: "#6aa84f"
    },
    // ...
  ];
  config.events = events;
};
You can also load the events using the direct API. The direct API is optimized to only perform partial updates when possible.
Instead of using the config object to update the data:
config.events = events;we will use the update() method:
schedulerRef.value?.control.update({events});Loading the Data during App Initialization
Now we need to add the loading methods to the onMounted lifecycle hook so they will be called during the Vue.js app initialization:
onMounted(() => {
const dp = schedulerRef.value?.control;
loadResources();
loadReservations();
dp.message("Welcome!");
dp.scrollTo(DayPilot.Date.today().firstDayOfMonth());
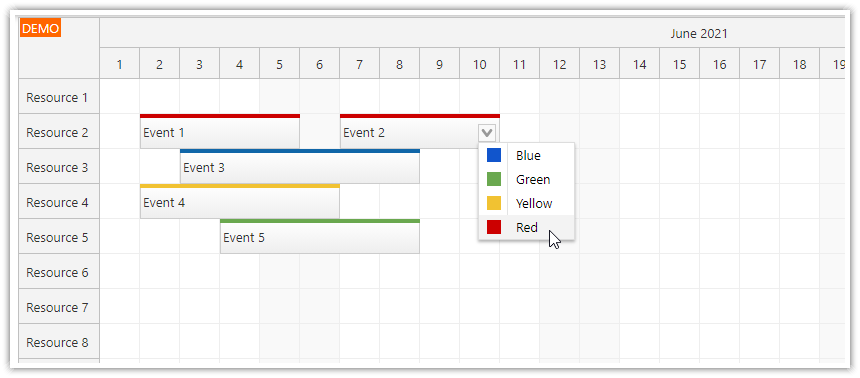
});Reservation Context Menu

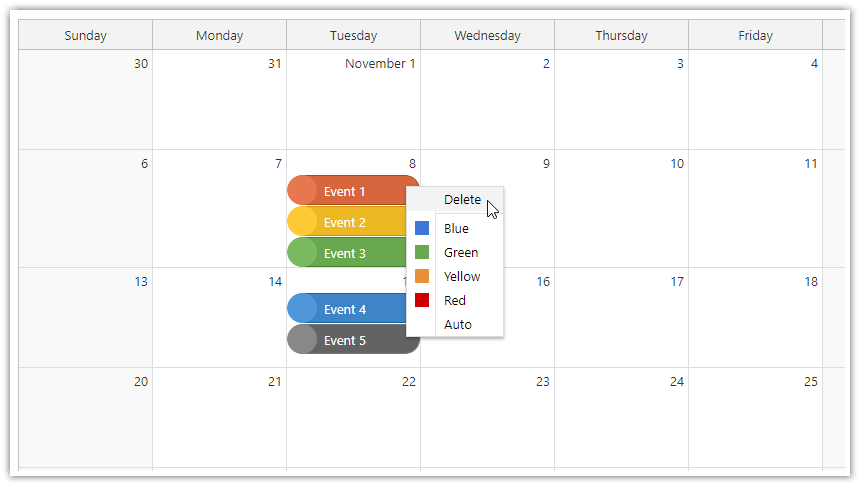
In this step, we will add a context menu to the reservations. The context menu will let users change the reservation color and delete it.
The context menu can be defined using contextMenu config property. Users can activate the context menu by right-clicking the reservation.
We will also add an icon to the reservation upper-left corner that will serve as a hint that a context menu is available. The icon can be added by inserting an active area using onBeforeEventRender event handler.
const config = reactive({
  // ...
  onBeforeEventRender: args => {
    args.data.barColor = args.data.color;
    args.data.areas = [
      {
        top: 12,
        right: 6,
        width: 20,
        height: 20,
        symbol: "icons/daypilot.svg#minichevron-down-4",
        fontColor: "#999",
        visibility: "Hover",
        action: "ContextMenu",
        padding: 1,
        style: "background-color: #f9f9f9; border: 2px solid #ccc; cursor:pointer; border-radius: 50%;"
      }
    ];
  },
  contextMenu: new DayPilot.Menu({
    items: [
      {
        text: "Delete",
        onClick: args => {
          const e = args.source;
          const dp = schedulerRef.value?.control;
          dp.events.remove(e);
          dp.message("Deleted.");
        }
      },
      {
        text: "-"
      },
      {
        text: "Blue",
        icon: "icon icon-blue",
        color: "#1155cc",
        onClick: args => {
          updateColor(args.source, args.item.color);
        }
      },
      {
        text: "Green",
        icon: "icon icon-green",
        color: "#6aa84f",
        onClick: args => {
          updateColor(args.source, args.item.color);
        }
      },
      {
        text: "Yellow",
        icon: "icon icon-yellow",
        color: "#f1c232",
        onClick: args => {
          updateColor(args.source, args.item.color);
        }
      },
      {
        text: "Red",
        icon: "icon icon-red",
        color: "#cc0000",
        onClick: args => {
          updateColor(args.source, args.item.color);
        }
      },
    ]
  })
});
The updateColor() function changes the reservation data object properties (color) and calls the Scheduler API to update the UI.
const updateColor = (e, color) => {
  const dp = schedulerRef.value?.control;
  e.data.color = color;
  dp.events.update(e);
  dp.message("Color updated");
};
Complete Vue App Source Code
Here you can find the full source code of our Vue.js application.
Scheduler.vue
<template>
  <DayPilotScheduler :config="config" ref="schedulerRef" />
</template>

<script setup>
import { DayPilot, DayPilotScheduler } from 'daypilot-pro-vue';
import { ref, reactive, onMounted } from 'vue';

const config = reactive({
      timeHeaders: [{groupBy: "Month"}, {groupBy: "Day", format: "d"}],
      scale: "Day",
      days: DayPilot.Date.today().daysInYear(),
      startDate: DayPilot.Date.today().firstDayOfYear(),
      timeRangeSelectedHandling: "Enabled",
      eventHeight: 40,
      onTimeRangeSelected: async args => {
        const dp = schedulerRef.value?.control;
        const modal = await DayPilot.Modal.prompt("Create a new event:", "Event 1");
        dp.clearSelection();
        if (modal.canceled) {
          return;
        }
        dp.events.add({
          start: args.start,
          end: args.end,
          id: DayPilot.guid(),
          resource: args.resource,
          text: modal.result
        });
      },
      eventMoveHandling: "Update",
      onEventMoved: args => {
        args.control.message("Event moved: " + args.e.data.text);
      },
      eventResizeHandling: "Update",
      onEventResized: args => {
        args.control.message("Event resized: " + args.e.data.text);
      },
      eventClickHandling: "Enabled",
      onEventClicked: args => {
        args.control.message("Event clicked: " + args.e.data.text);
      },
      eventHoverHandling: "Disabled",
      treeEnabled: true,
      onBeforeEventRender: args => {
        args.data.barColor = args.data.color;
        args.data.areas = [
          {
            top: 12,
            right: 6,
            width: 20,
            height: 20,
            symbol: "icons/daypilot.svg#minichevron-down-4",
            fontColor: "#999",
            visibility: "Hover",
            action: "ContextMenu",
            padding: 1,
            style: "background-color: #f9f9f9; border: 2px solid #ccc; cursor:pointer; border-radius: 50%;"
          }
        ];
      },
      contextMenu: new DayPilot.Menu({
        items: [
          {
            text: "Delete",
            onClick: args => {
              const e = args.source;
              const dp = schedulerRef.value?.control;
              dp.events.remove(e);
              dp.message("Deleted.");
            }
          },
          {
            text: "-"
          },
          {
            text: "Blue",
            icon: "icon icon-blue",
            color: "#1155cc",
            onClick: args => {
              updateColor(args.source, args.item.color);
            }
          },
          {
            text: "Green",
            icon: "icon icon-green",
            color: "#6aa84f",
            onClick: args => {
              updateColor(args.source, args.item.color);
            }
          },
          {
            text: "Yellow",
            icon: "icon icon-yellow",
            color: "#f1c232",
            onClick: args => {
              updateColor(args.source, args.item.color);
            }
          },
          {
            text: "Red",
            icon: "icon icon-red",
            color: "#cc0000",
            onClick: args => {
              updateColor(args.source, args.item.color);
            }
          },
        ]
      })
    }
);
const schedulerRef = ref(null);

const loadReservations = () => {
  const events = [
    {
      id: 1,
      resource: "R1",
      start: DayPilot.Date.today().firstDayOfMonth().addDays(3),
      end: DayPilot.Date.today().firstDayOfMonth().addDays(7),
      text: "Event 1",
      color: "#1155cc"
    },
    {
      id: 2,
      resource: "R1",
      start: DayPilot.Date.today().firstDayOfMonth().addDays(9),
      end: DayPilot.Date.today().firstDayOfMonth().addDays(12),
      text: "Event 2",
      color: "#6aa84f"
    },
    {
      id: 3,
      resource: "R3",
      start: DayPilot.Date.today().firstDayOfMonth().addDays(3),
      end: DayPilot.Date.today().firstDayOfMonth().addDays(5),
      text: "Event 3",
      color: "#1155cc"
    },
    {
      id: 4,
      resource: "R3",
      start: DayPilot.Date.today().firstDayOfMonth().addDays(5),
      end: DayPilot.Date.today().firstDayOfMonth().addDays(7),
      text: "Event 4",
      color: "#6aa84f"
    },
    {
      id: 5,
      resource: "R3",
      start: DayPilot.Date.today().firstDayOfMonth().addDays(7),
      end: DayPilot.Date.today().firstDayOfMonth().addDays(9),
      text: "Event 5",
      color: "#f1c232"
    },
    {
      id: 6,
      resource: "R3",
      start: DayPilot.Date.today().firstDayOfMonth().addDays(9),
      end: DayPilot.Date.today().firstDayOfMonth().addDays(11),
      text: "Event 6",
      color: "#cc0000"
    },
  ];
  config.events = events;
};

const loadResources = () => {
  const resources = [
    {
      name: "Group A", id: "GA", expanded: true, children: [
        {name: "Resource 1", id: "R1"},
        {name: "Resource 2", id: "R2"},
        {name: "Resource 3", id: "R3"},
        {name: "Resource 4", id: "R4"},
      ]
    },
    {
      name: "Group B", id: "GB", expanded: true, children: [
        {name: "Resource 5", id: "R5"},
        {name: "Resource 6", id: "R6"},
        {name: "Resource 7", id: "R7"},
        {name: "Resource 8", id: "R8"},
      ]
    }
  ];
  config.resources = resources;
};

const updateColor = (e, color) => {
  const dp = schedulerRef.value?.control;
  e.data.color = color;
  dp.events.update(e);
  dp.message("Color updated");
};

onMounted(() => {
  const dp = schedulerRef.value?.control;

  loadResources();
  loadReservations();

  dp.message("Welcome!");
  dp.scrollTo(DayPilot.Date.today().firstDayOfMonth());
});
</script>
History
November 30, 2023: Switched to Vue 3 Composition API, upgraded to DayPilot Pro for JavaScript 2023.4.5801
June 3, 2021: Upgraded to DayPilot Pro for JavaScript 2021.2.5000; upgraded to Vue 3; using system fonts; switched to SVG icons
December 5, 2020: Using package-based Vue 2 project, upgraded to DayPilot Pro for JavaScript 2020.4.4788
September 24, 2019: Upgraded to DayPilot Pro for JavaScript 2019.3.4012
February 9, 2018: Context menu added
February 5, 2018: Initial release